Guide how to set up Notification plus Card campaign
1. Select Notification + Card Campaign Type
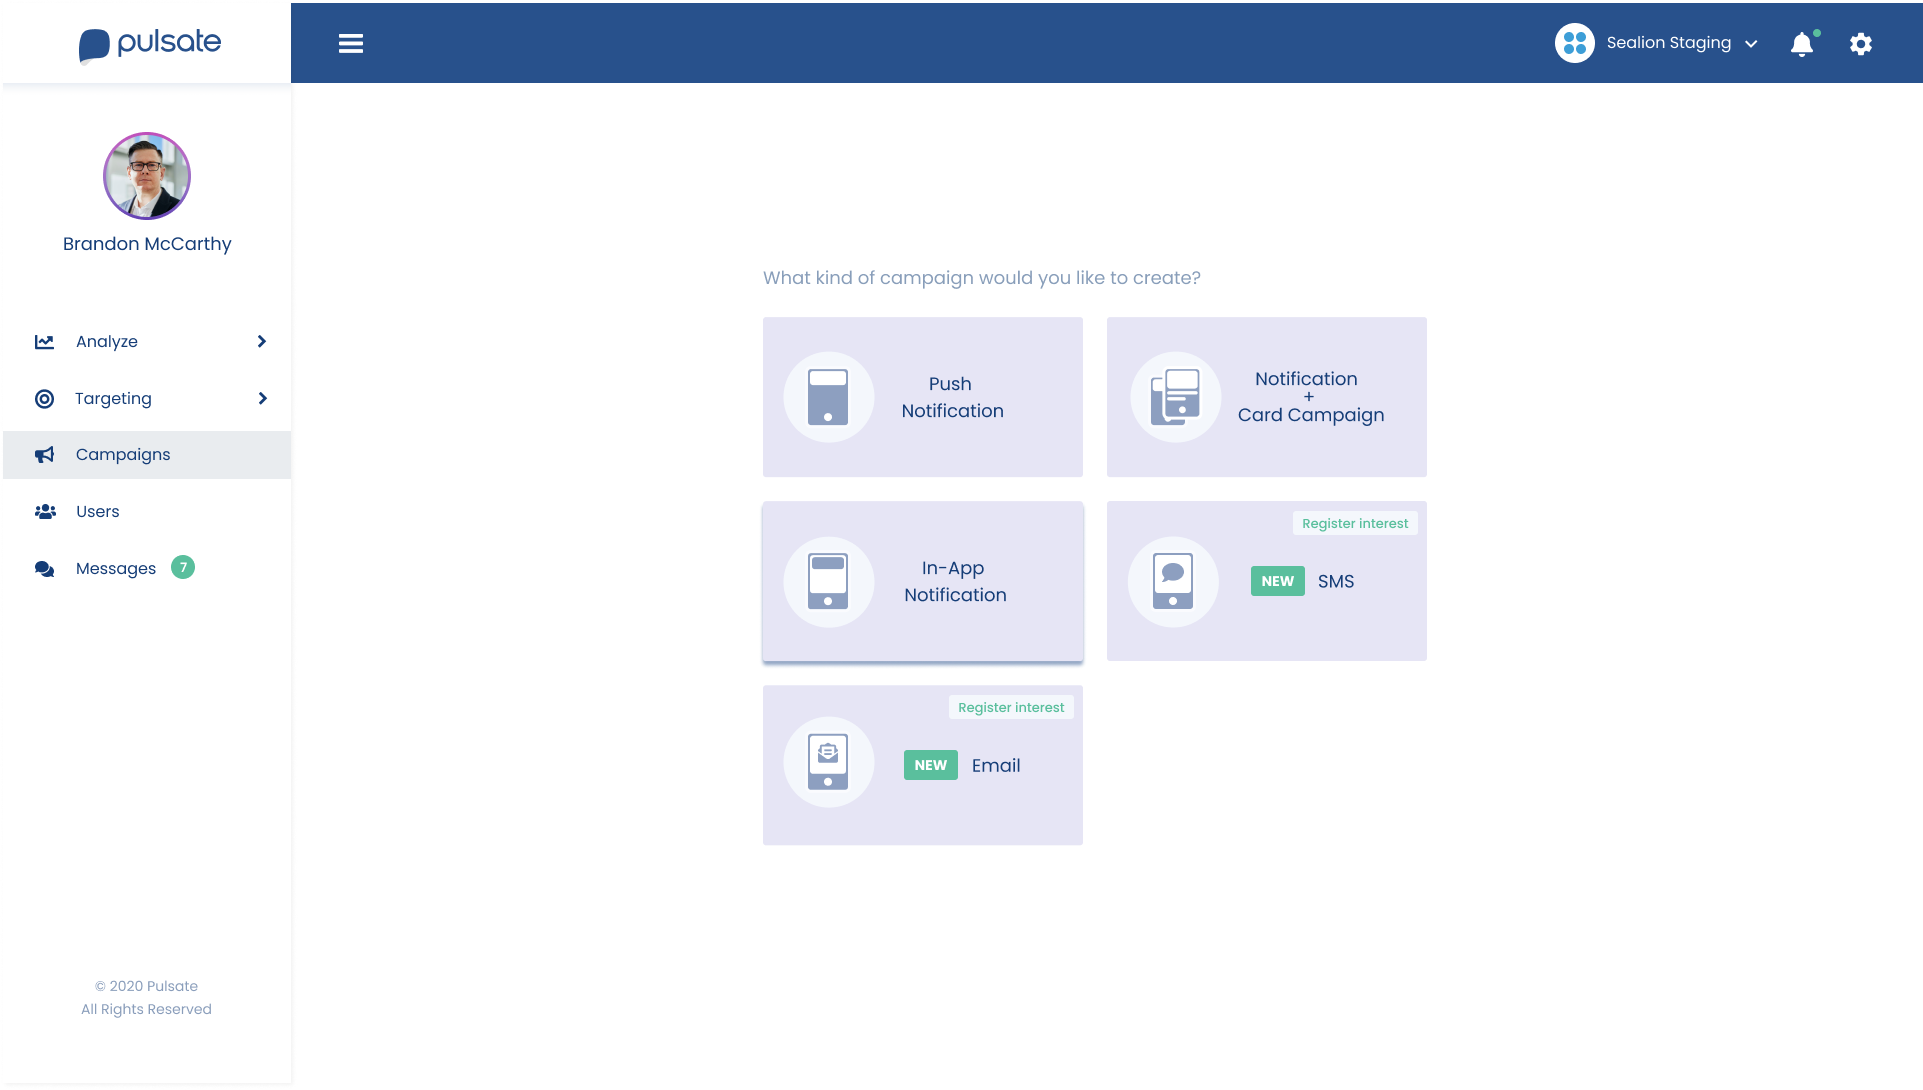
To send a Notification + Card campaign, click on New Campaign and choose Notification + Card Campaign from the grid containing different types of campaigns.
2. Select Notification Type
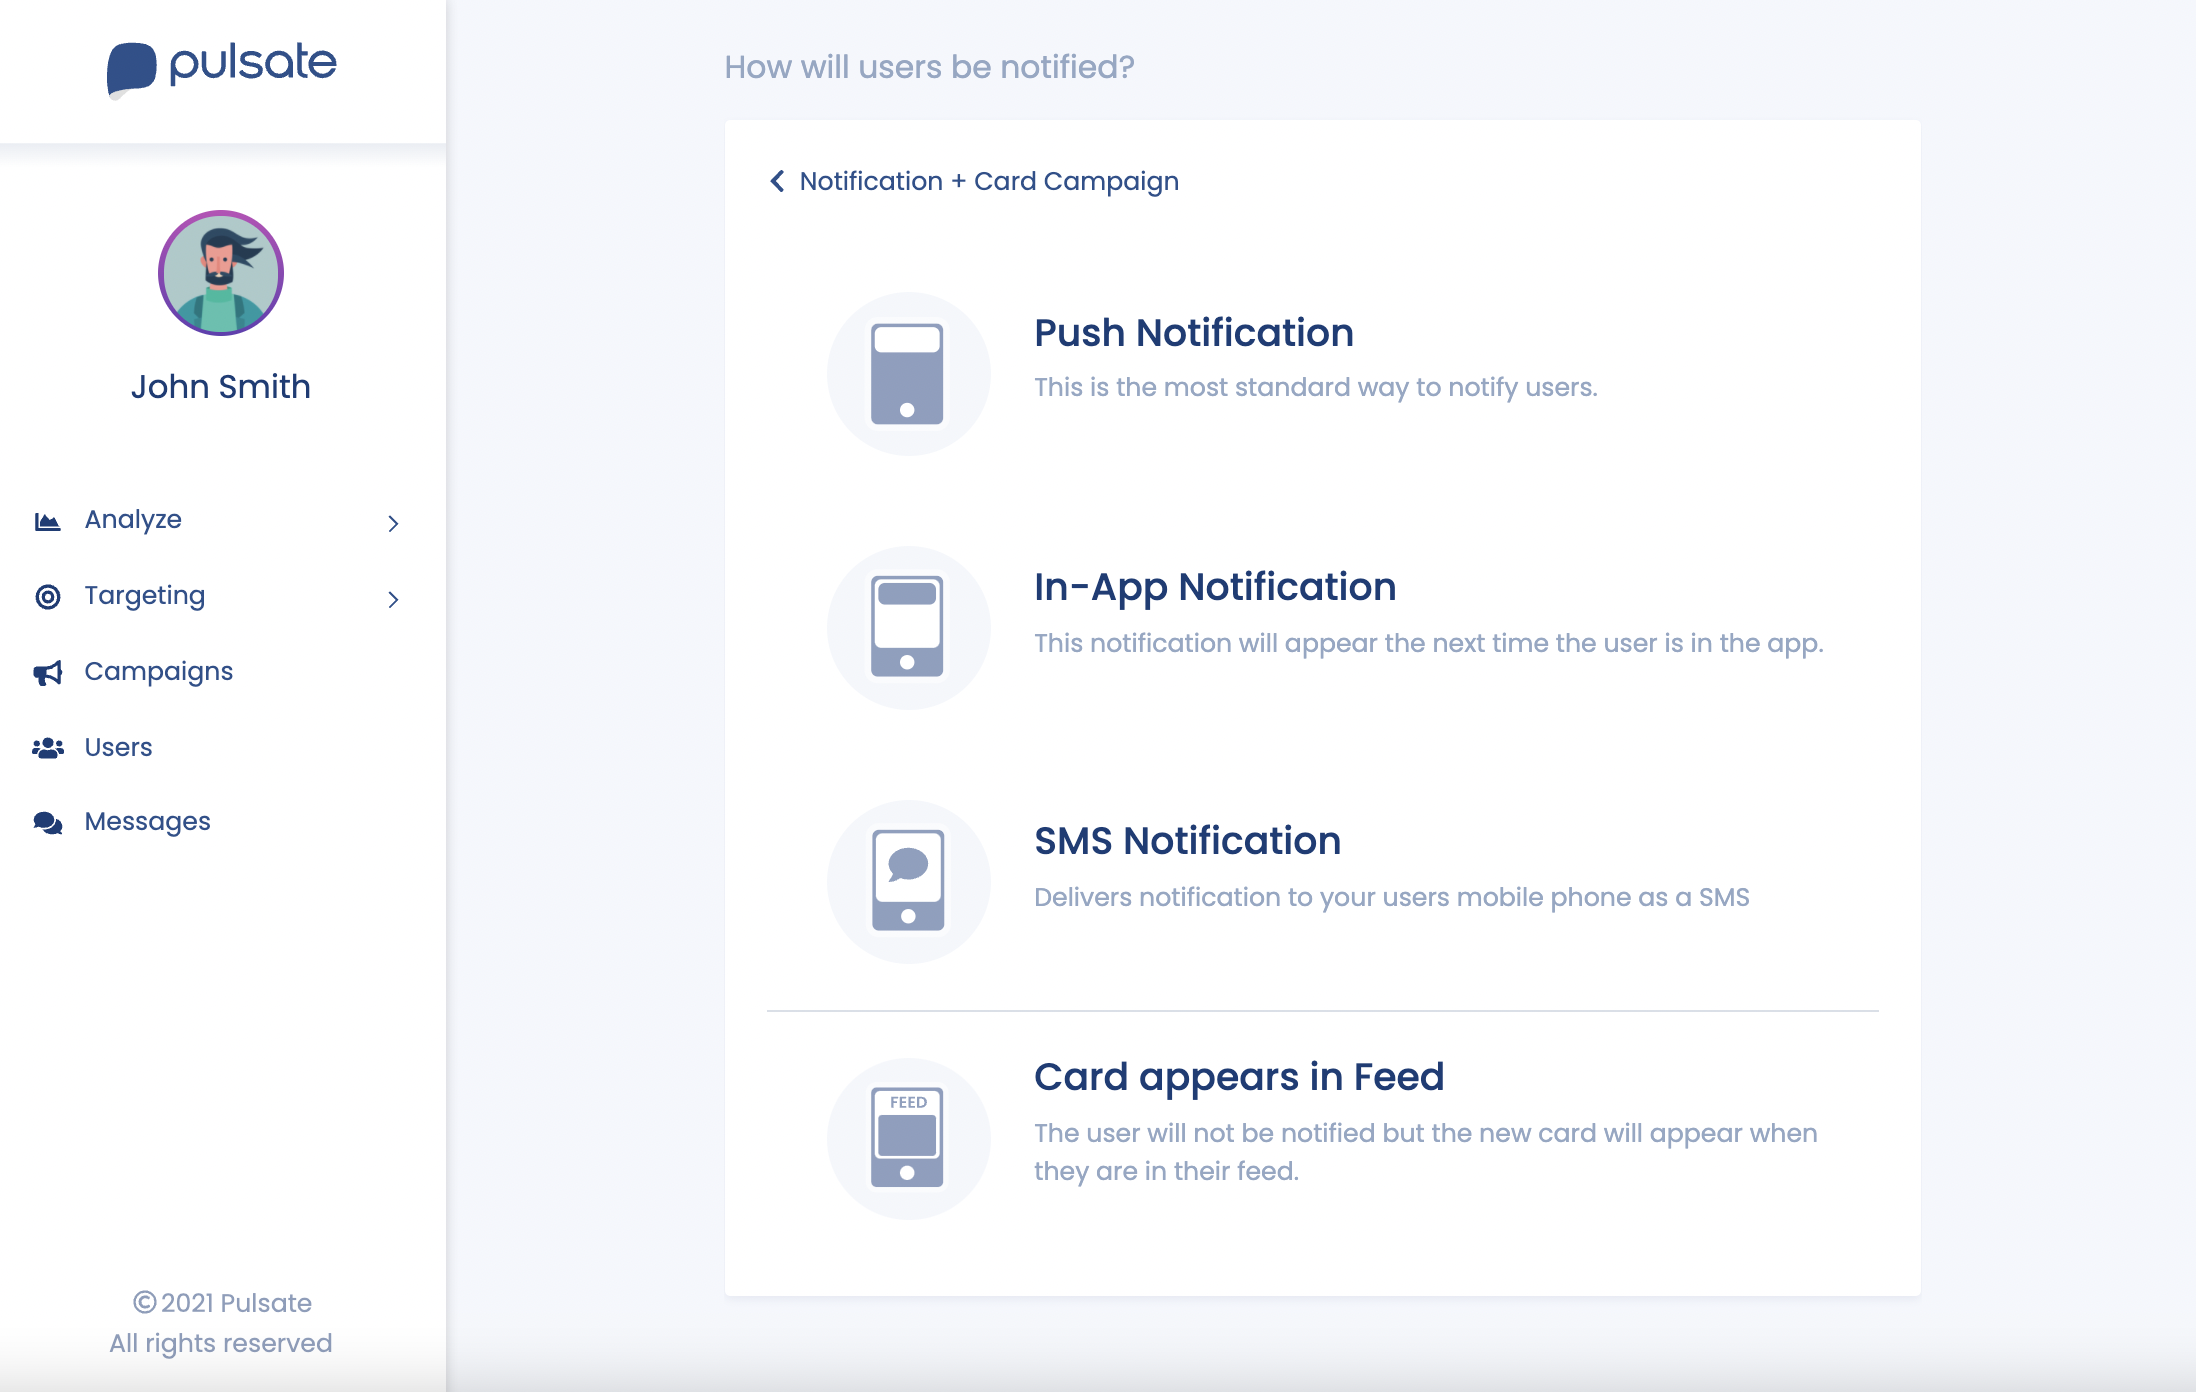
Pulsate allows choosing four options of how the user will be notified.
| Type | Description |
|---|---|
| Push Notification | A push notification is a message that pops up on a mobile device. More about push notifications here |
| In-App Notification | This notification will appear the next time the user is in the app. You can select size small or full screen. More about In-App notifications here |
| Appears in Feed | The user will not be notified but the new card will appear when they are in their feed. |
| User Receives SMS | Delivers notification to your user's mobile phone as an SMS. More about SMS notifications here |
3. Set up Campaign
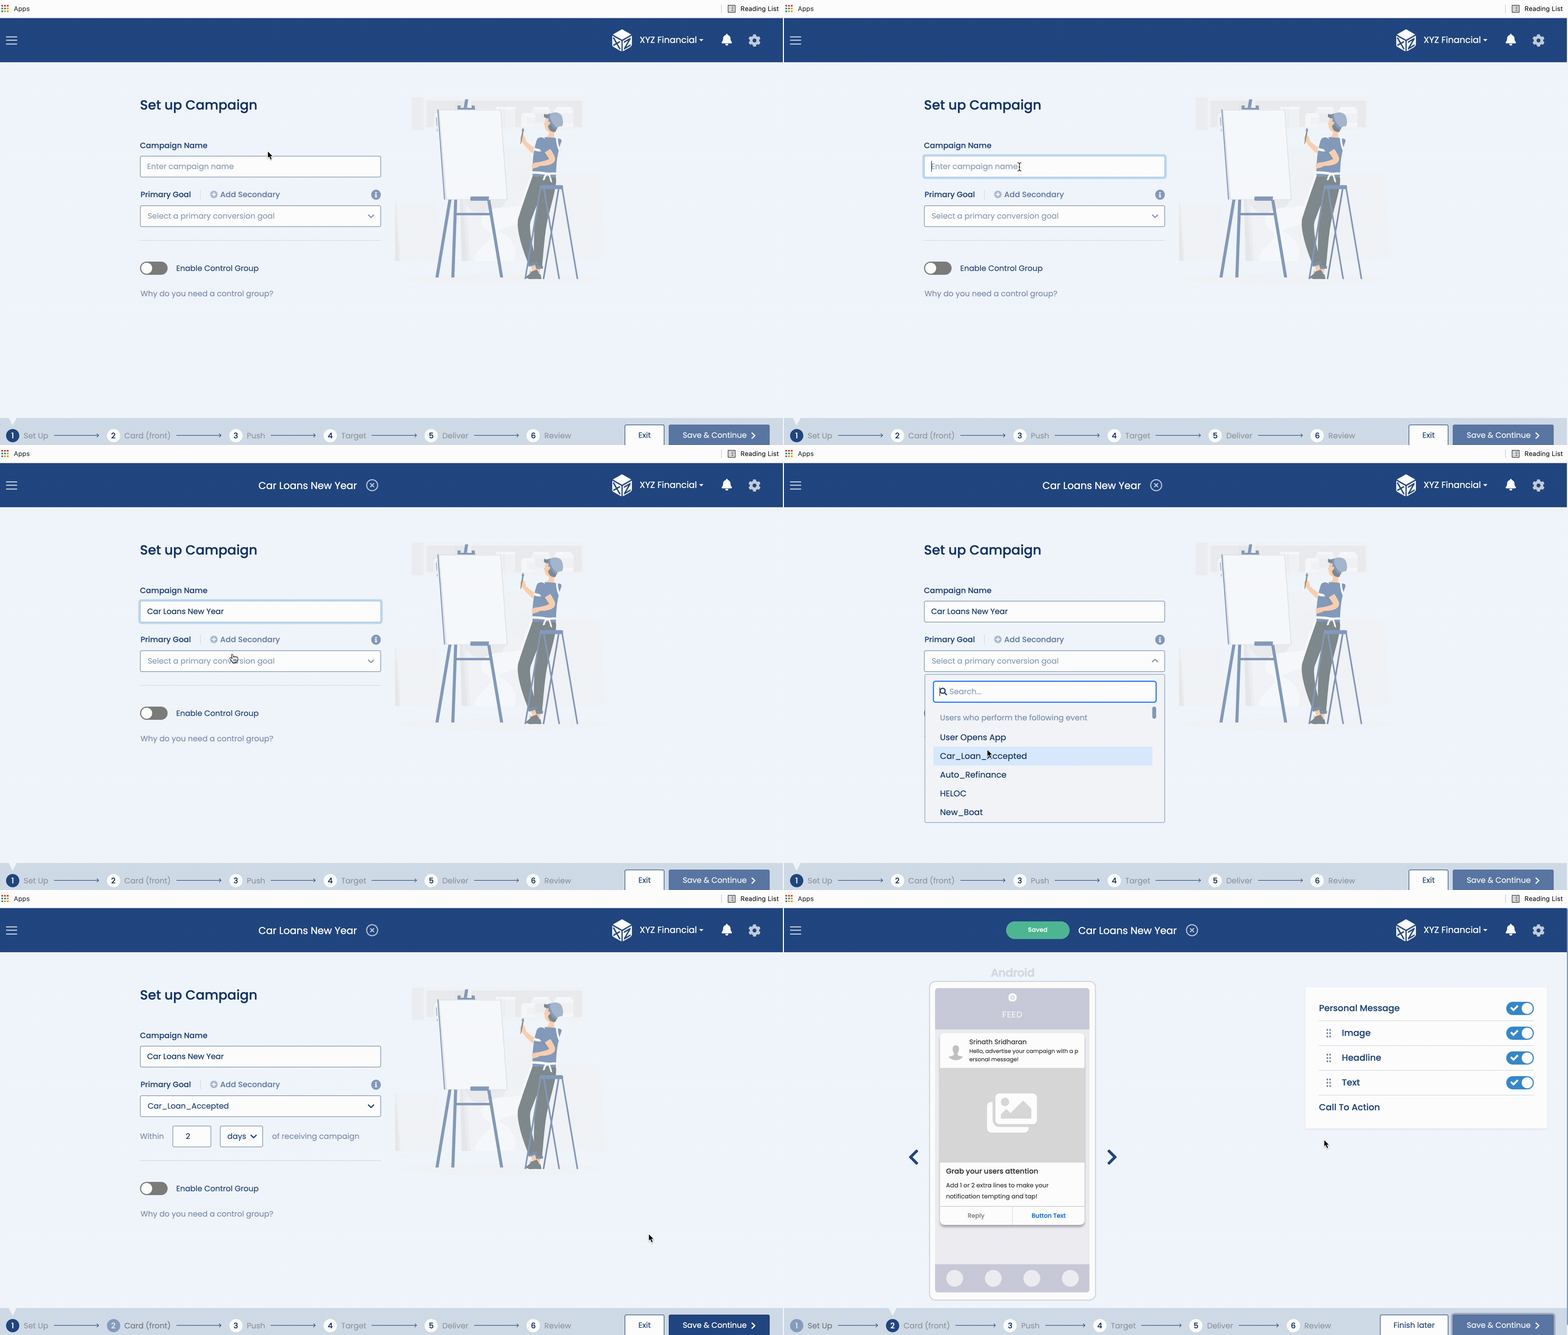
The campaign name, primary goal, and secondary goal could be configured on this page. Additionally, it allows the administrator to enable a control group, a subset of the customers we are targeting with a particular campaign, who will not receive the campaign communication. Upon setting up the parameters click on “Save & Continue”.
4. Setting Front of the Card
Mandatory Font Card Parameters
On the front of the card, the following parameters are mandatory before a campaign can be sent:
| Name | Description |
|---|---|
| Selected Widget | At least one widget from the following list must be activated on the front of the card to proceed: - Personal Message - Image - Headline - Text Also, any combination of these parameters can be selected. |
| Call to Action | At least one of the following Call to Action button destinations must be selected before you can proceed to the next screen: - Card (Back) - Deeplink - URL |
Personal Message
The Personal Message widget allows you to send a card to a user as if it is directly sent from a member of your company. You can choose any Pulsate admin to send the campaign and these campaigns work best when they are tailored to a very specific segment of users such as High-Value Customers or Lapsed Customers.
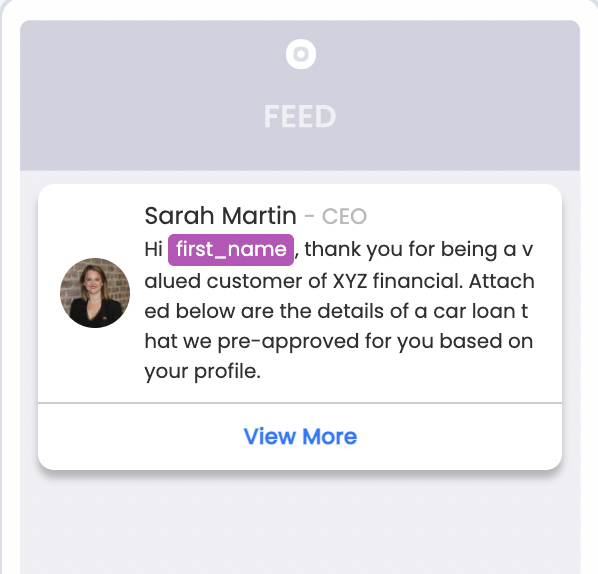
Example of a Personal Message
The following are a list of all of the parameters that can be added to a Personal Message:
| Name | Description |
|---|---|
| Select Admin | You can choose the admin that you wish to send the card from. You can choose any admin that has been added to your account. To add an admin, please select Settings and then Account Settings. If you have added a photo for the admin, it will also be sent within each card where Personal Message is selected to build up a personal rapport with the user who is receiving it. If you choose to send a card with a Personal Message, it is mandatory to select an admin for the Personal Message. |
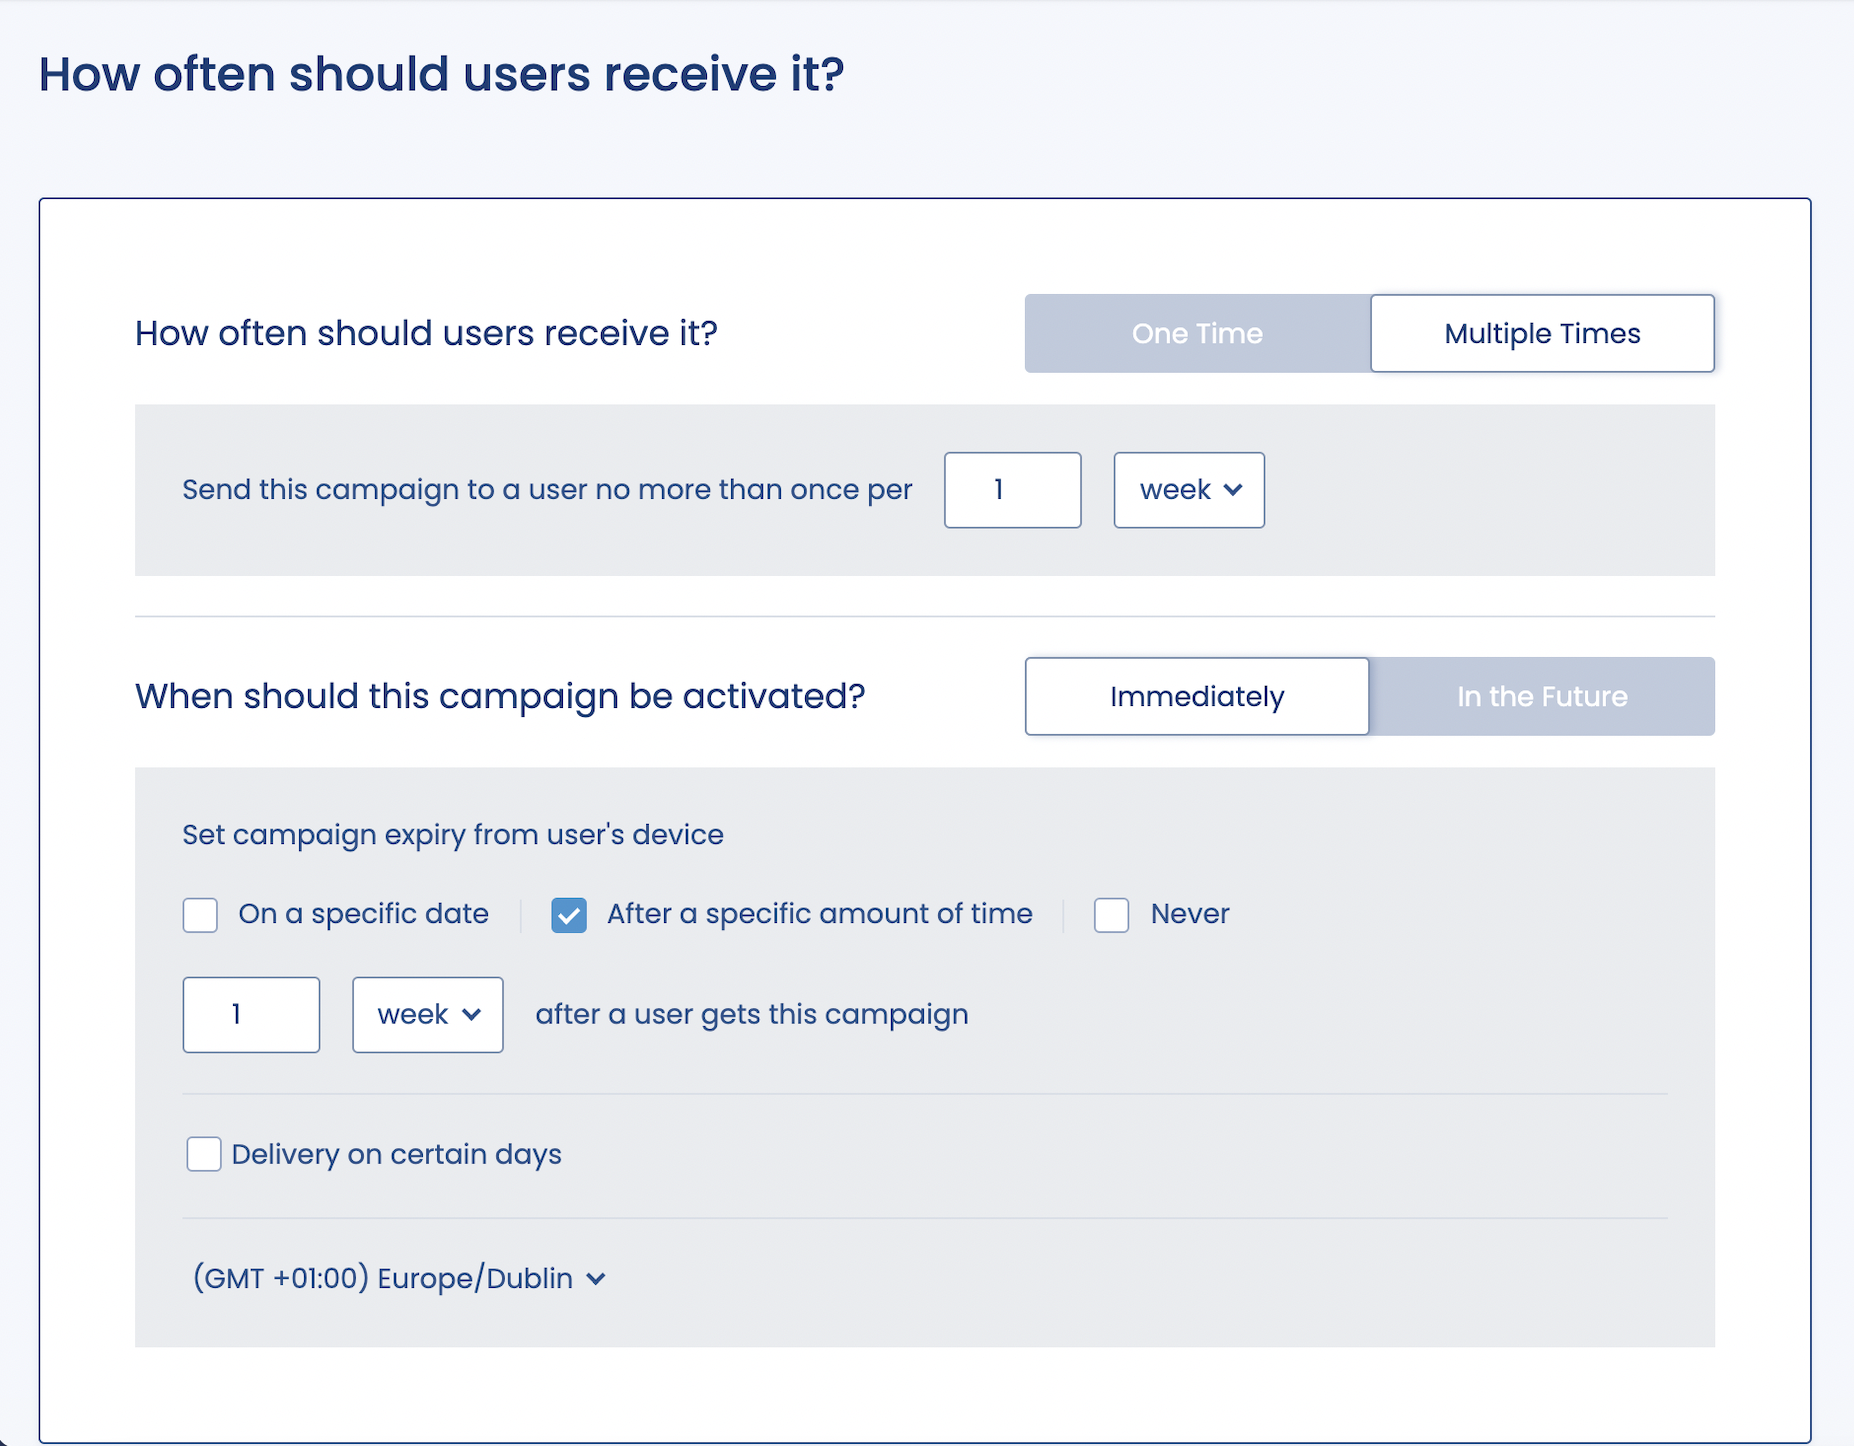
Select Admin
| Name | Description |
|---|---|
| Personal Message Text | There is no limit to the amount of text that you can enter for a Personal Message. However, we advise that the optimum length for a personal message is less than 3 lines of text. |
| Select a Merge Tag | Merge tags insert a piece of data that you have sent us about your users. One example is First Name. If you have supplied us with the first name of the user, we will programmatically insert it into a message to personalize the experience for the user. In situations where we do not have the user's first name, we will not insert anything so those users will not be aware of the merge tag. Or, you could substitute the merge tags with a common word which would be shown in place of the merge tags in case the value is missing for a set of customers. Any piece of custom data can be used as a merge tag. In the Personal Message section, you can choose to add the label for the merge tag and we will programmatically insert the value that was sent to us for that user. When you click Insert to add a Merge tag, you can scroll through the list of available Merge tags or search directly for them. Please note that if the value of the Merge Tag is quite long (such as a long first name) if will expand the length of this field for the user when it is inserted. |
| Emoticon | Emoticons are widely used in business messages and emails to convey emotions. The personal message widget allows you to add various emoticons from the list or search for a specific emoticon. |
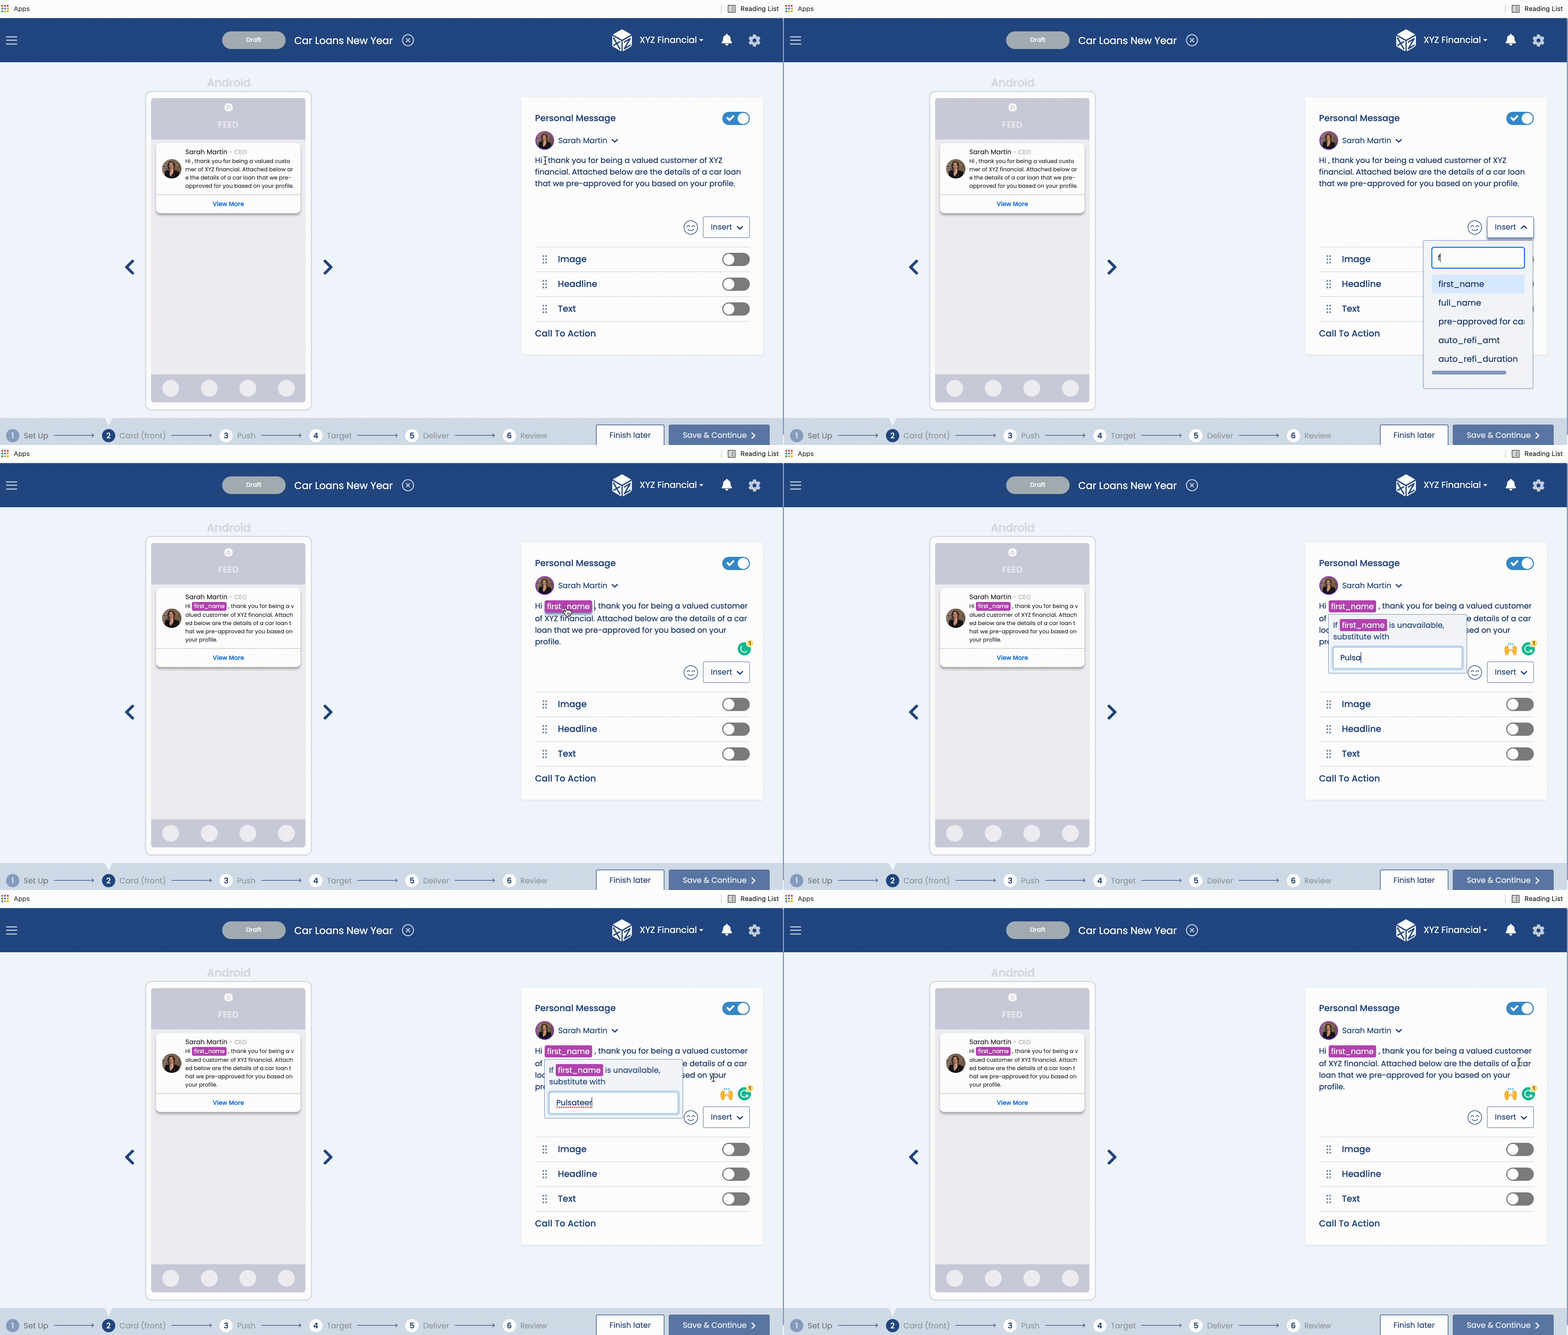
Select Merge Tag
Image
Great imagery can really improve your card and entice users to really take notice of it and take that next important stop of clicking on one of the Call To Action buttons to find out more.
This is a list of the parameters that you need to be aware of when you decide to add an image to your card:
| Name | Description |
|---|---|
| Image Sizes | Images must be be a minimum width of 500px |
| Image File Size | The image file must not be more than 700kb |
| Supported Image Types | The following image types are supported by Pulsate: JPEG PNG GIF |
| Drag and Drop Image Builder | To Add an Image you should enable and open the Image Widget by clicking anywhere on the widget and then either drag and drop an image or press Click Here to manually locate the image on your machine. If you wish to Remove an image that you have uploaded, press Remove. |
| Crop Image | Pulsate also allows you to crop any image that you upload. To crop an image, select Crop and a new modal will appear. You can then drag the cropping cropper around the image until you are happy with the new dimensions. When the image is satisfactorily cropped, press the Crop button. If you wish to edit the image dimensions or return to the original dimensions, you can follow the same steps. |
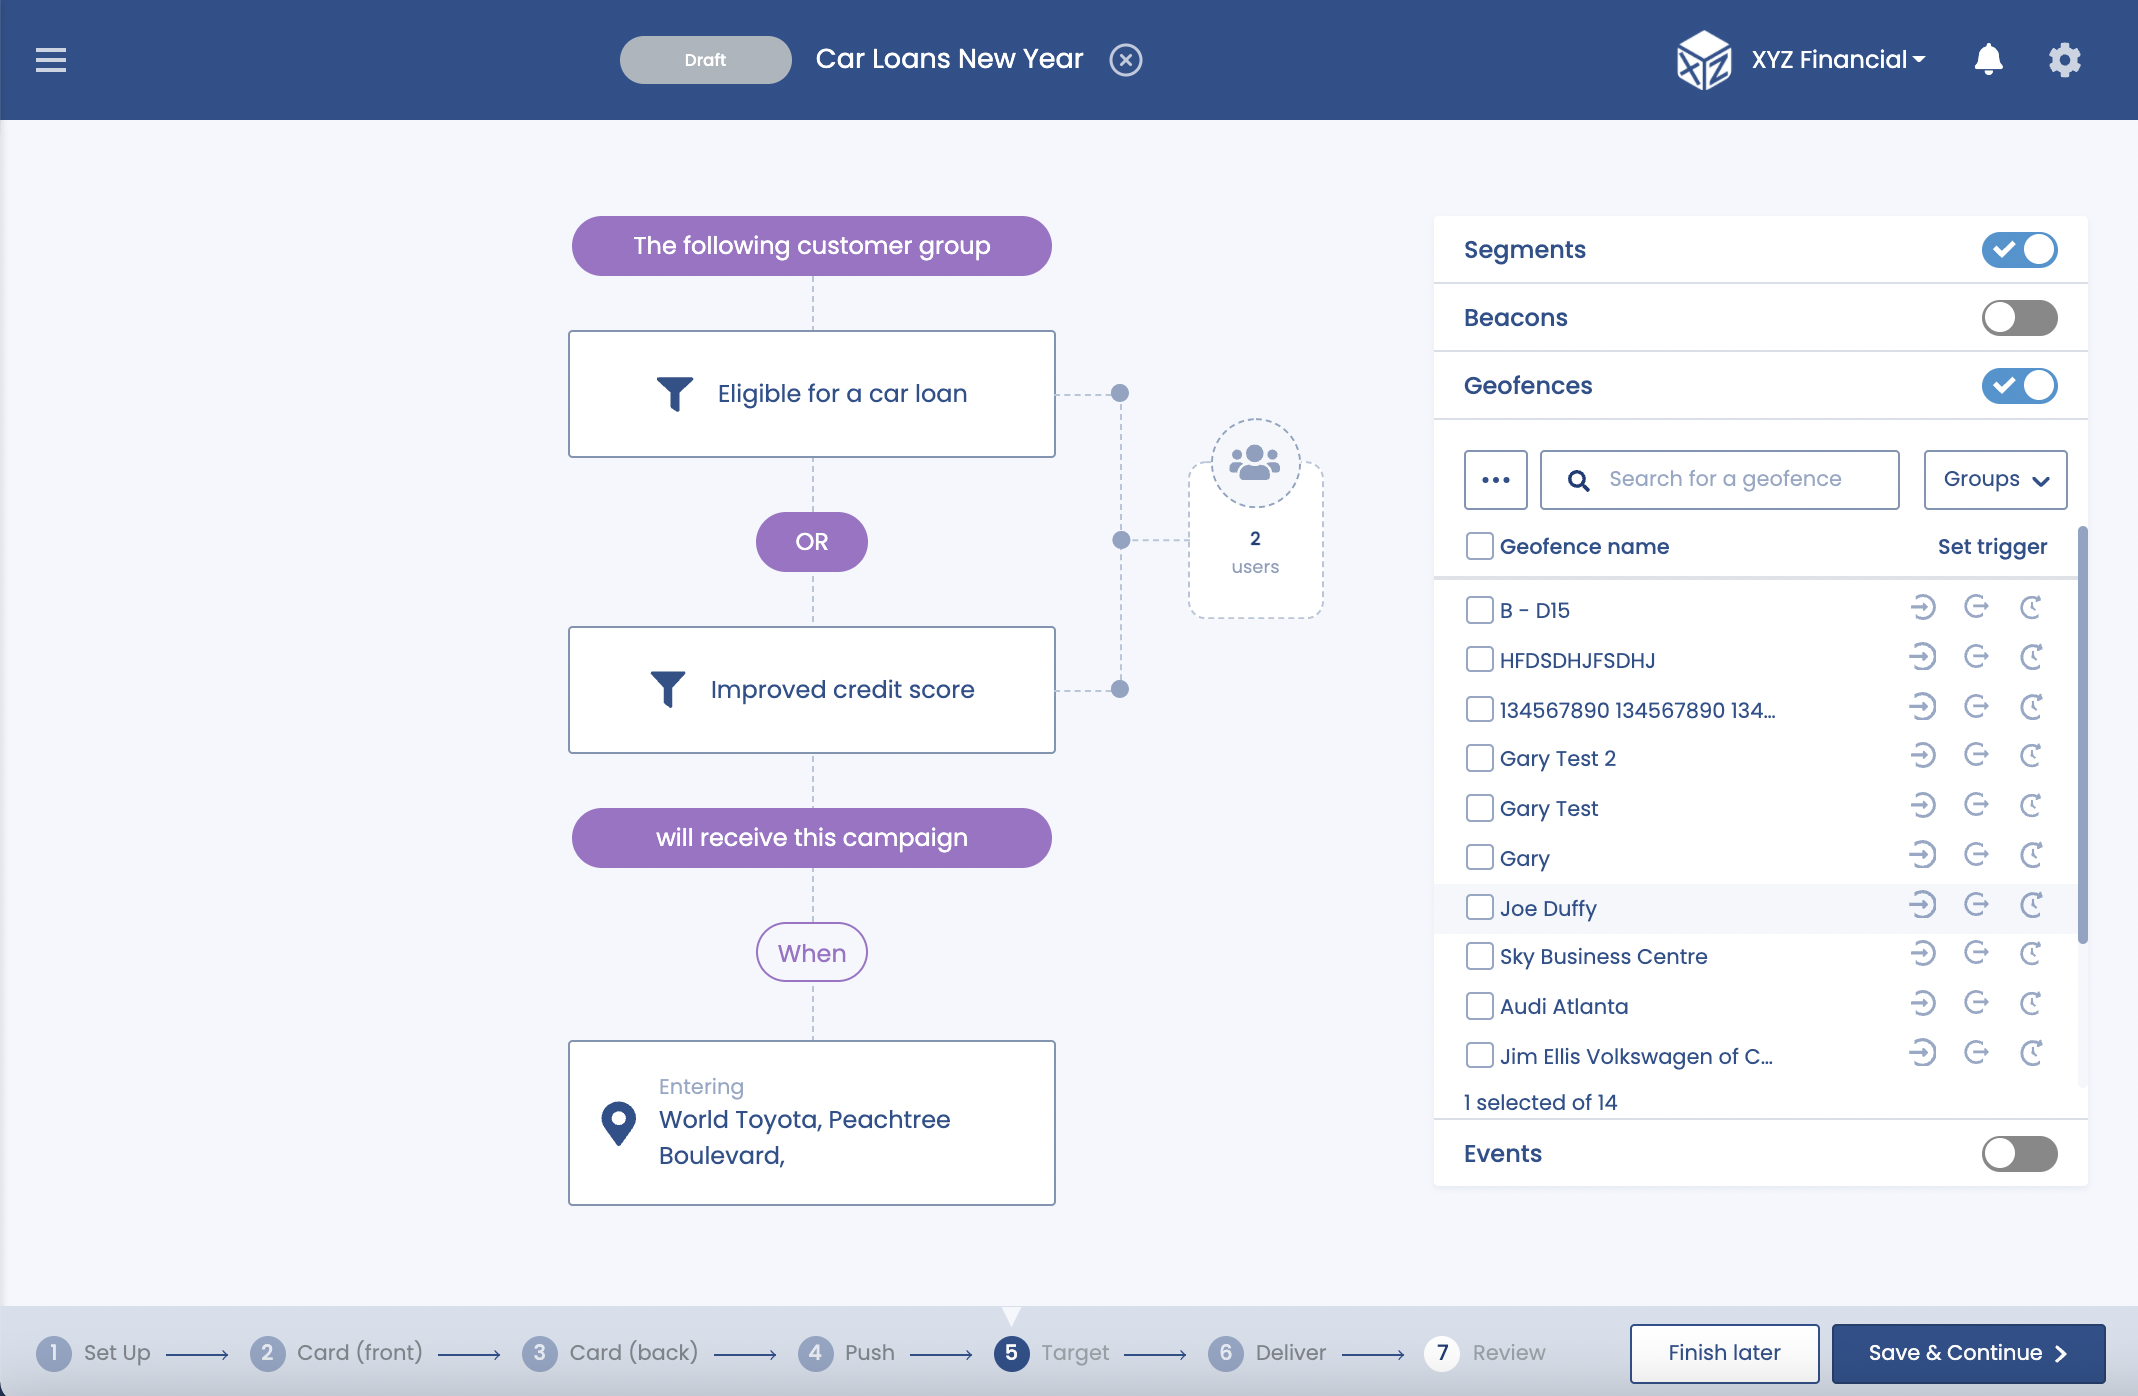
Add/ Remove Image
Headline
The Headline widget is great for quickly getting a message across to users with bold text. It is much more direct than a Personal Message but also less tailored to individual users and/ or segments.
Headlines should be short and snappy and only a few words long to make them as striking as possible. You can also add merge tags to the Headline widget by pressing the Insert button when you are in the widget. See Personal Message for more information on Merge Tags.
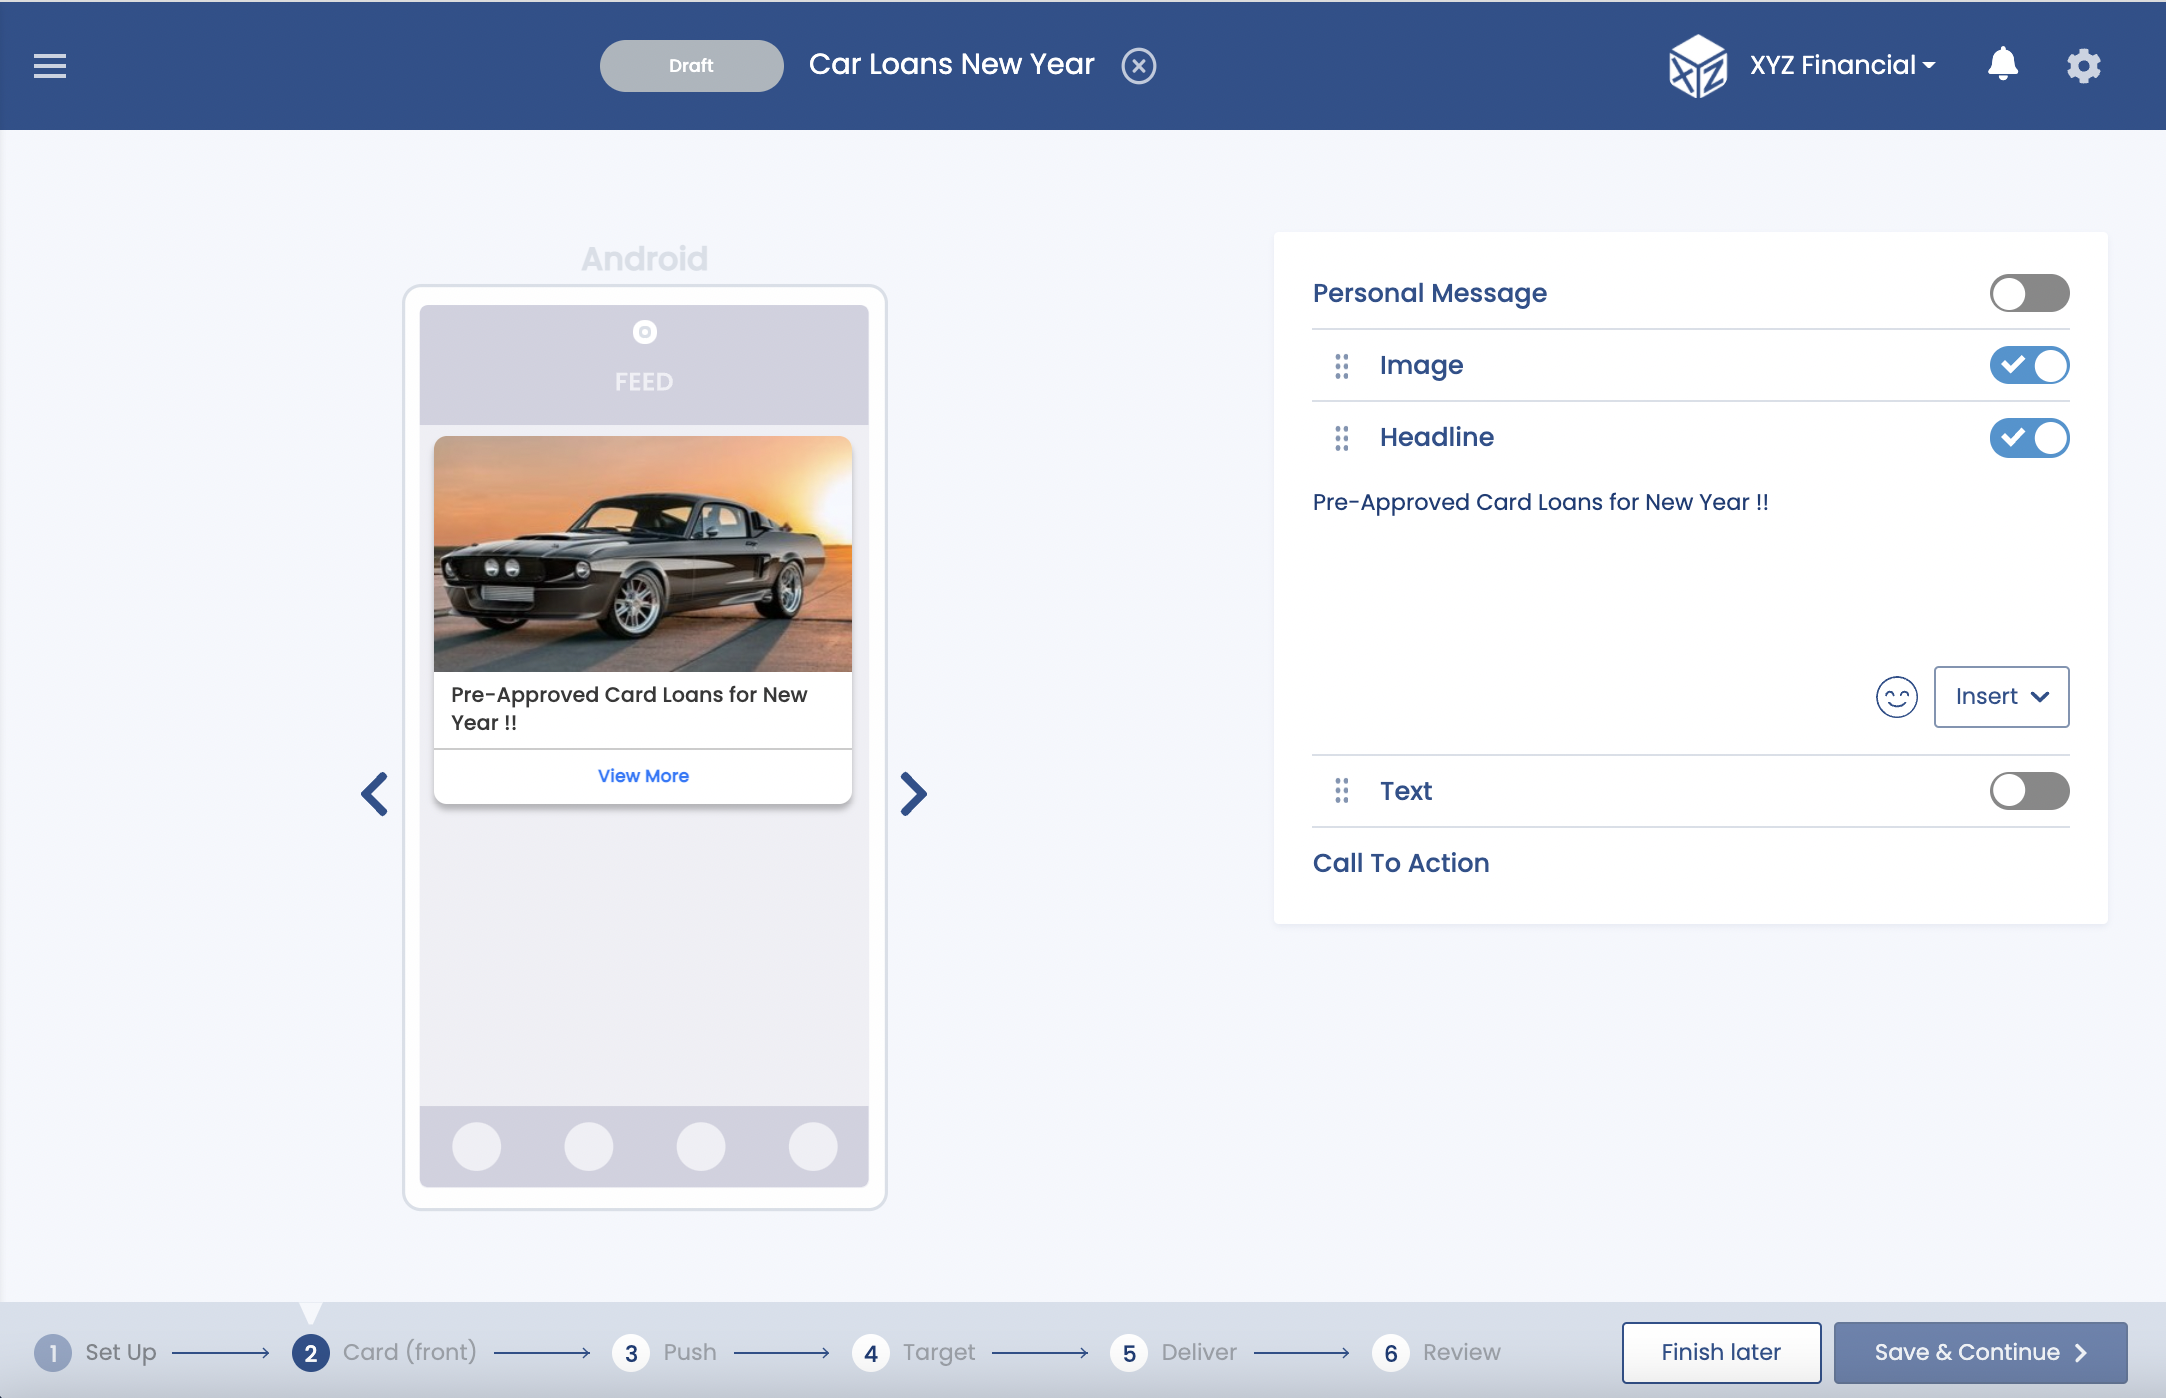
Headline Example
Text
The text widget can be used as a standalone widget to outline the message that you are trying to deliver with the camapign card. However, it can also be used in addition to the other widgets (Personal Message, Image and Headline) to add more information to the content within those widgets. It is a great way to add extra information about the campaign you are sending and the copy entered should be short, snappy and informative for the end user.
Use the text widget to explain why somebody should be interested in the campaign that you are sending and to offer additional background information for the user. You can also insert merge tags into the text widget to include the user's name or some other piece of custom data. See Personal Message above for more information on merge tags.
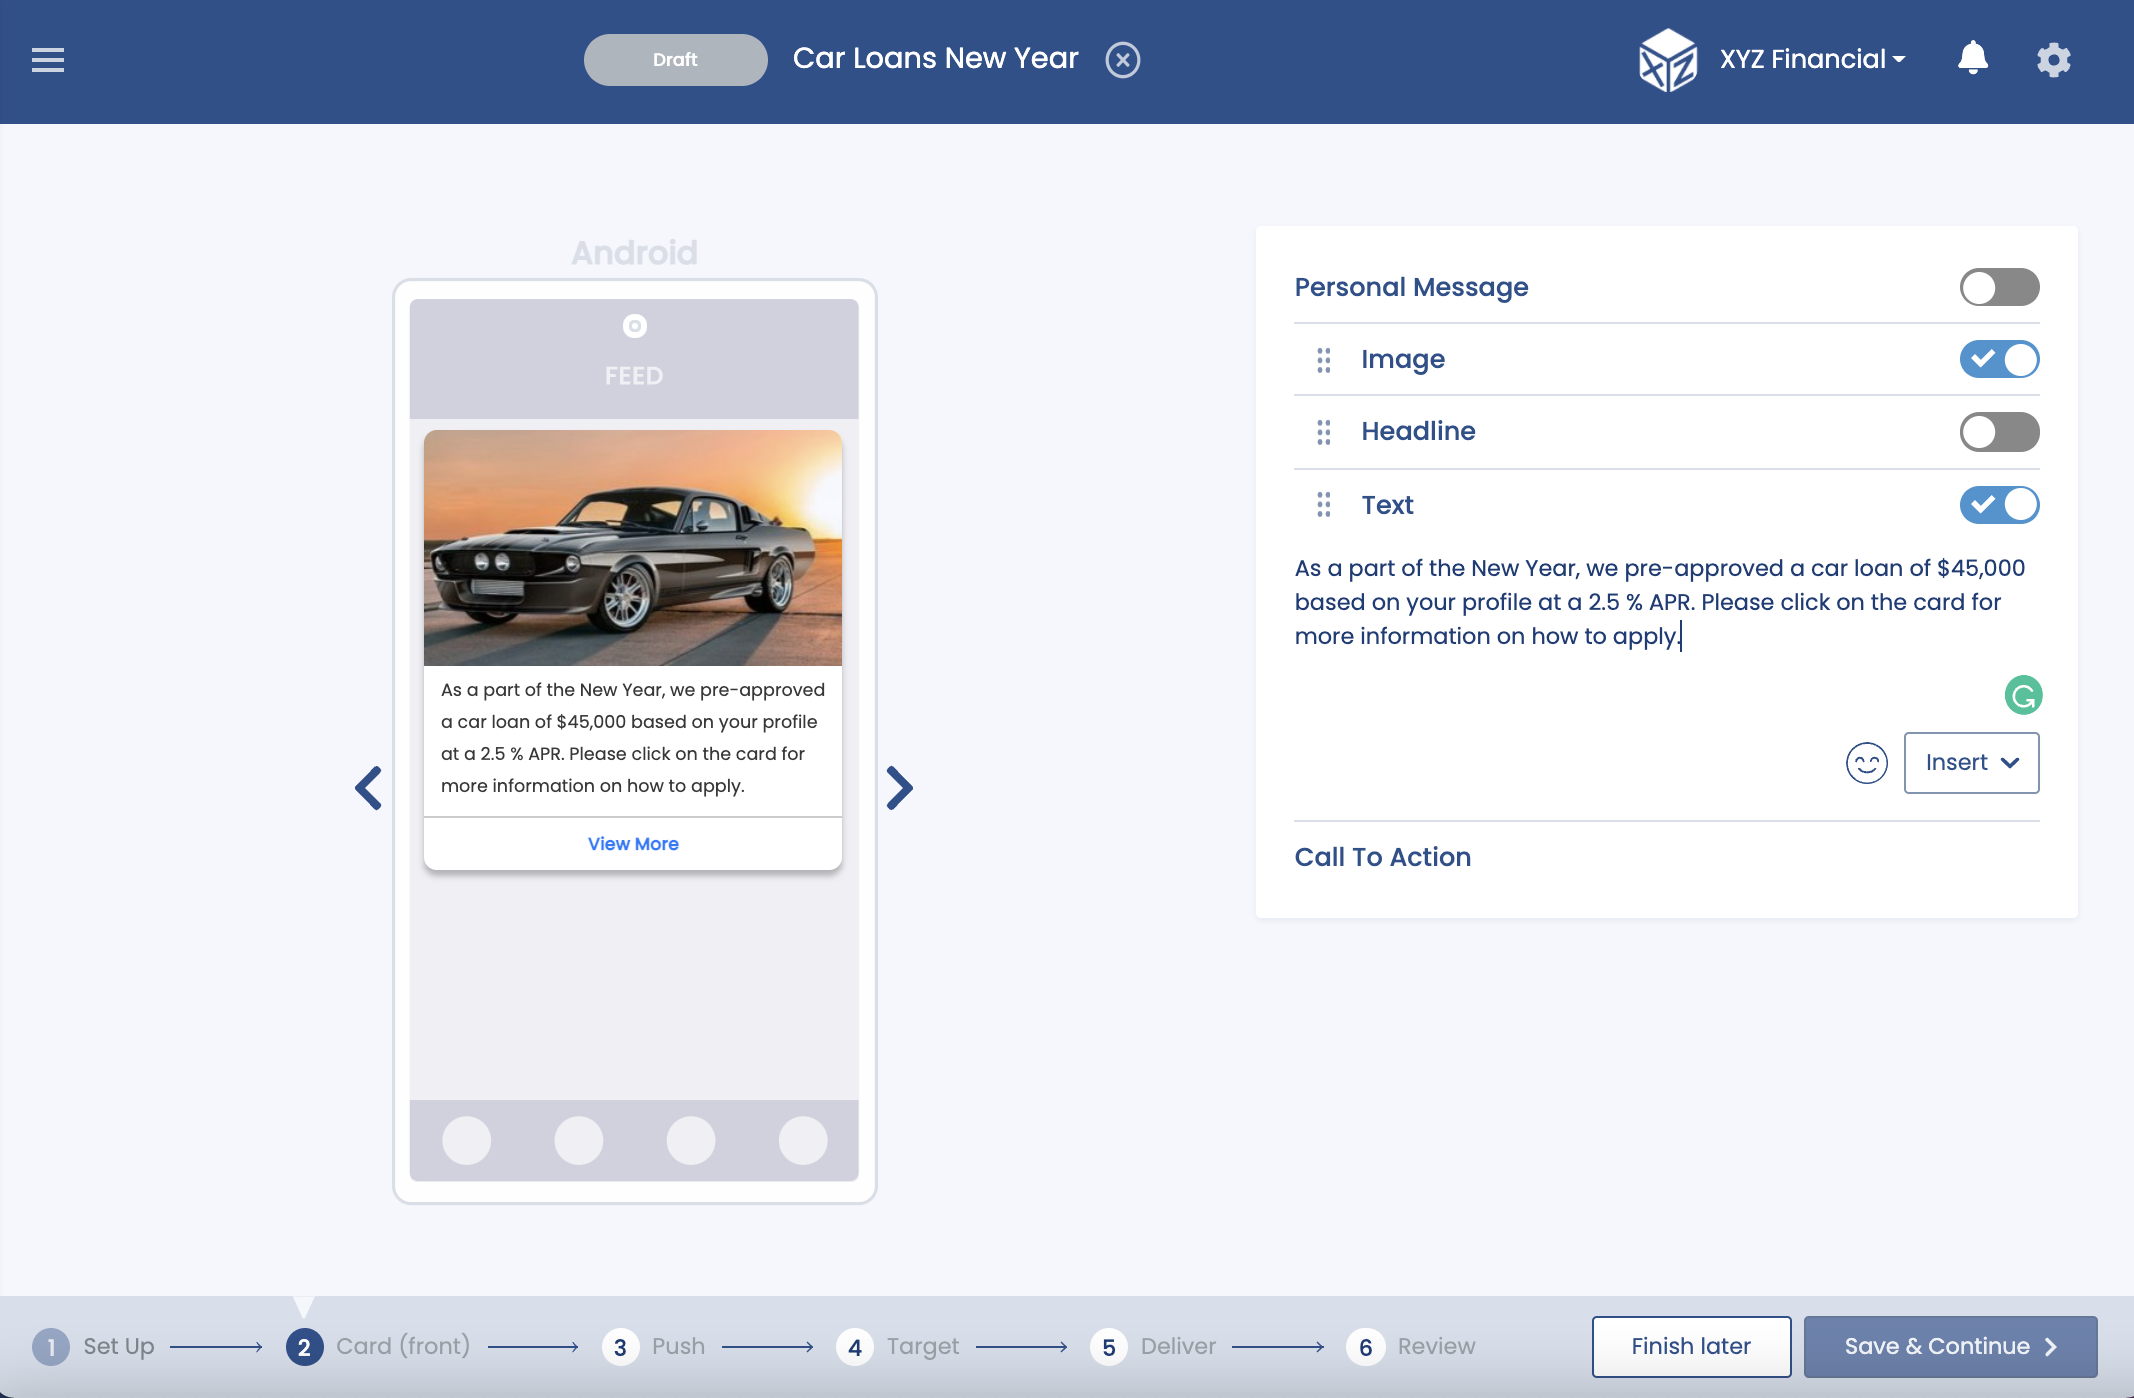
Text Example
Call to Action
The front of card call to action widget is mandatory for all campaigns. It allows you to specify a destination for your card and also to specify whether or not you want to allow users to reply to that campaign. Finally, the call to action widget also allows you to setup an In-App event to record which users click on the call to action event that you specify.
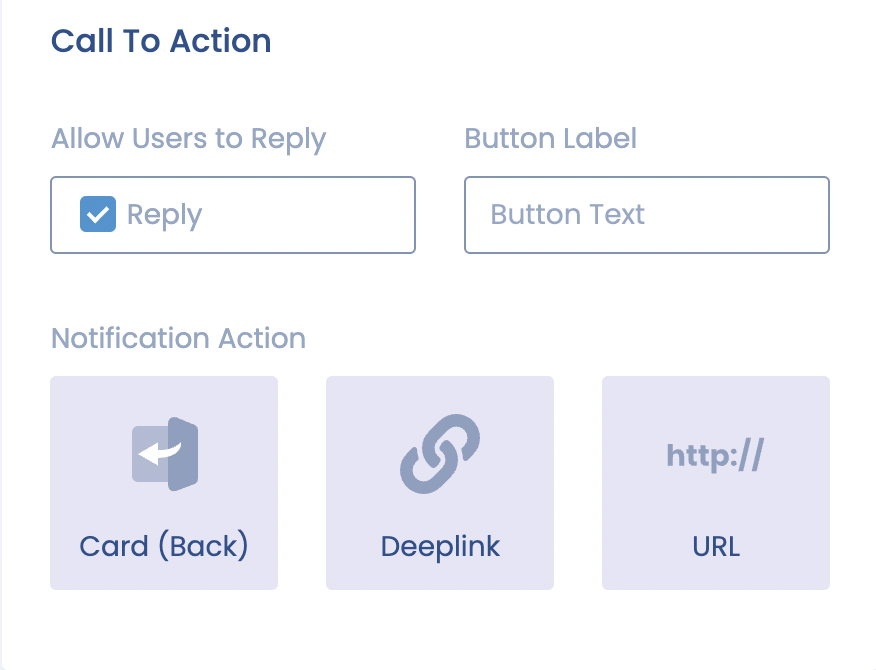
Call to o Action widget
Call to Action Parameters
| Name | Description |
|---|---|
| Campaign Reply | This checkbox allows you to specify whether or not users can reply to this card. By default, this option is checked so the users will be able to reply to the campaign and a Reply button will be added to the bottom of the card along with the other call to action button. When a user clicks on that reply button, they will be able to compose a reply to that card either with feedback about the campaign or any questions that they have about it. When a user replies to a card, their message will be available for you in the Messages section of the CMS and the campaign name will be listed so that you know which campaign they are replying to. For more information on Pulsate's messaging functionality, please see Starting a Conversation If you do not wish to allow a user to reply to this campaign, uncheck this box and the Reply button will be removed from the campaign card. |
| Button Text | Every campaign that has a card must have a destination for that card. The destination can be the back of the card, somewhere else within the app, or a URL outside the app (more info on these options below). The Button Text field allows you to specify what text should appear on the Call to Action button. The default text is 'View More' but you can enter any text that you want into this field. However, please note that if you have allowed users to reply to their campaign, any text that you enter into this field that is over 15 characters will truncate. If you have not enabled campaign reply, any text over 33 characters will be truncated. |
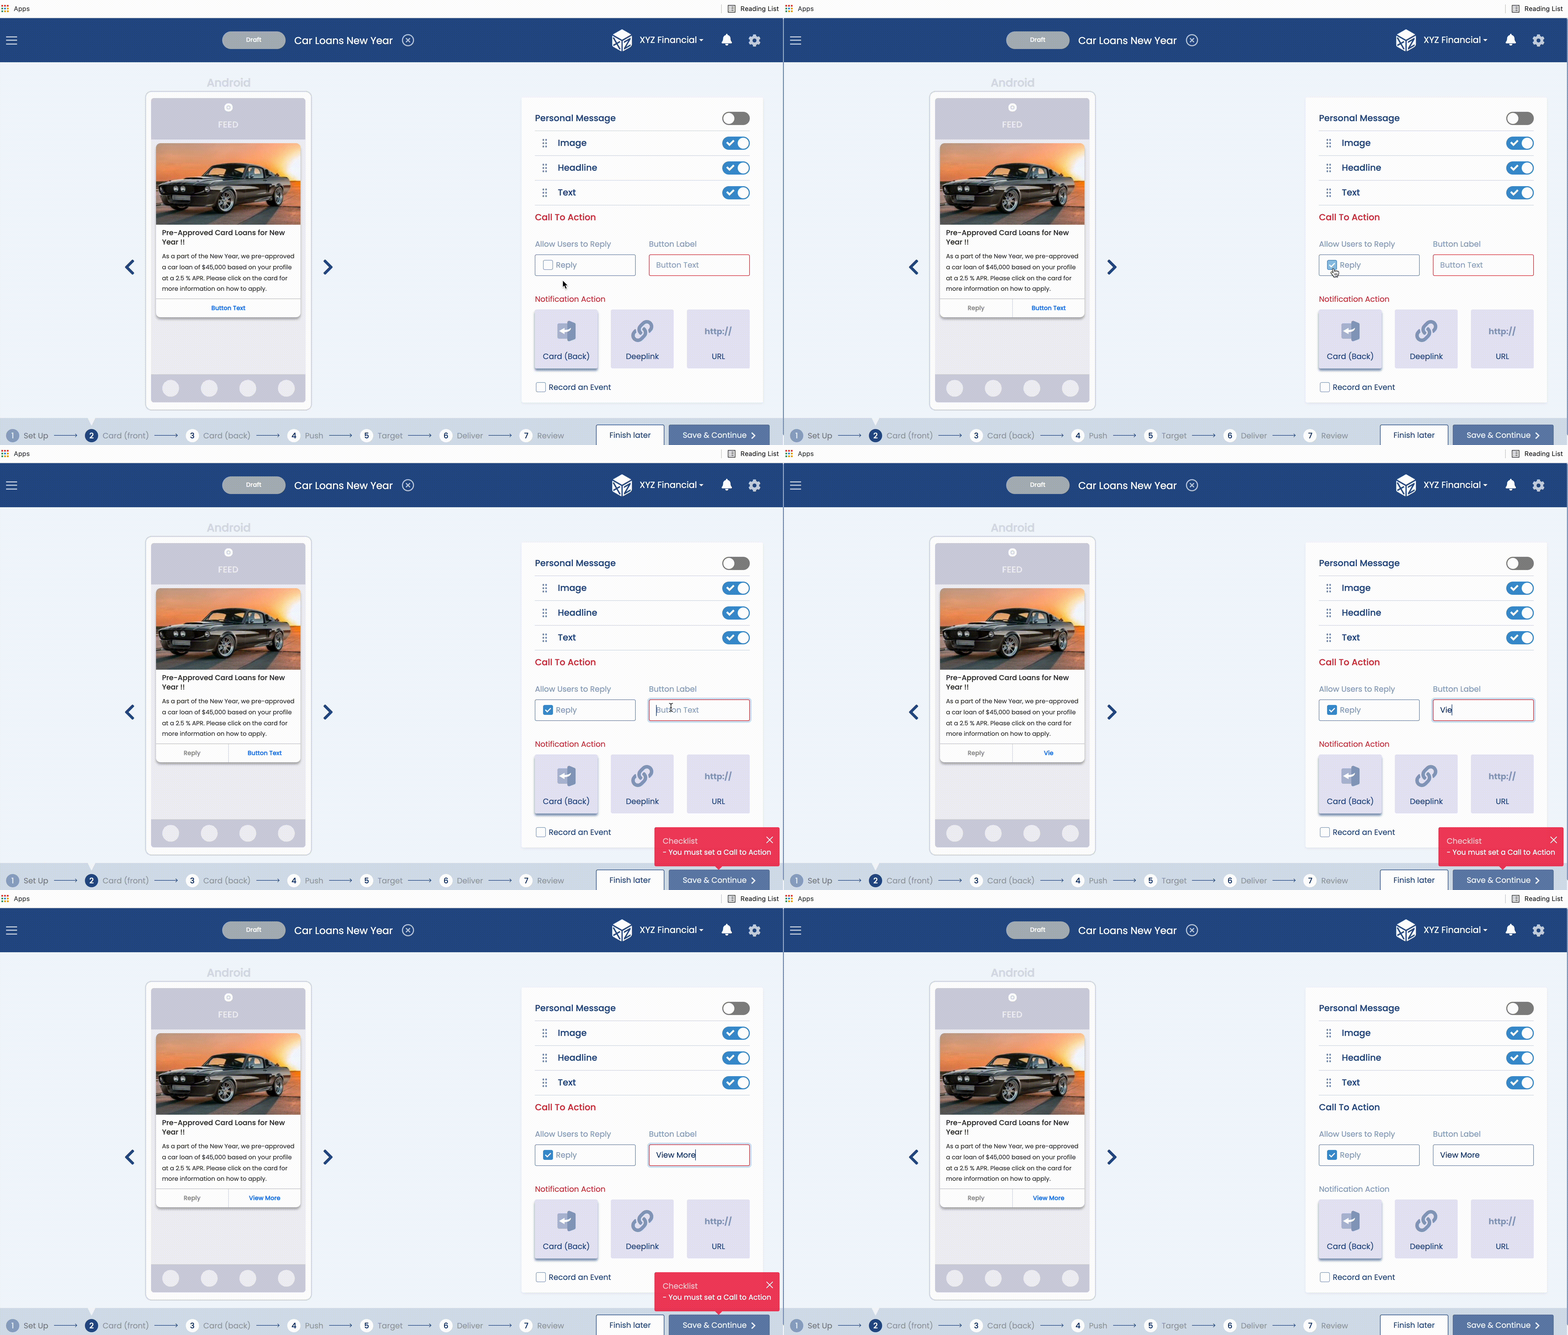
Reply Checkbox
Options to set up Card Back, Deeplink, or URL.
| Name | Description |
|---|---|
| Card (Back) | If you select the Card (Back) option, you will be able to setup the destination of the card to an ancillary card that can provide more information and images for the user. This option is useful if you have a lot of information that you want to send to the user that will not fit on the front of card alone or if you wish to add a table of information of such as store opening hours. When you select the Card (Back) option, another step will be added to the navigation bar at the bottom of the screen and you will be able to design the back of card when you press the Next button. Card (Back) is selected by default in the Call to Action section. |
| Deeplink | Instead of bringing users to an ancillary card, you can bring them to another location within your app that is outside of the Pulsate feed. You will need to first set up a deep link for the view within your app that you want to route users to and you can find out more information about setting up deep links for iOS or Android by following those links. When you have set up deep links as per the instructions above, you will be able to select them in a dropdown when you select the deep link call to action option. |
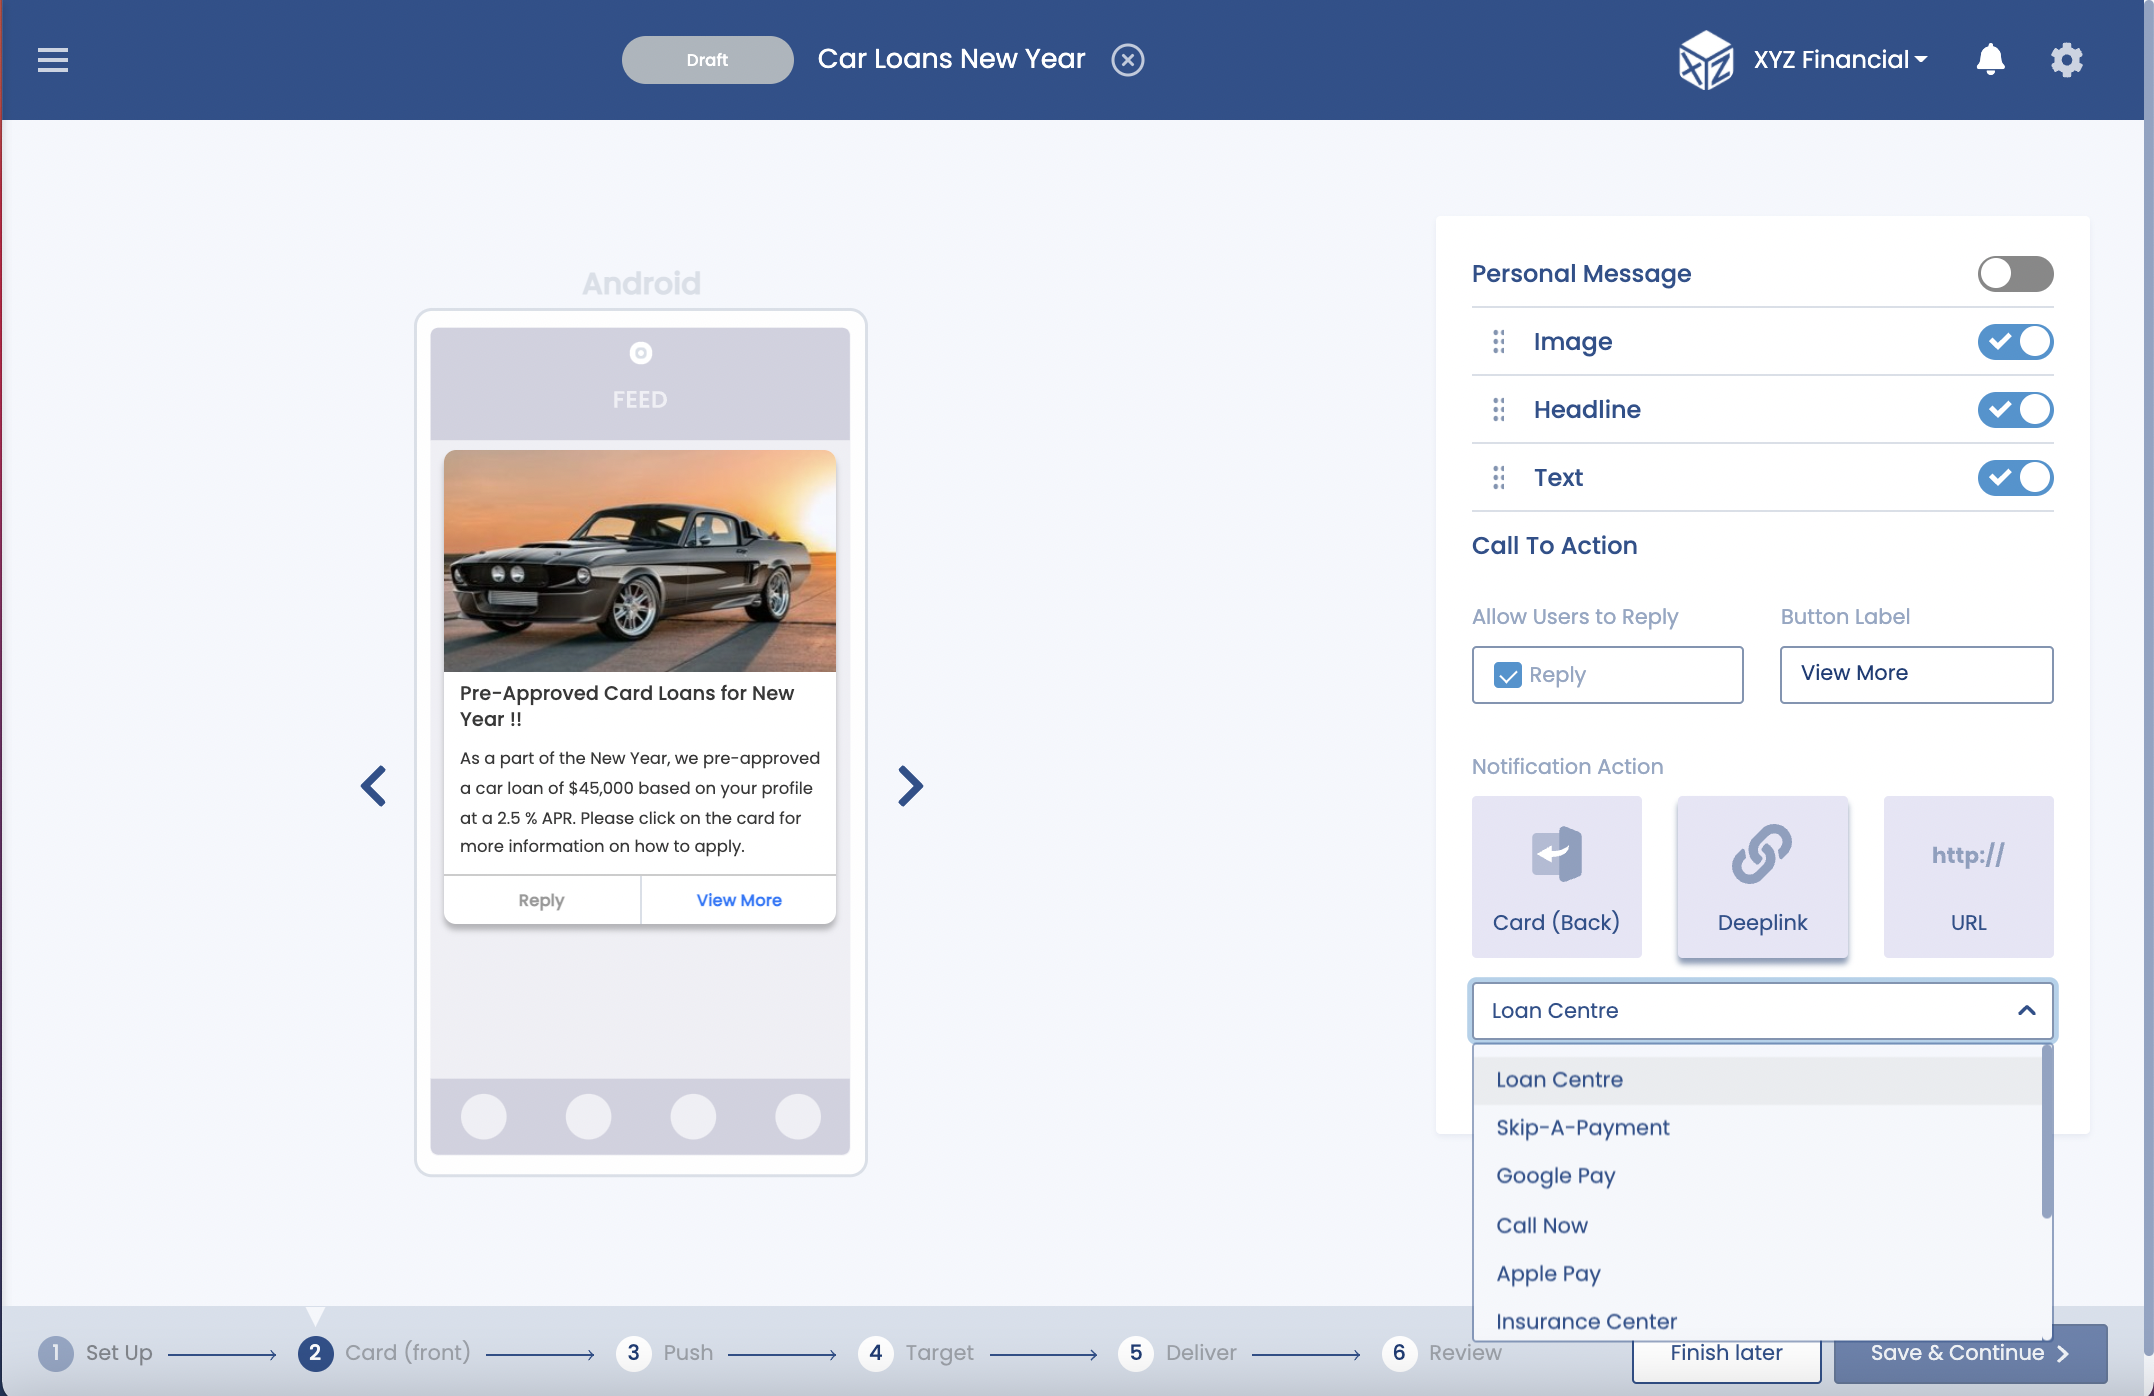
Selecting a deeplink
| Name | Description |
|---|---|
| URL | You can also route the user directly to a web page. When you select the URL call to action option, you will be able to enter a web page and if users click on the call to action button, that web page will open on their mobile devices. Please note that you have to enter the full URL address so if you wanted to send users to the Pulsate website you should enter http://www.pulsatehq.com as the URL and not just www.pulsatehq.com Finally, it is important to check that any website that you are directing users to is optimised for mobile devices so that your users have the best possible experience. |
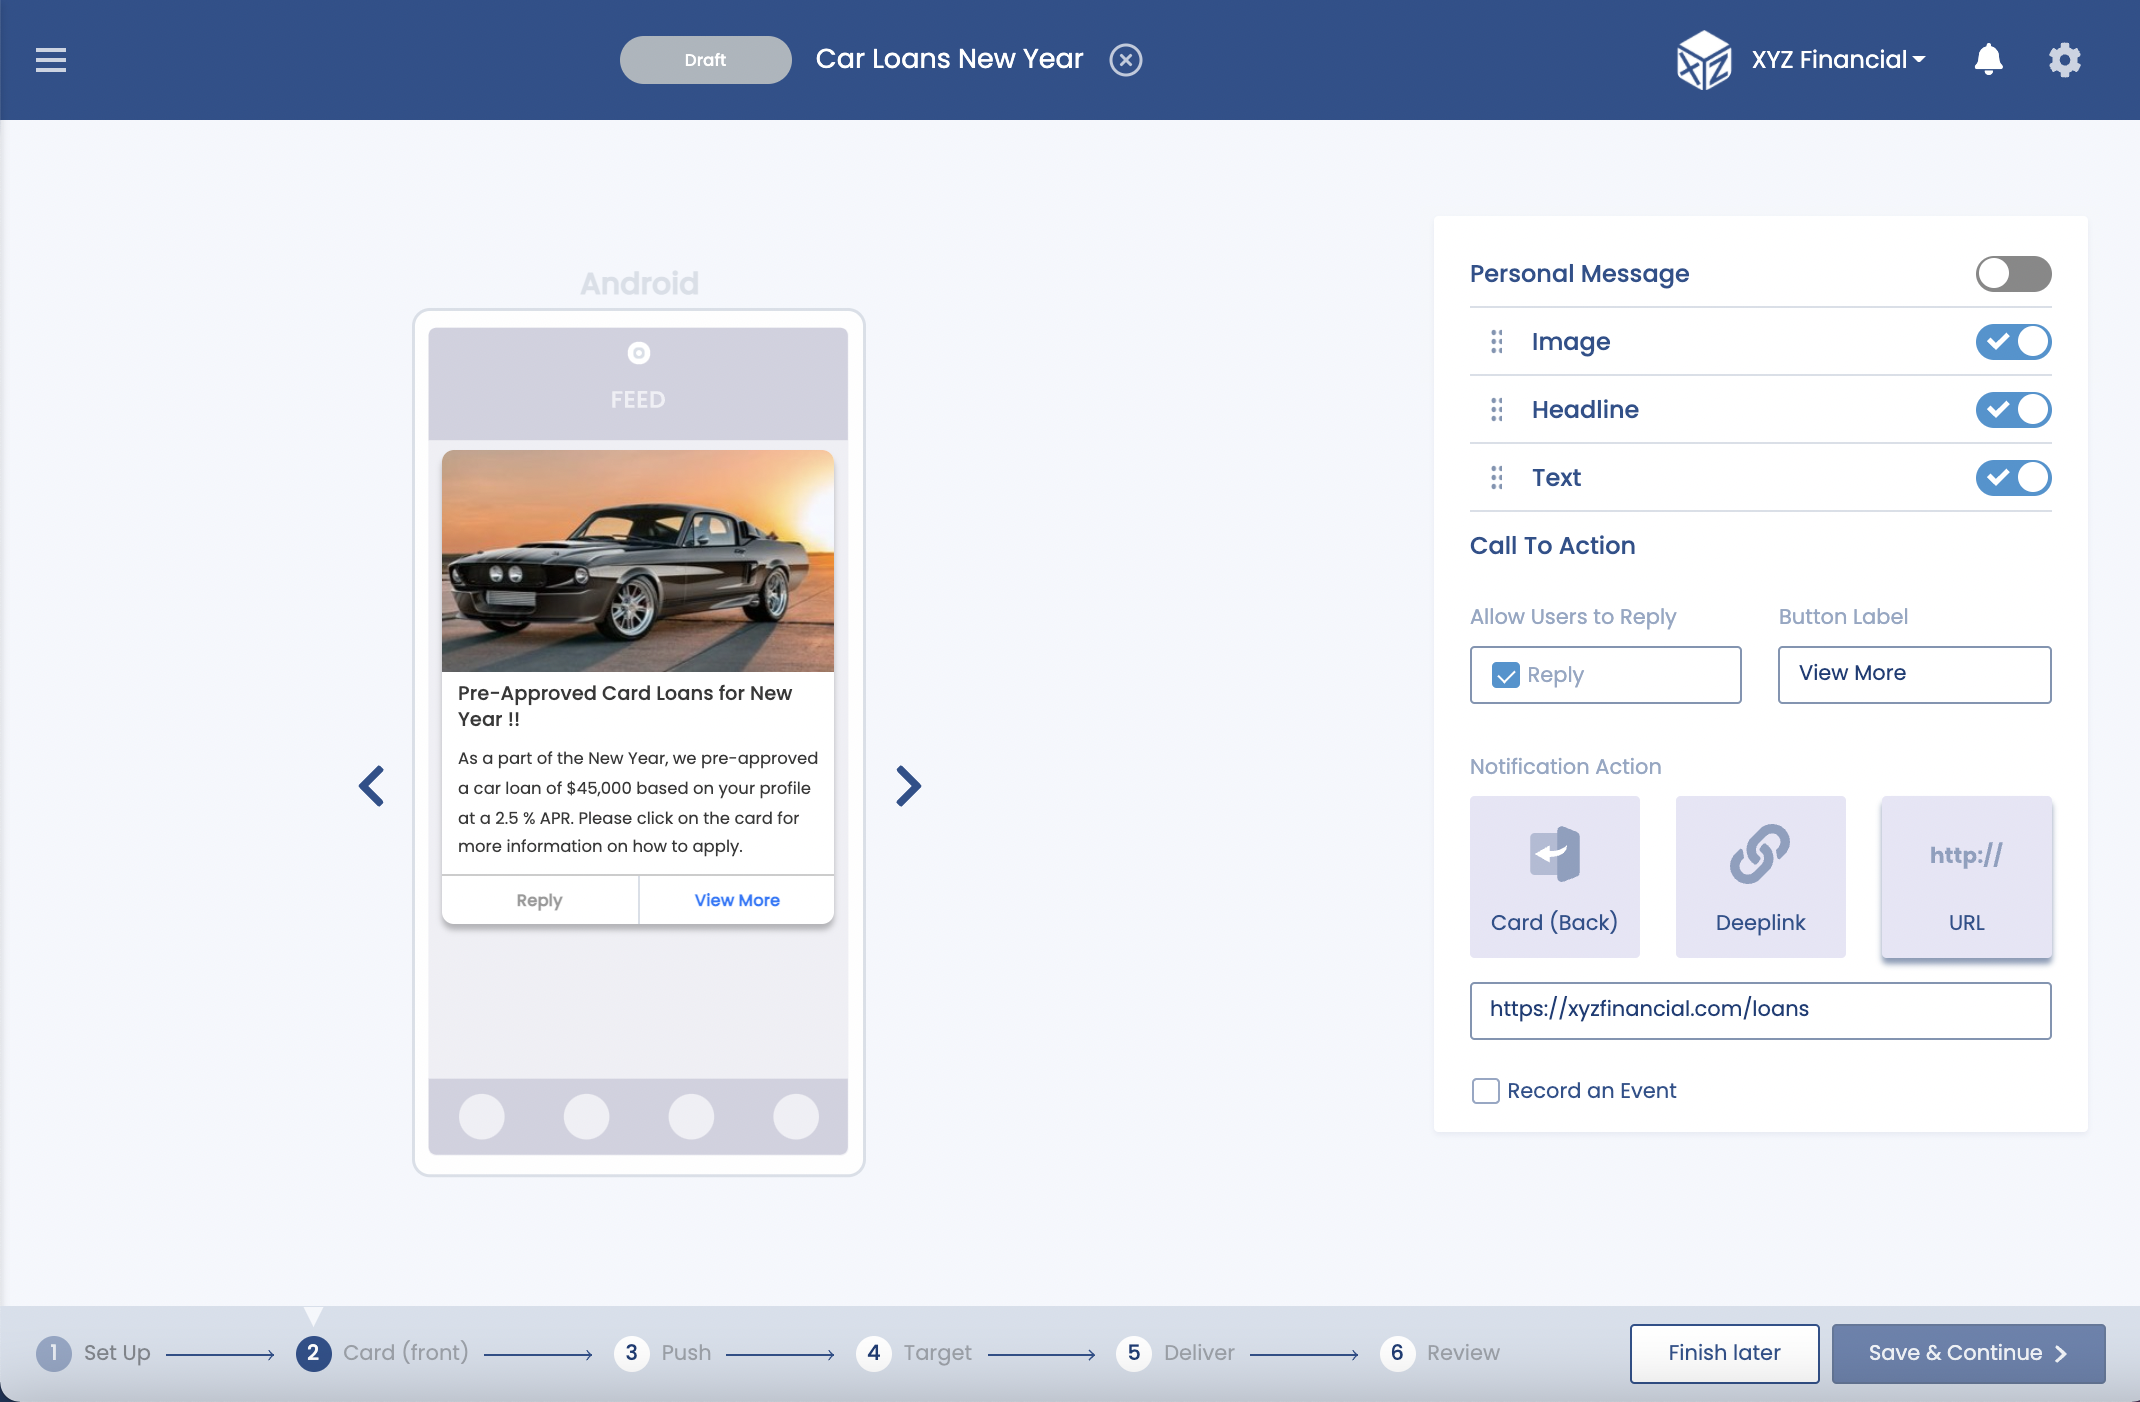
Adding a URL
| Name | Description |
|---|---|
| In-App Events | An In-App Event is any action that the user takes when they are within your app. Outside of the Pulsate Feed, you can set up In-App Events to record actions that users take. You can set up a campaign to be delivered when the user carries out that action or simply use the information for analytical purposes. For information on setting up In-App Events outside of the Pulsate Feed, please consult our guides for iOS and Android. Within the Pulsate Feed, you can set up an in-app event to record when a user clicks on one of the call-to-action buttons that were specified above. This allows you to track the conversion rate for your campaign and to find out how many users have clicked on each call to action button. To add an In-App Event to a call-to-action item, click on In-App Event and a text field will open. You can use this text field to enter the name of the in-app event or select one event from the dropdown in case you would like to use the same event for several campaigns. When you are naming these in-app events it is best to come up with a set naming protocol or else you will end up with lots of in-app events called did_click_buttonX or something along those lines. It is useful to include the name of the campaign in the title of the In-App Event so that you can quickly reference what campaign the event was recorded from. |
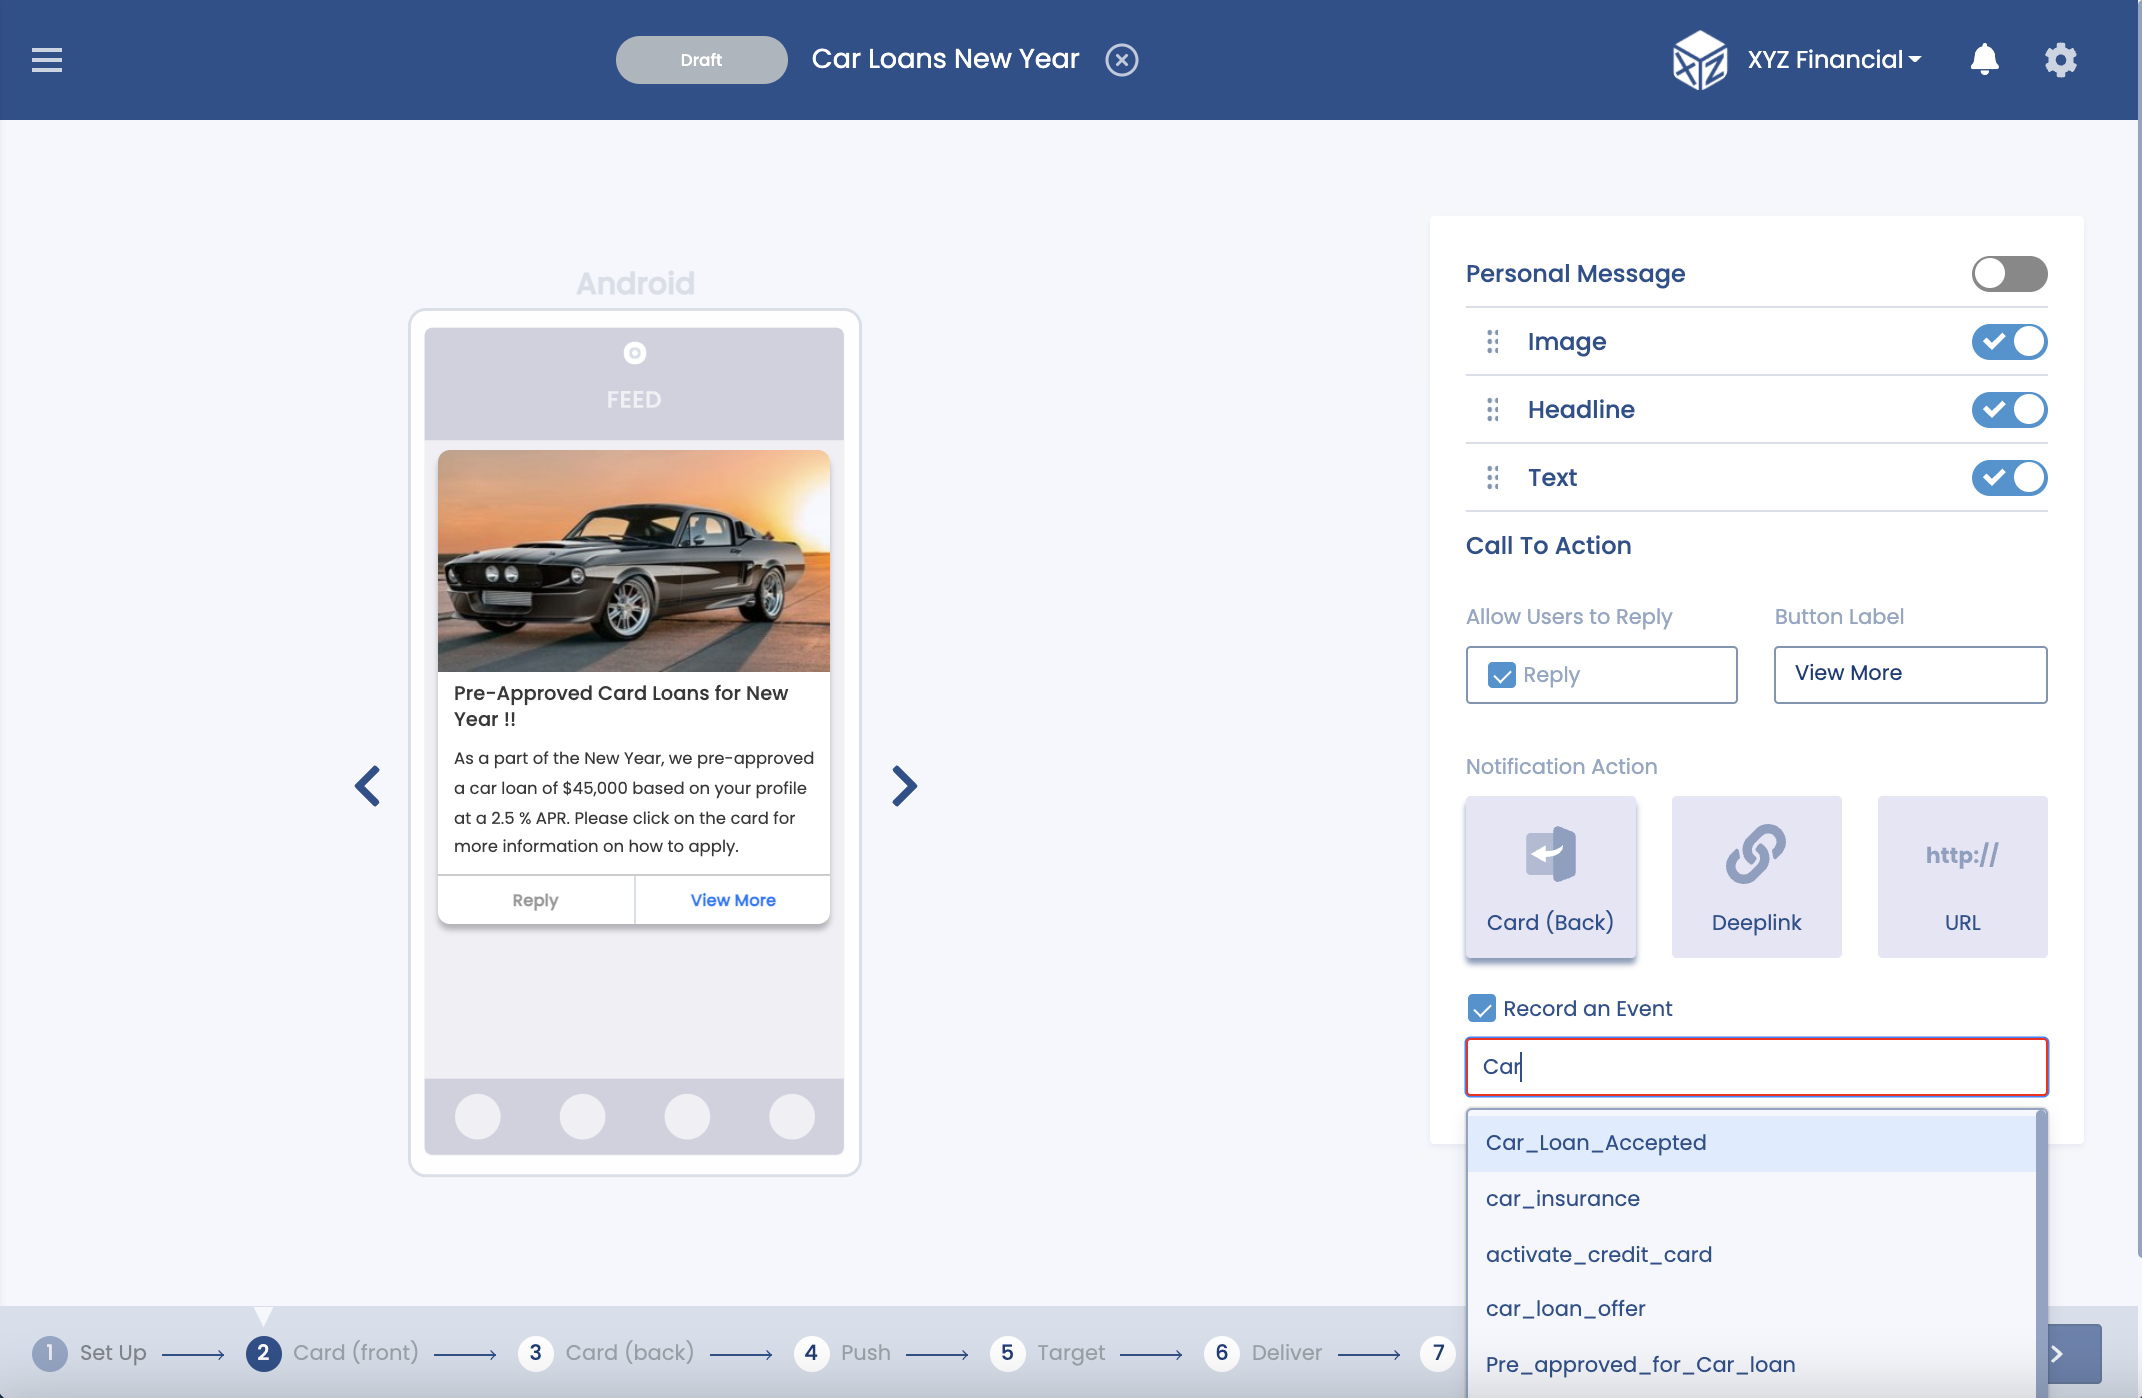
Adding an In App Event
5. Setting Back of the card
The back of the card option allows you to bring users to another campaign card with more information and imagery. The back of the card has more space than the front of the card so it enables you to include much more detail for the user.
Just like on the front of the card, you must select at least one widget. You can also select multiple widgets at the same time and reorder those widgets into whichever order you wish. Unlike the front of the card, the call to action widget is not mandatory on the back of the card so it can be switched off if you wish.
If you have included a personal message on the front of the card, this message will be displayed at the top of the back of the card. Likewise, if you allowed users to reply to the campaign, a reply icon will be added to the top navbar at the back of the card.
Back of Card Parameters
| Name | Description |
|---|---|
| Image | Much like on the front of the card, you can add an image to the back of the card as well. However, as you have the full screen to play with on the back of the card, the image can be a bit longer. Images on the back of the card must also be a minimum width of 300px and a maximum size of 1MB. You can also crop the image on the back of the card. Please refer to the front of card image documentation for specific instructions on cropping an image. |
| Headline | Much like on the front of the card, the purpose of the Headline is to immediately grab the user's attention and let them know what the campaign is about. The headline is an optional widget once at least one other widget has been selected. Merge tags can also be added to the headline field if you wish to personalize the message and/ or programmatically insert some custom data into the headline. |
| Text | The function of the text widget on the back of the card is the same as its function on the front of the card. It is a great way to add complimentary detail to an image or headline. There is more room on the back of the card than the front so there is also an opportunity to add more text. However, for optimal results, the text entered should be short, snappy, and to the point. Merge tags can also be added to the text field if you wish to personalize the message and/ or programmatically insert some custom data into the headline. |
| Table | The table widget is a great way to provide structured information for the user such as store opening hours or prices. When the widget is selected you can enter a heading for the table and a series of rows under the View and Label headings. To add a new row, press the Add button, and to delete a row press the minus button. |
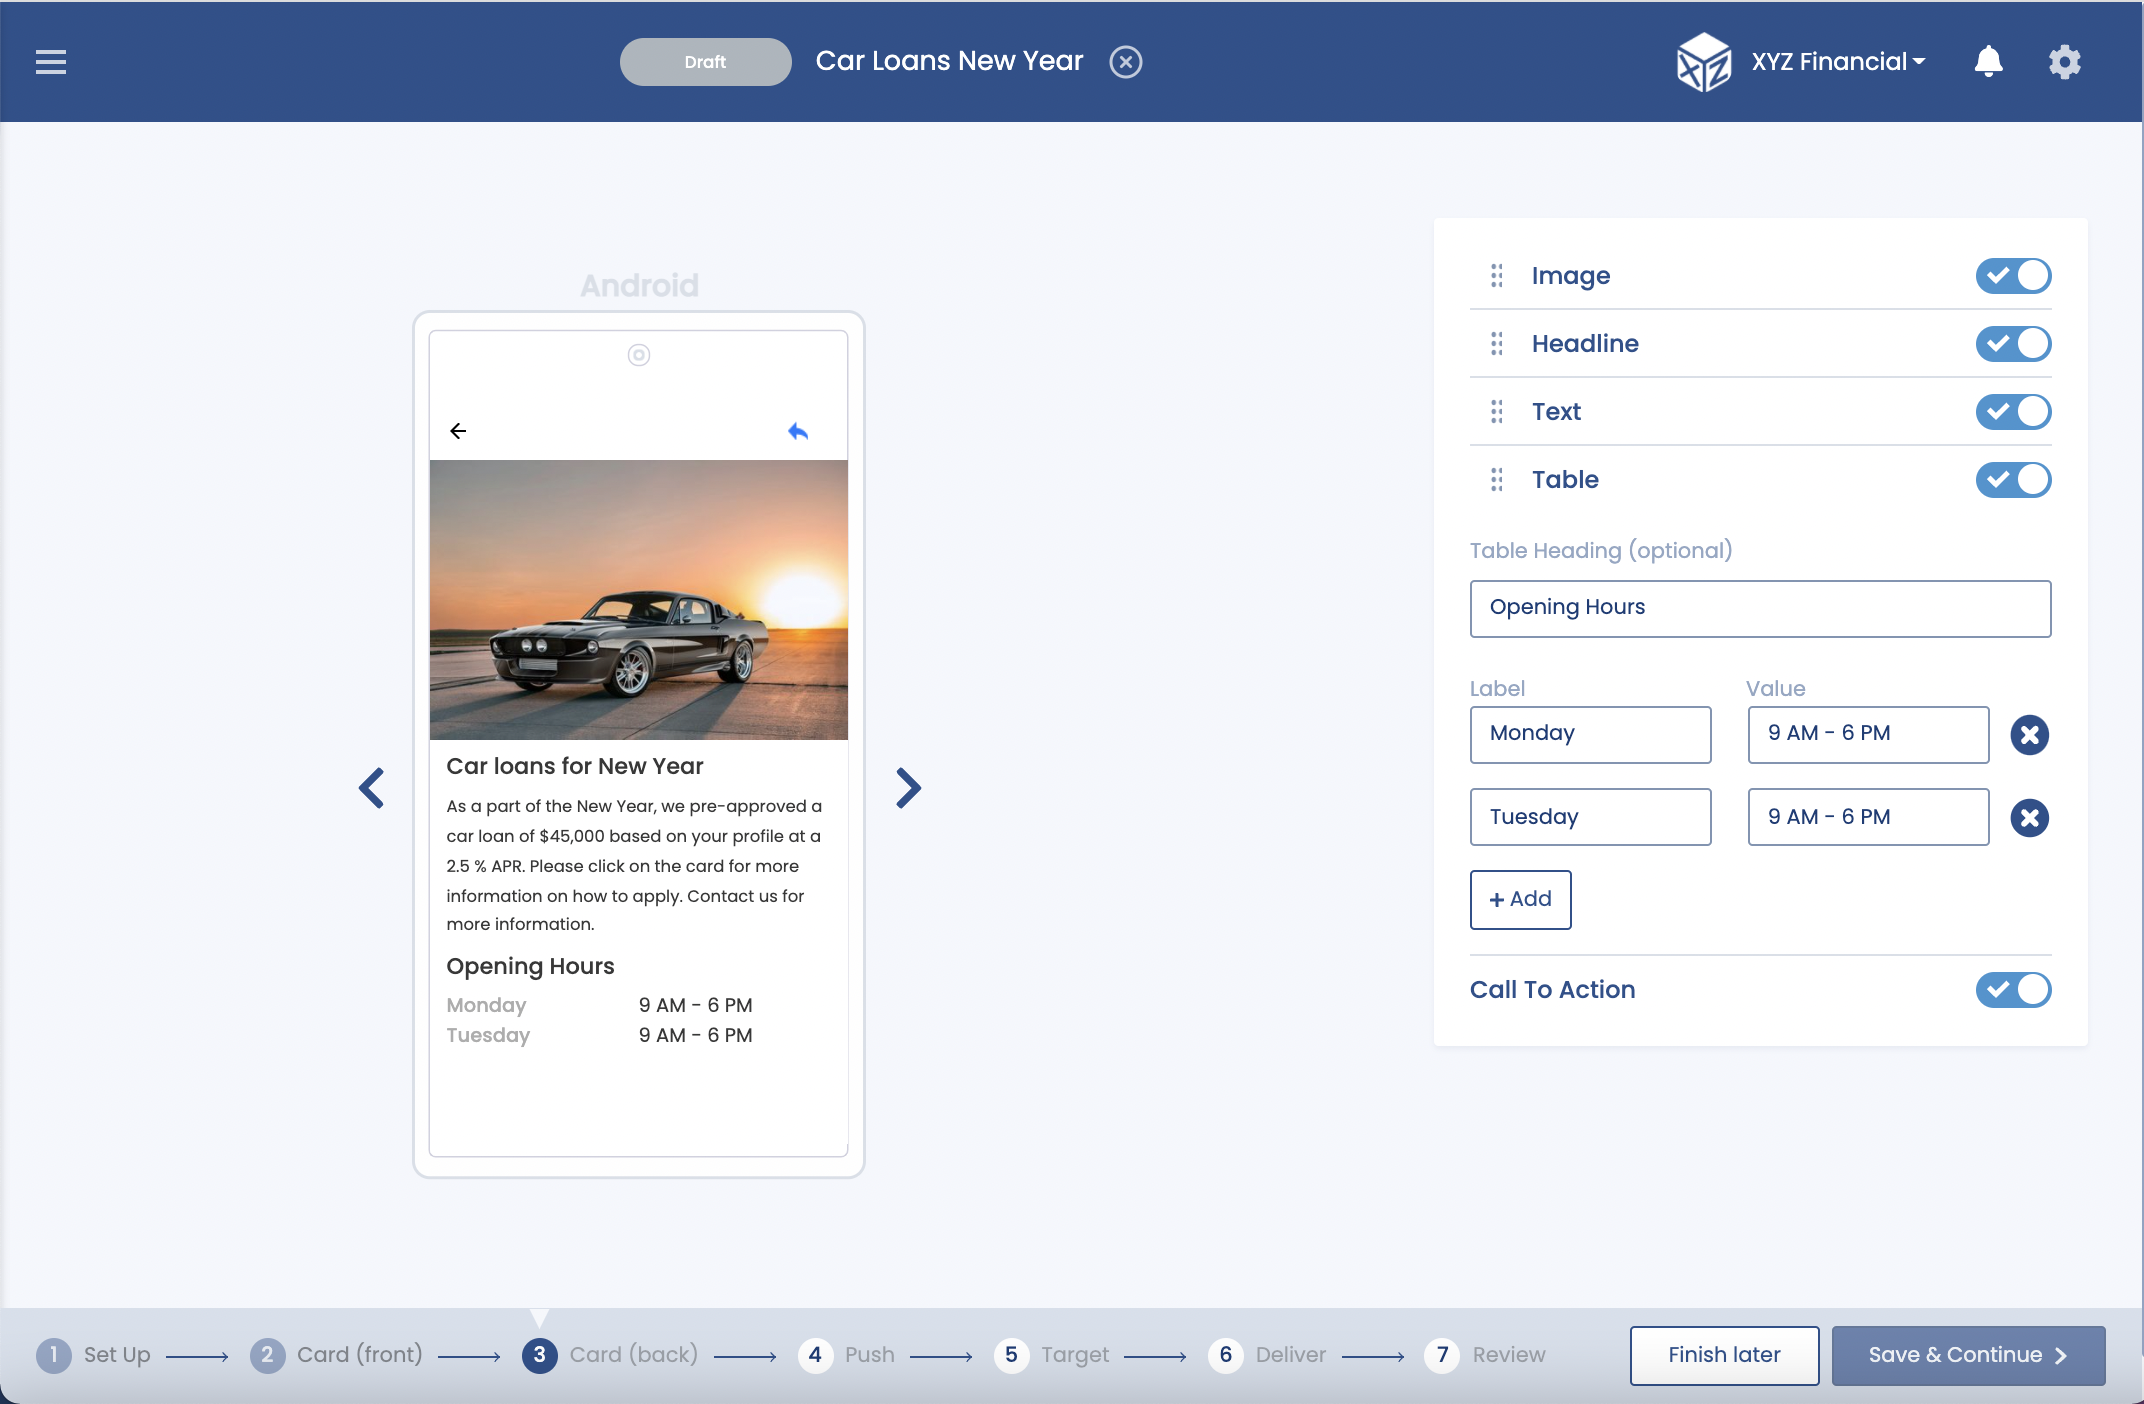
Adding a Table
Call to Action
For the back of card, you have the option to select call to action buttons. If you do not wish to include a call to action on that back of the card, you can turn the widget off and the user will not be able to go any further.
However, if you do choose to enable the call to action widget on the back of the card, you will be able to choose one or two call to action buttons. To select these buttons click the checkboxes when the widget is open. Once the number of buttons has been selected, you can specify the text and destination of each button.
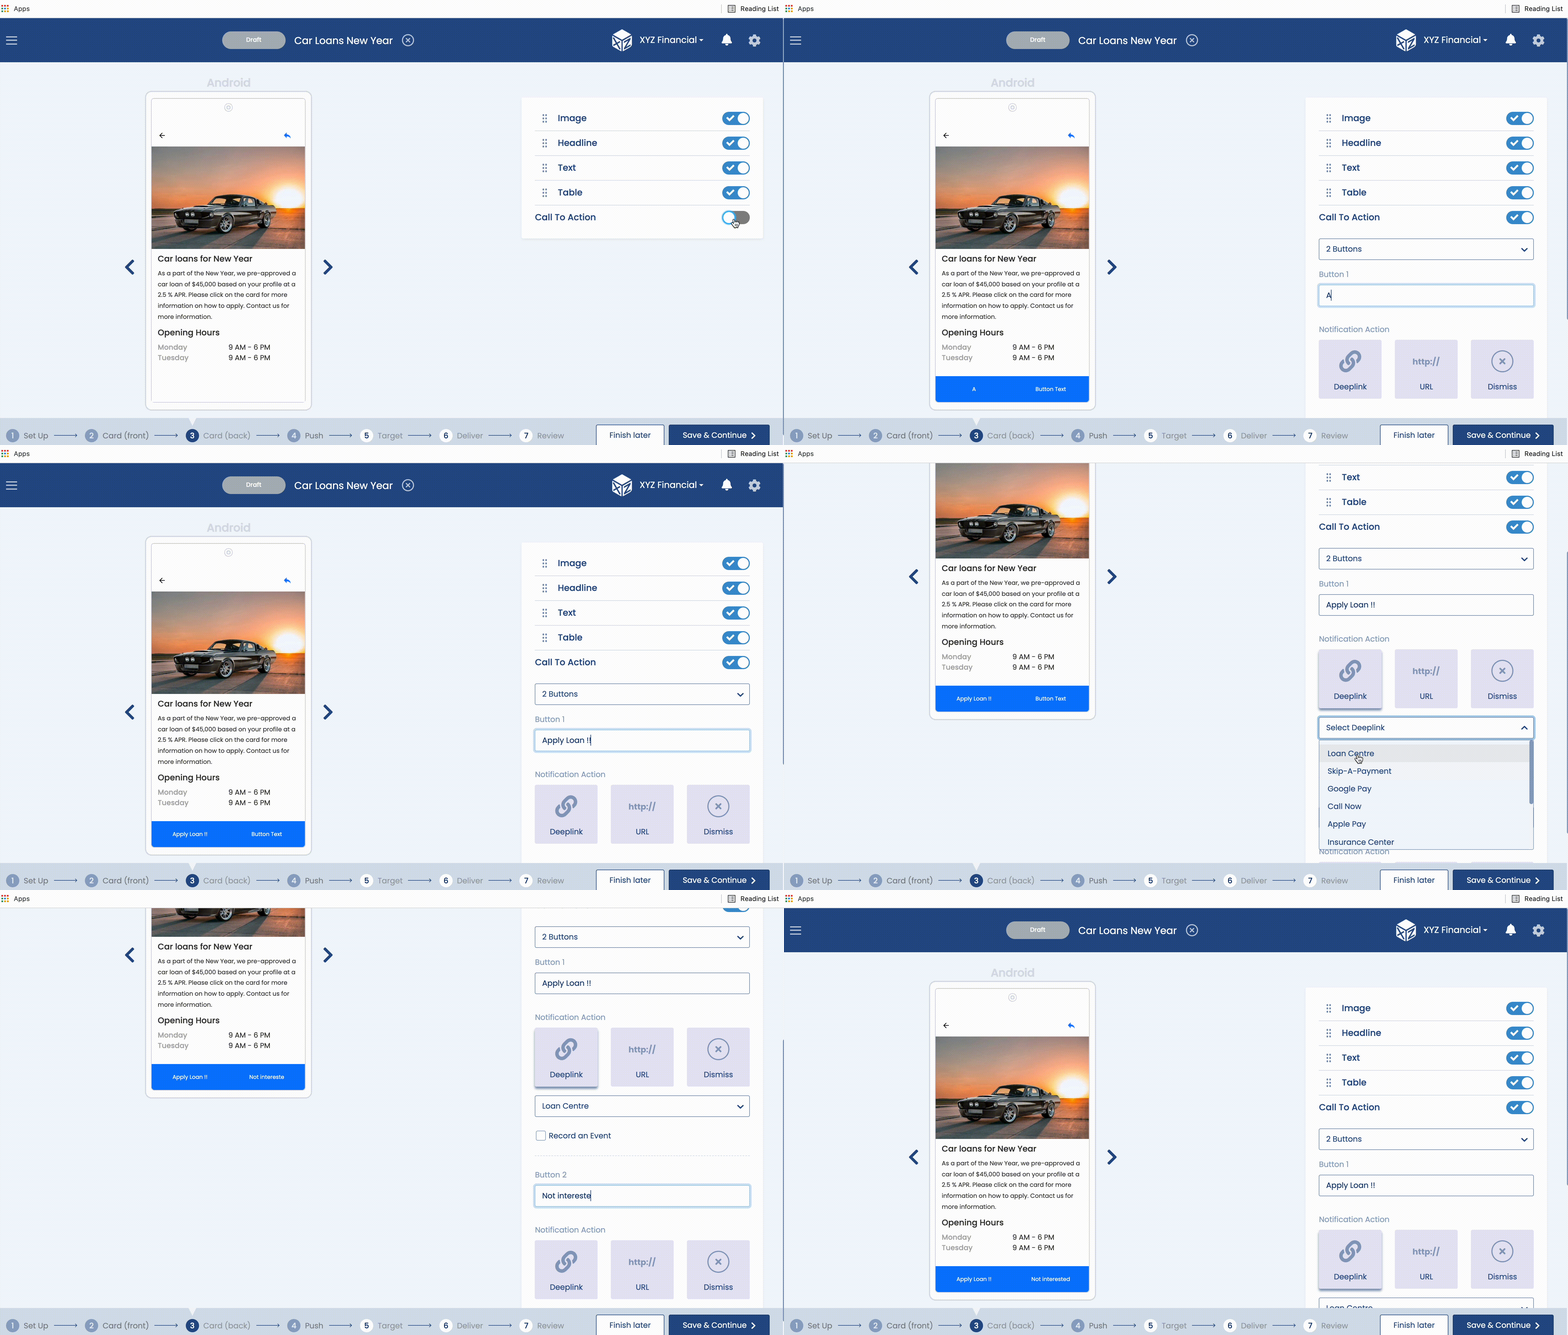
Call to Action
If you decide to turn the Call to Action widget on, there are a number of options on the back or card:
| Name | Description |
|---|---|
| Deeplink | Just like on the front of card if you select Deeplink, you can route users to another location within your app that is outside of the Pulsate feed. You will need to first setup a deeplink for the view within your app that you want to route users to and you can find out more information about setting up deeplinks for iOS or Android by following those links. When you have setup deeplinks as per the instructions above, you will be able to select them in a dropdown when you select the deeplink call to action option. |
| URL | You can also route the user directly to a web page. When you select the URL call to action option, you will be able to enter a web page and if users click on the call to action button, that web page will open on their mobile devices. Please note that you have to enter the full URL address so if you wanted to send users to the Pulsate website you should enter http://www.pulsatehq.com as the URL and not just www.pulsatehq.com Finally, it is important to check that any website that you are directing users to is optimised for mobile devices so that your users have the best possible experience. |
| Dismiss | On the back of card you can also select an option to dismiss the current view. When this is selected, it will route users back to the front of the card if they press it. |
| In-App Events | On the back of card, you can setup an in-app event for each button that you enable in the call to action widget. This allows you to track the conversion rate for your campaign and to find out how many users have clicked on each call to action button. To add an In-App Event to one or both of the back or card buttons item, click on In-App Event within the CTA widget for each button and a text field will open. You can use this text field to enter the name of the in-app event. When you are naming these in-app events it is best to come up with a set naming protocol or else you will end up with lots of in-app events called did_click_buttonX or something along those lines. It is useful to include the name of the campaign in the title of the In App Event so that you can quickly reference what campaign the event was recorded from. For information on setting up In-App Events outside of the Pulsate Feed, please consult our guides for iOS and Android. |
6. Select Targeting
When you have created your notification and chosen a destination for it, press the Next button to bring you into the Targeting section. Here you will be able to choose which groups of your users get your campaign. This is the audience for your notification and as much as possible it should be chosen based on the group of users that you believe will be most interested in this campaign based on their previous transaction history, current proximity to a physical location and/ or in-app actions that the users will take within your app.
In the Targeting section you can choose from the following parameters:
- Segments
- Beacons
- Geofences
- In-App Events
When you choose any of these parameters, they will be displayed on the left-hand side of the screen in the Targeting simulator with an estimate of how many users the campaign will be sent to.
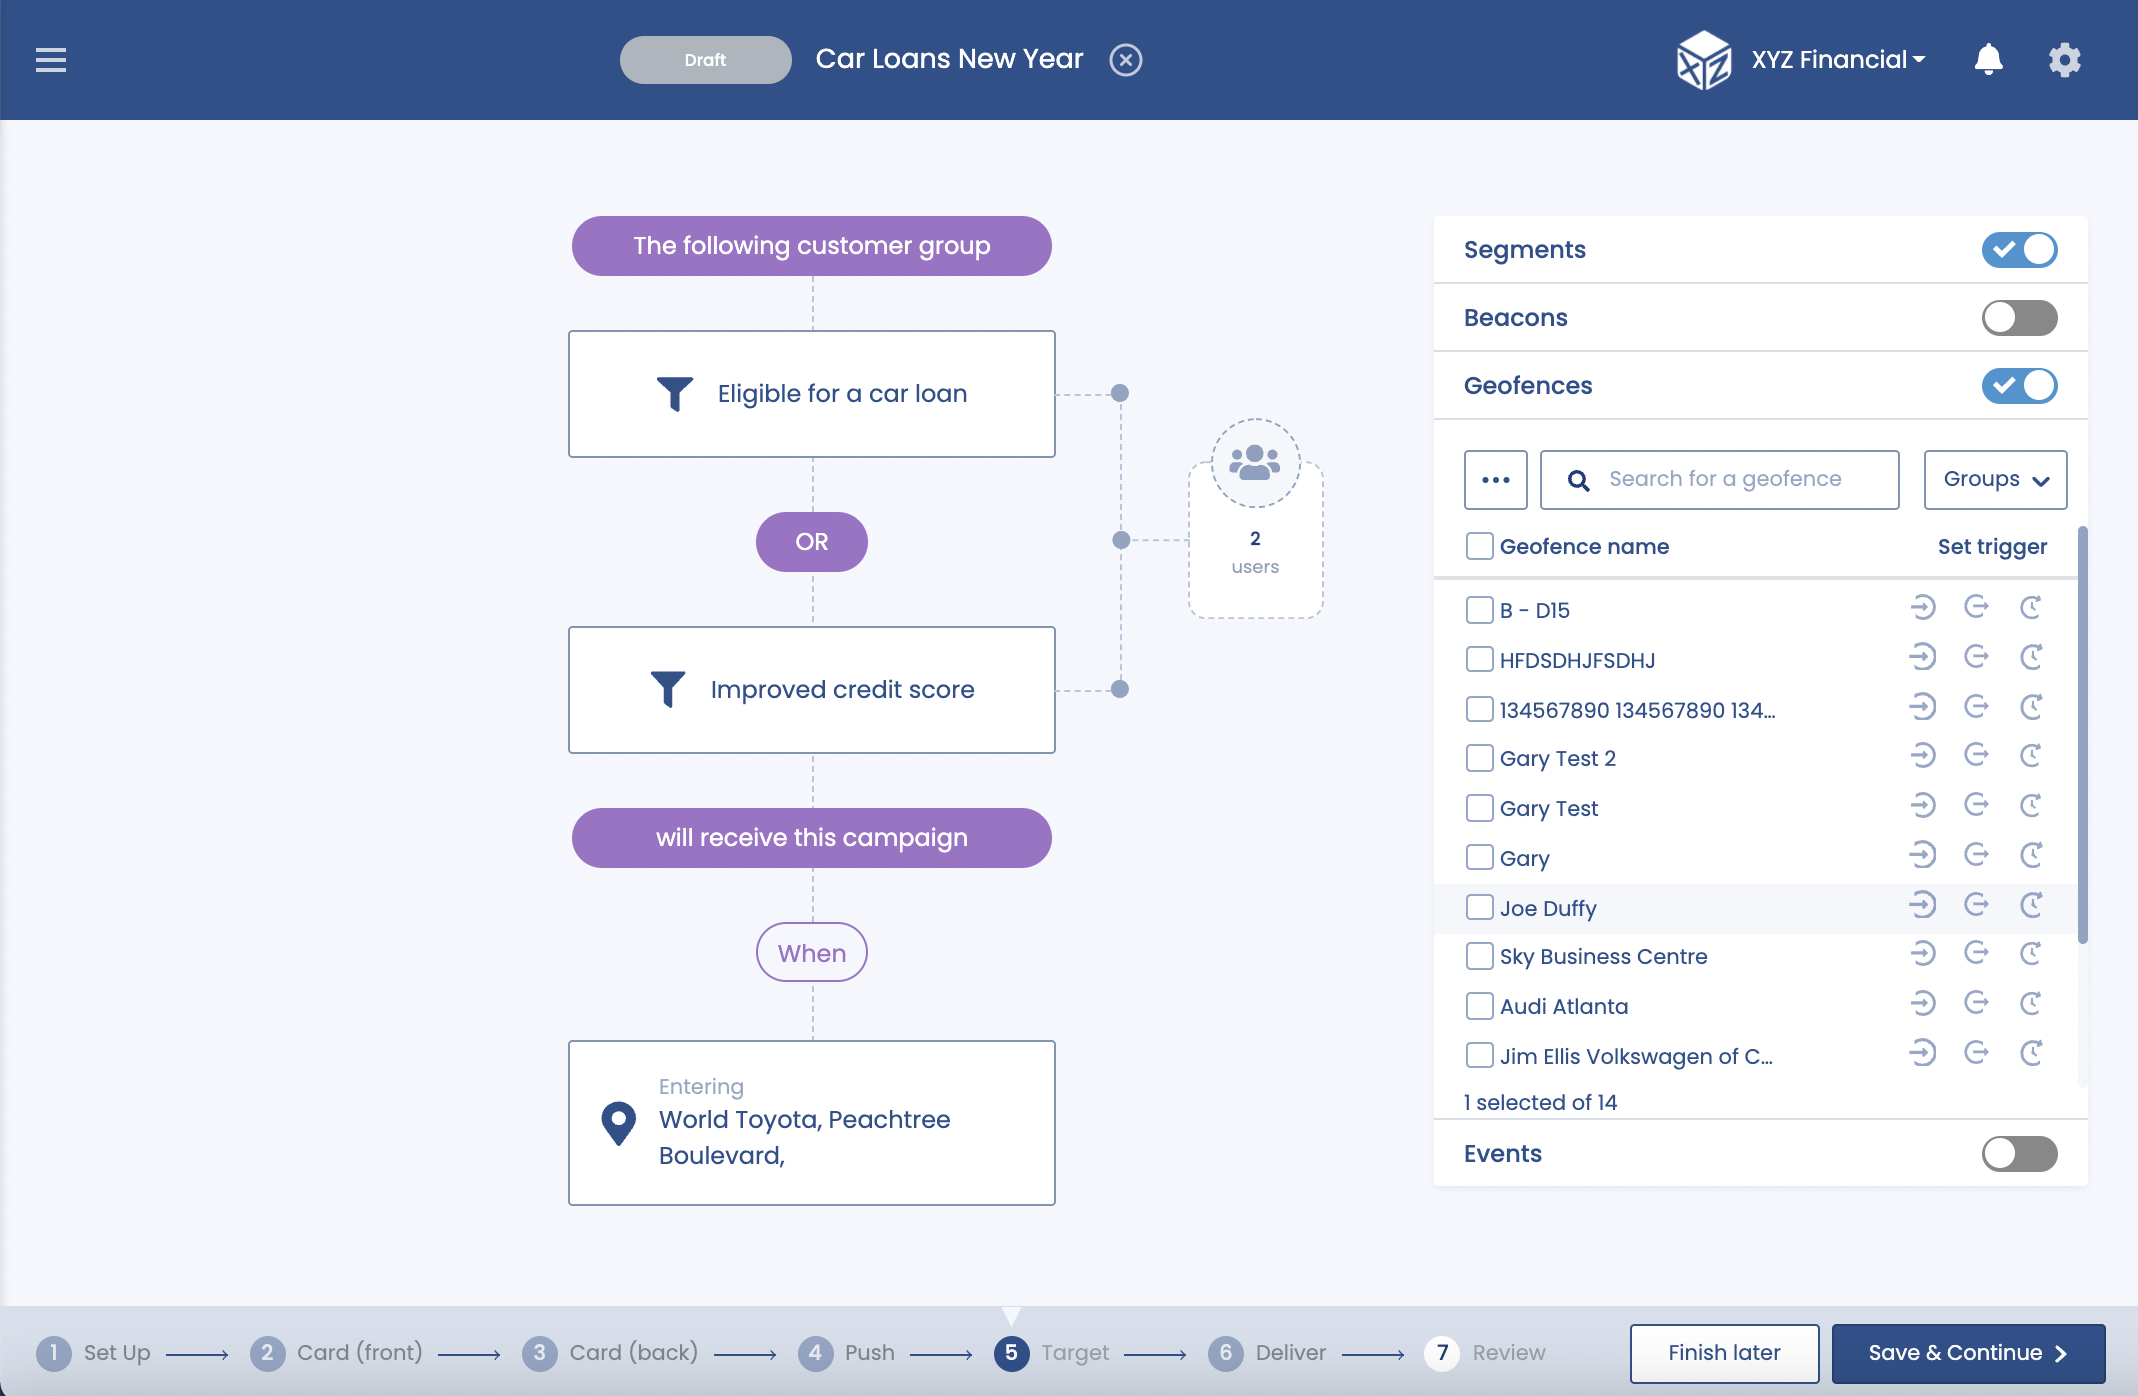
With Pulsate you can choose to target as many Segments, Beacons, Geofences and In App Events as you want. However, you should be trying to send each campaign to as well targeted a group of users as possible to ensure the highest open rates. You can send a campaign to multiple Segments of users and/ or send it to users who enter a Beacon, Geofence or carry out a specific in app action. Don't worry though, users will only receive the campaign once by default no matter how many of these parameters that they meet unless you specify otherwise whilst sending the campaign.
Pro Tip
Use the search functionality when you are looking for a Segment, Beacon, Geofence or In-App Event to quickly find the one that you are looking for.
You can also set up a Control Group in the Targeting section. For more information on Control Groups and how to set them up, please go here.
7. Select Delivery
Now that you have set up your notification and chosen what users should receive it, the final step is to define when and how often users should receive your campaign. There are different scheduling options depending on whether you have chosen to send a campaign to a Segment or chosen to send it to any combination of Segments, Beacons, Geofences or In-App Events. The reason for the difference is that if you are sending a campaign to only a segment, you may want to just send the campaign to users already in the segment.
However, if you decide to send the campaign to users who enter or exit a beacon or geofence region or carry out an In-App Event (and possibly are also in a segment), you are relying on those users being in that location or carrying out that event in the future so you cannot just send it to users already in that segment.
Segment Only Campaigns
As mentioned above, if you send a campaign exclusively with a segment you will be given a choice whether to send the campaign only to users who are already in the segment or users in the segment combined with users who may enter the segment at some point in the future whilst the campaign is live.
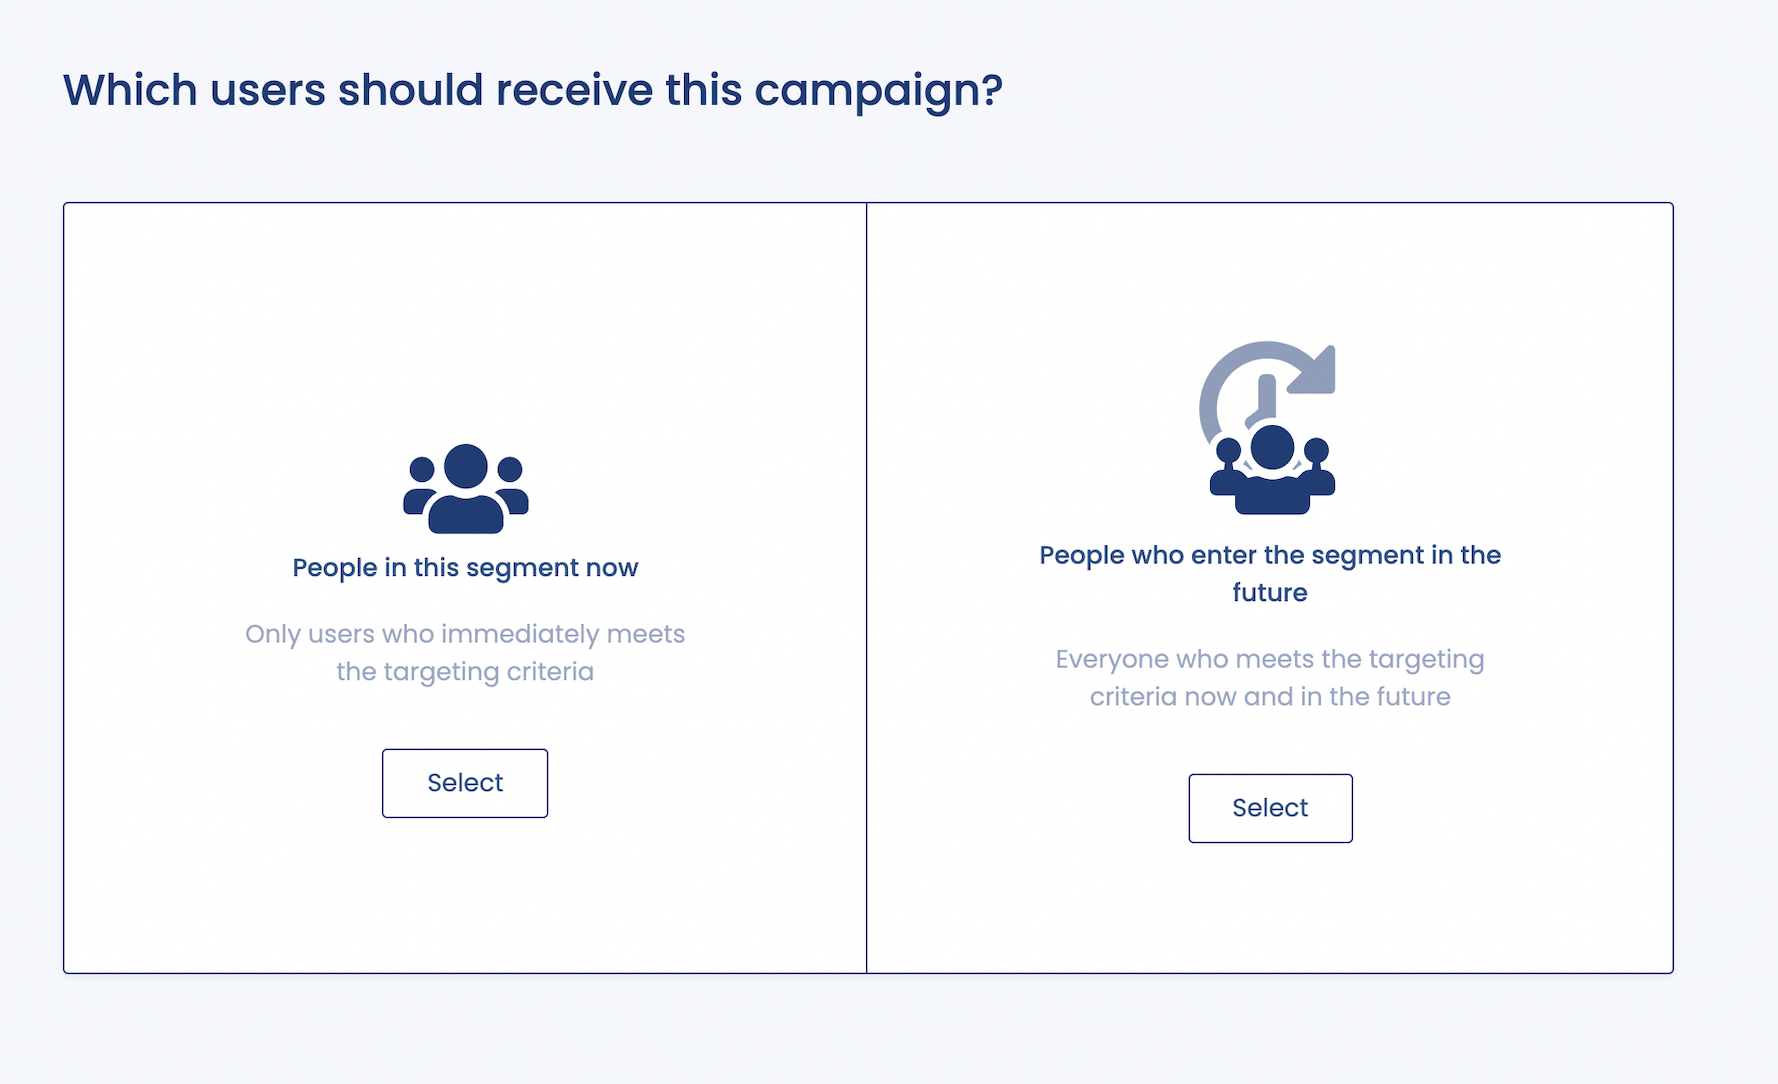
People in the segment now
If you choose to send the campaign to only users who are currently in the segment, it will be sent to every user that is in the segment when the campaign is sent and the campaign will then end. However you can still choose whether the campaign should be sent now or at some point in the future.
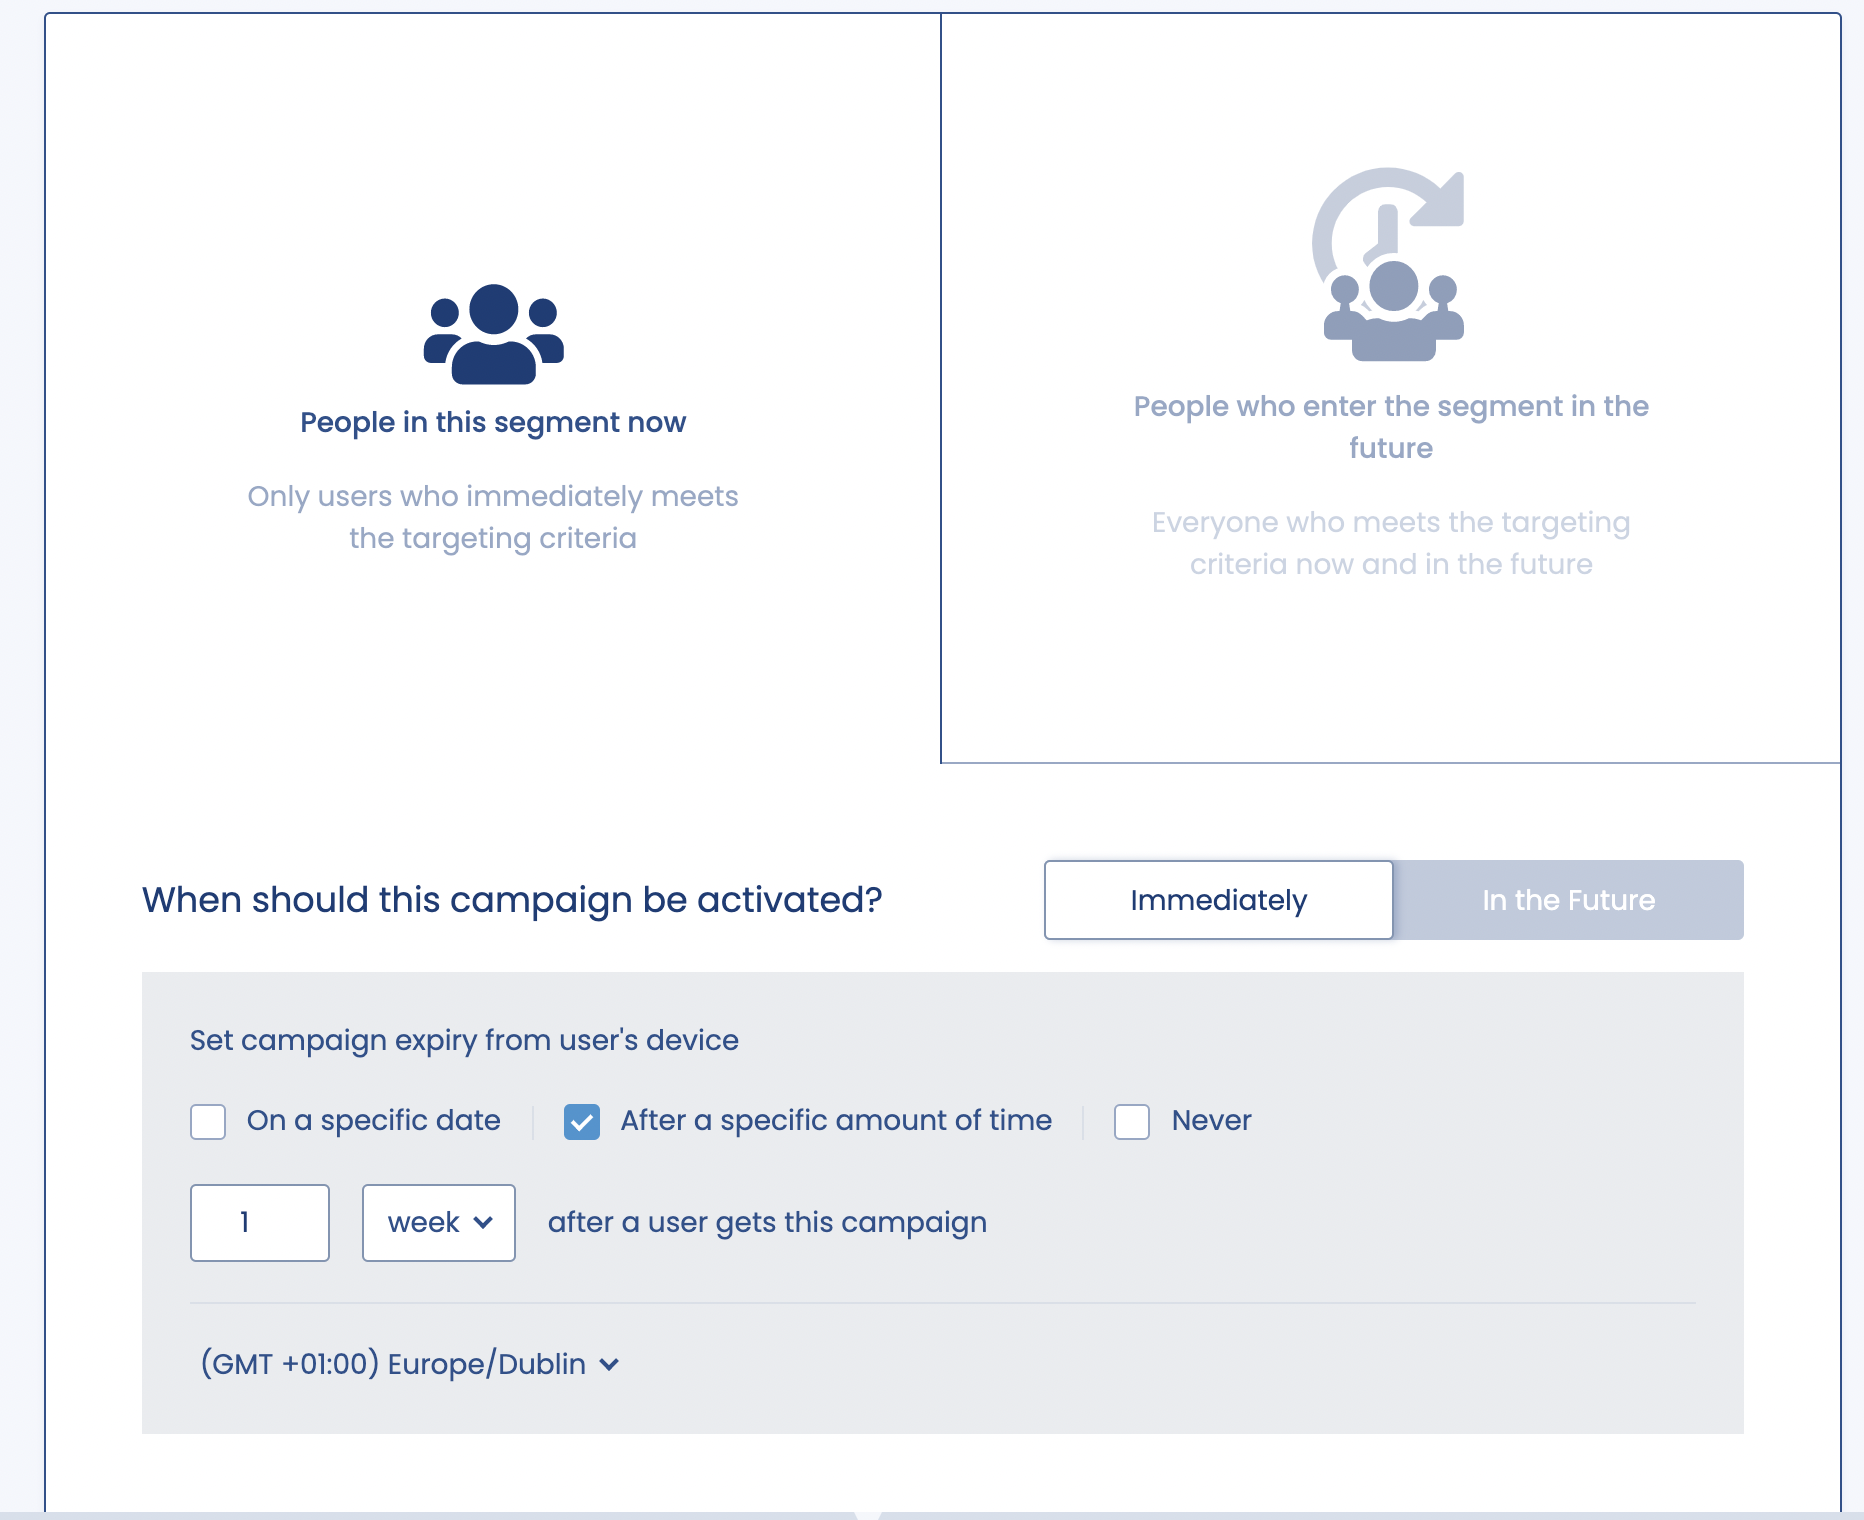
There is no option for an end date when you are sending a campaign to People in the segment now because the campaign will be ended as soon as it is sent to all users in that segment.
People who enter the segment in the future
There are a number of different options if you want to send a campaign to users who enter the segment in the future too.
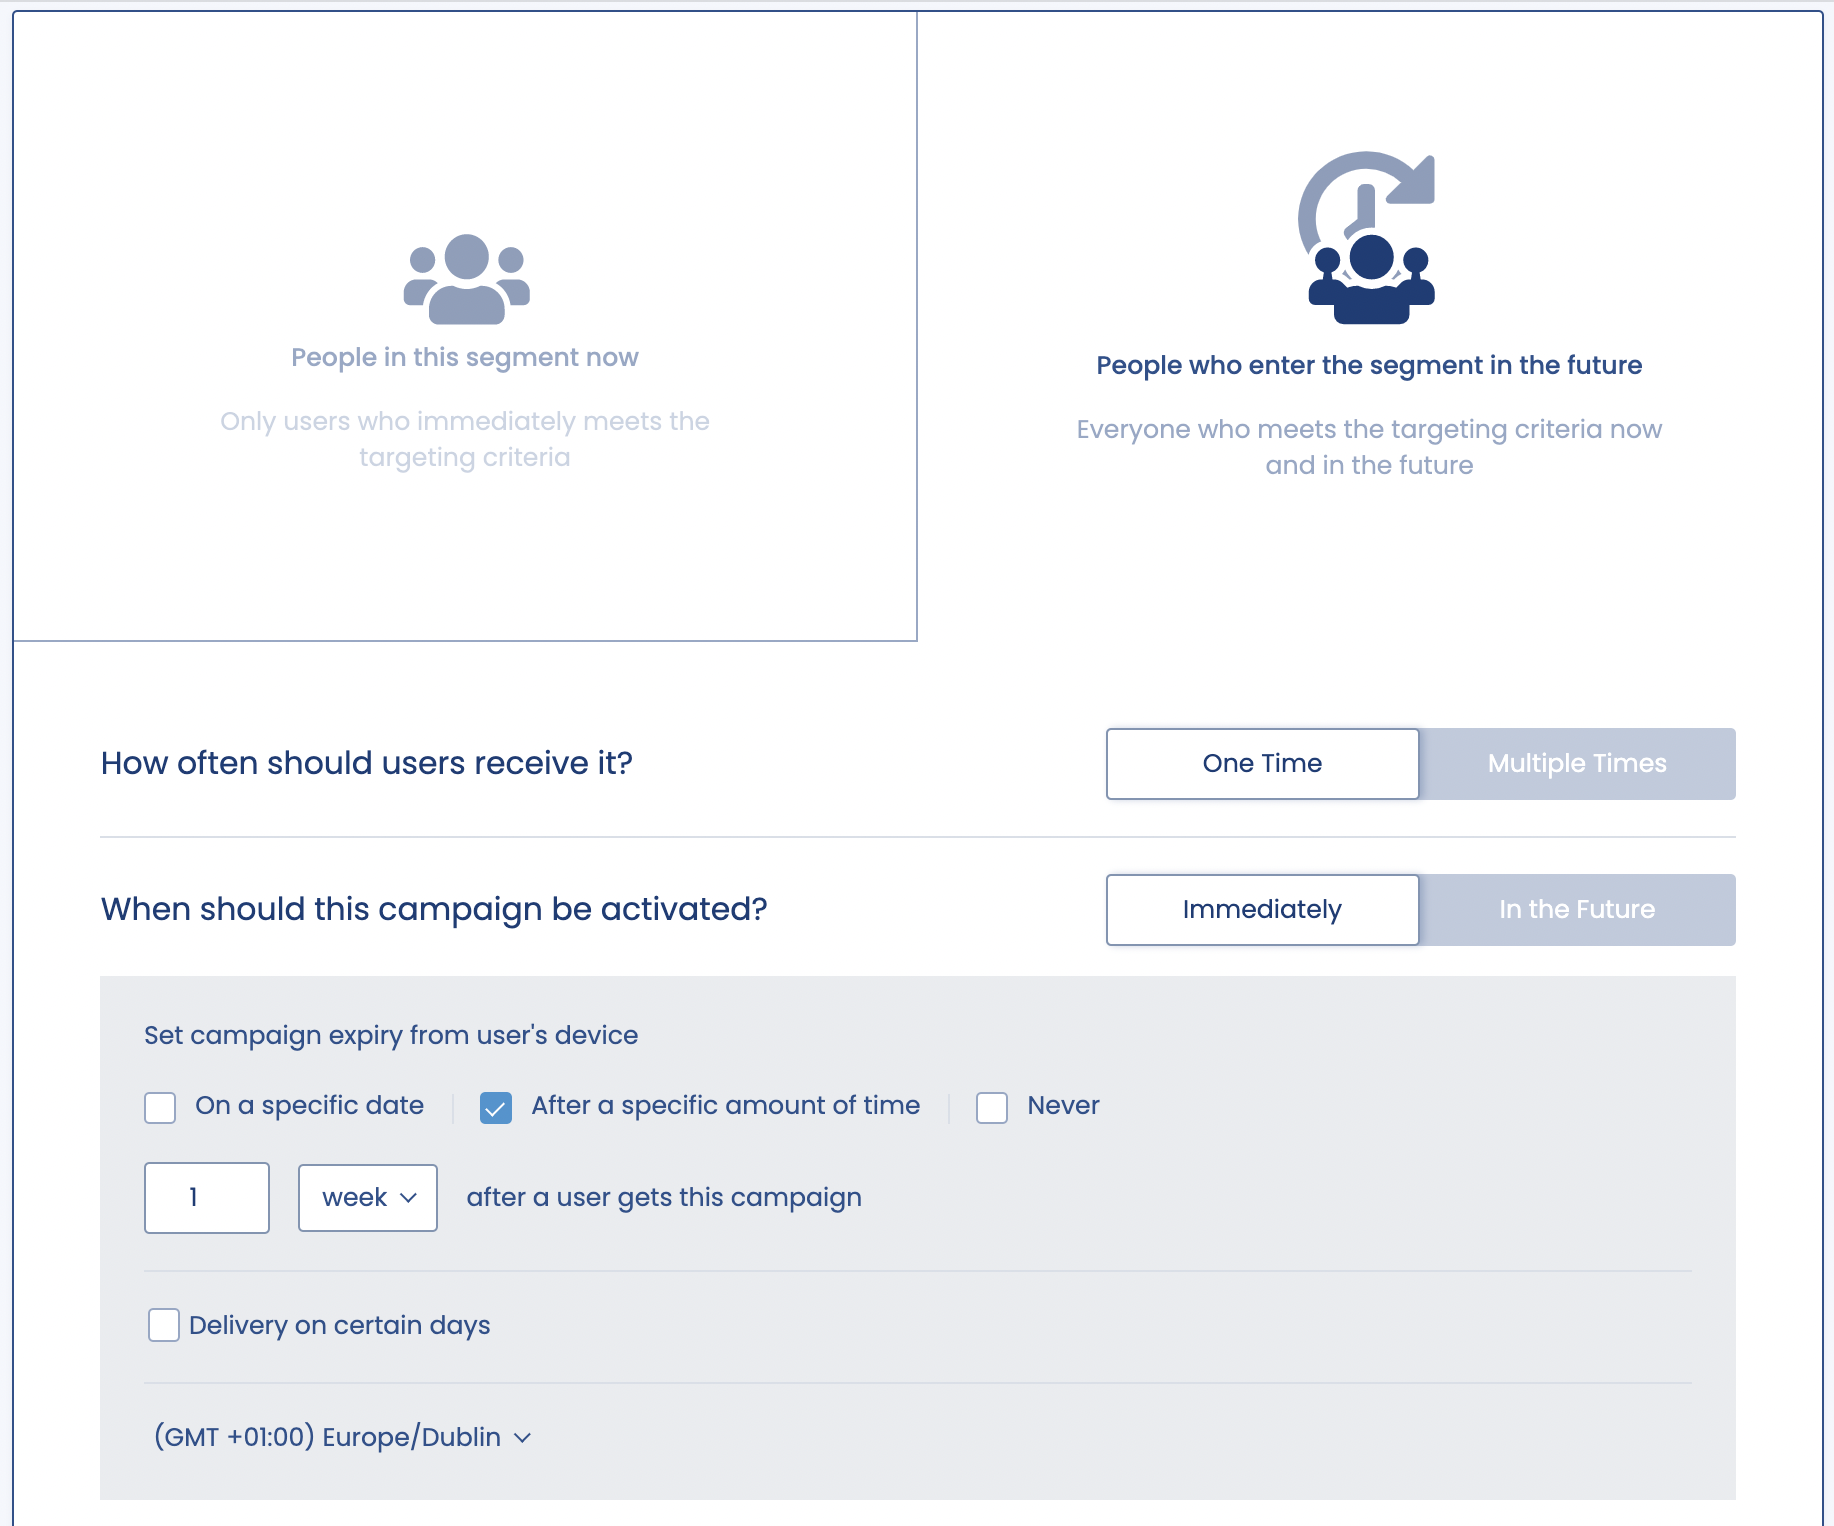
The first choice to be made is whether this campaign is send to each user once or multiple times if they remain eligible for it. Choosing One Time is useful would be useful if you were sending a campaign that every user in that segment should get but only once. An example might be a Welcome Campaign which you would like to send every user once they enter the segment but you only want to send it once even if the user leaves and re-enters the segment at some point in the future.
Conversely, you may want to send other campaigns multiple times to a user. An example might be a receipt for purchases the user makes, you may want to send that campaign to users every time they make a purchase and are added to that segment. If you choose to send a campaign Multiple Times, you can set Campaign Limits to ensure that users do not get overloaded by campaigns. Campaign Limits adds a delay between users receiving this campaign. For instance, if you set the campaign limit to five minutes, users will only receive this campaign once every five minutes even if they are eligible to receive it more often than that.
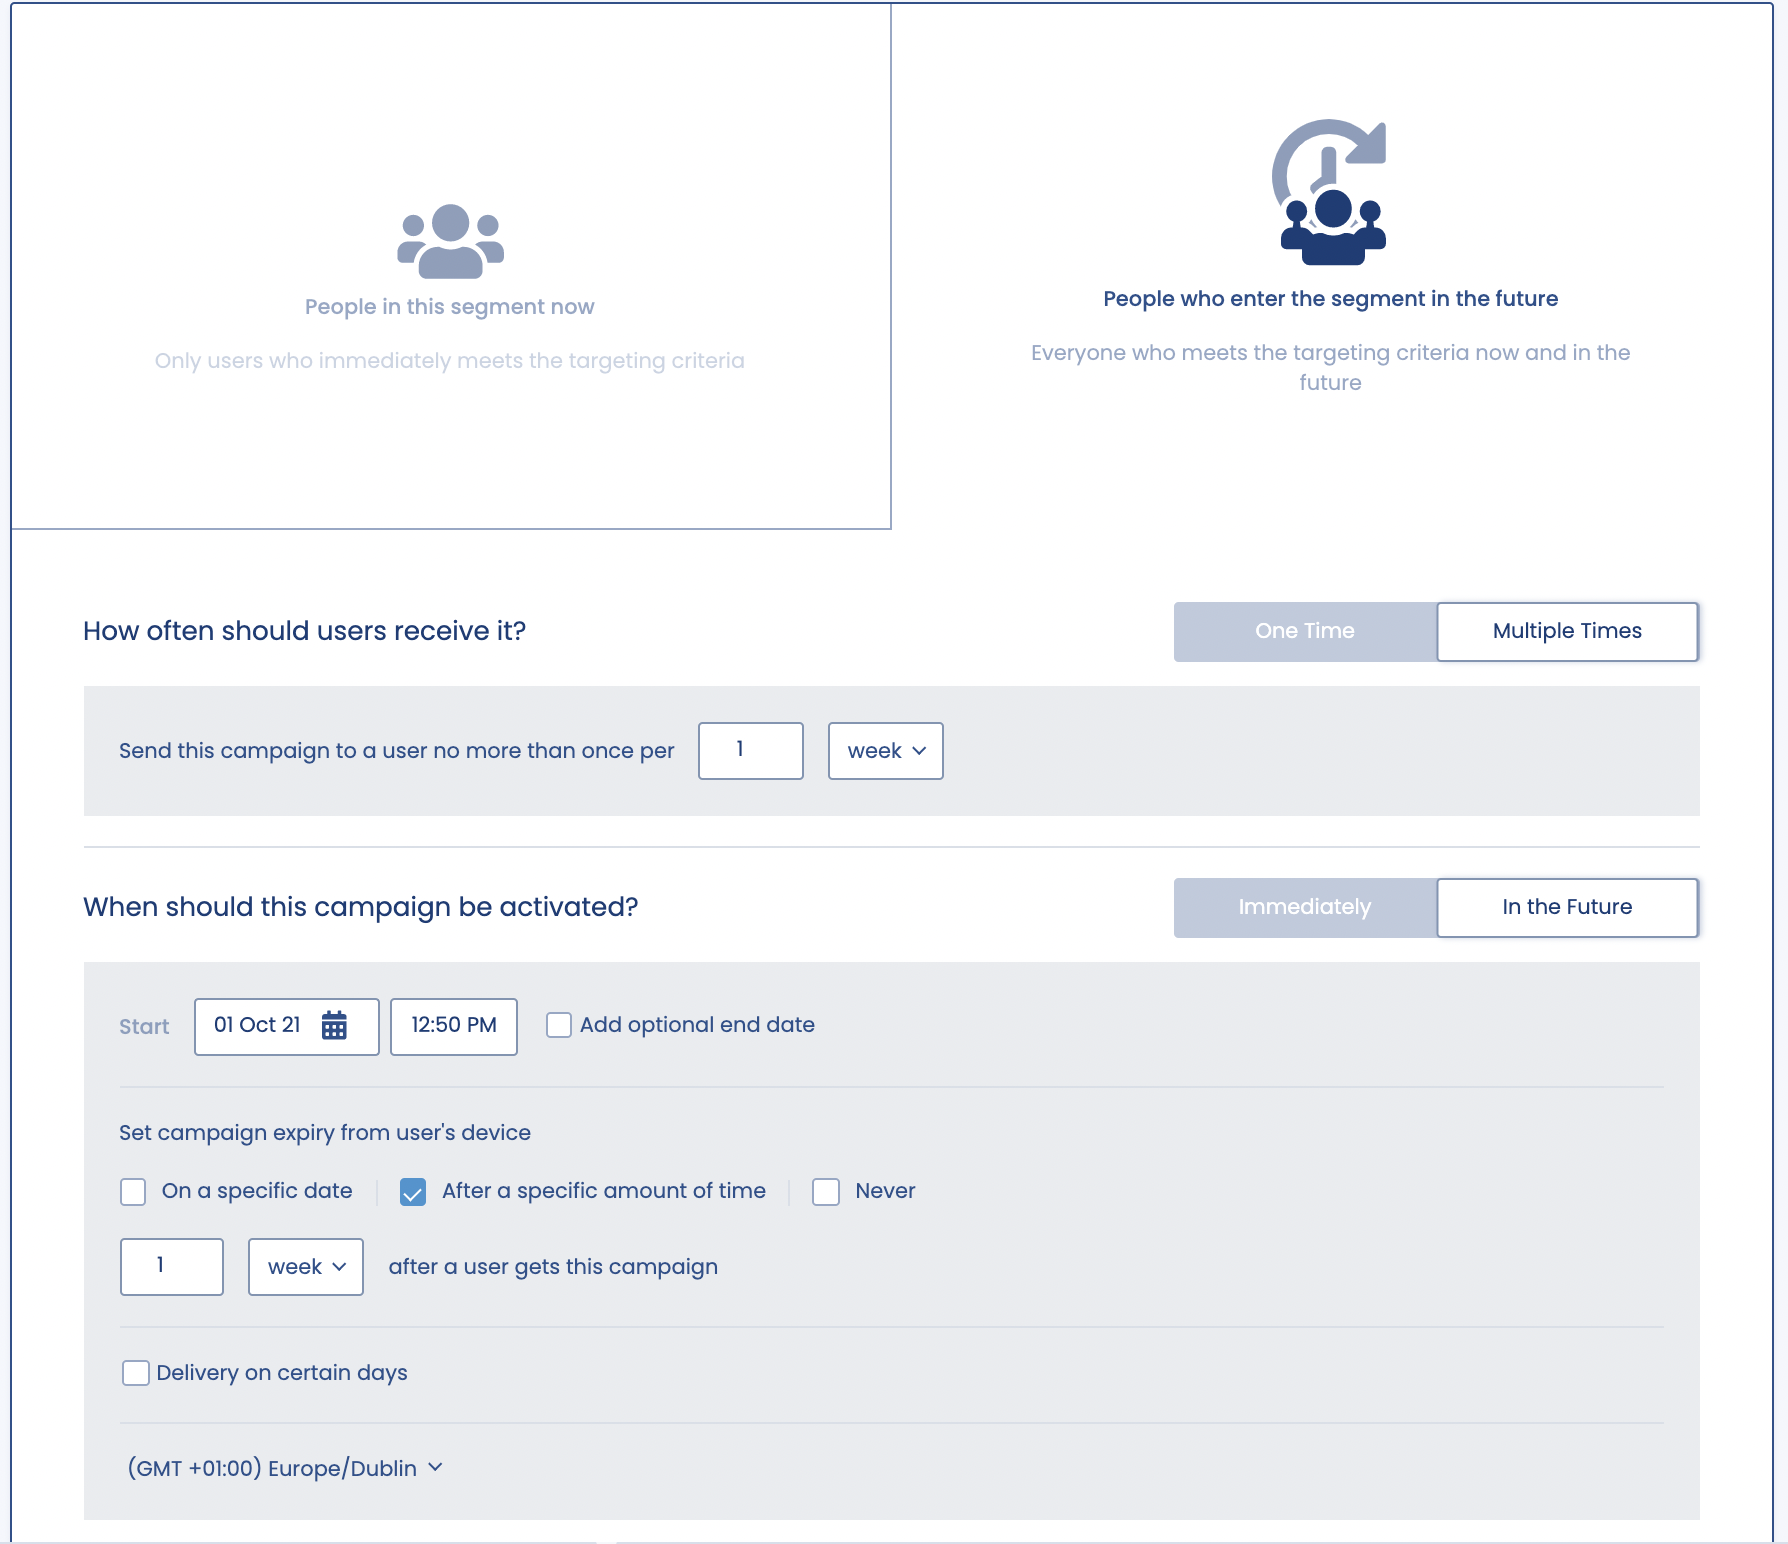
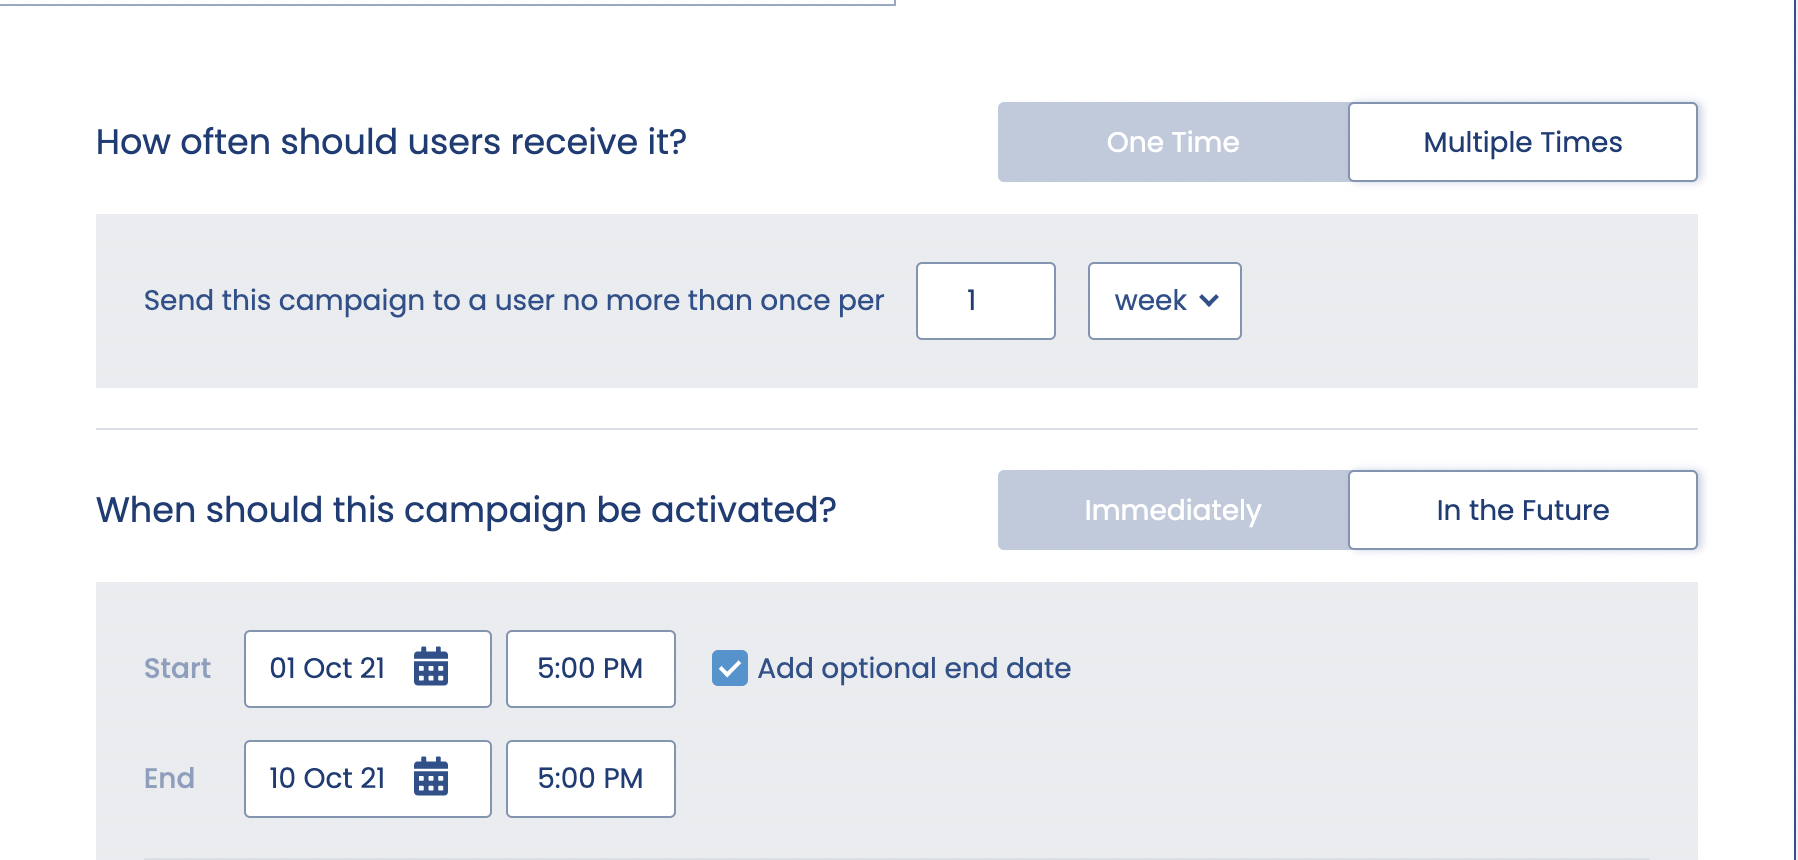
The final choice to make is to decide when the campaign should be scheduled. Choose Activate Immediately to send the campaign immediately or choose Schedule for the future to send the campaign at some point in the future. You can also choose here when the campaign should stop sending or whether it should continue until it is manually stopped. You can also choose to send your campaign in another timezone if you wish.
Pro Tip
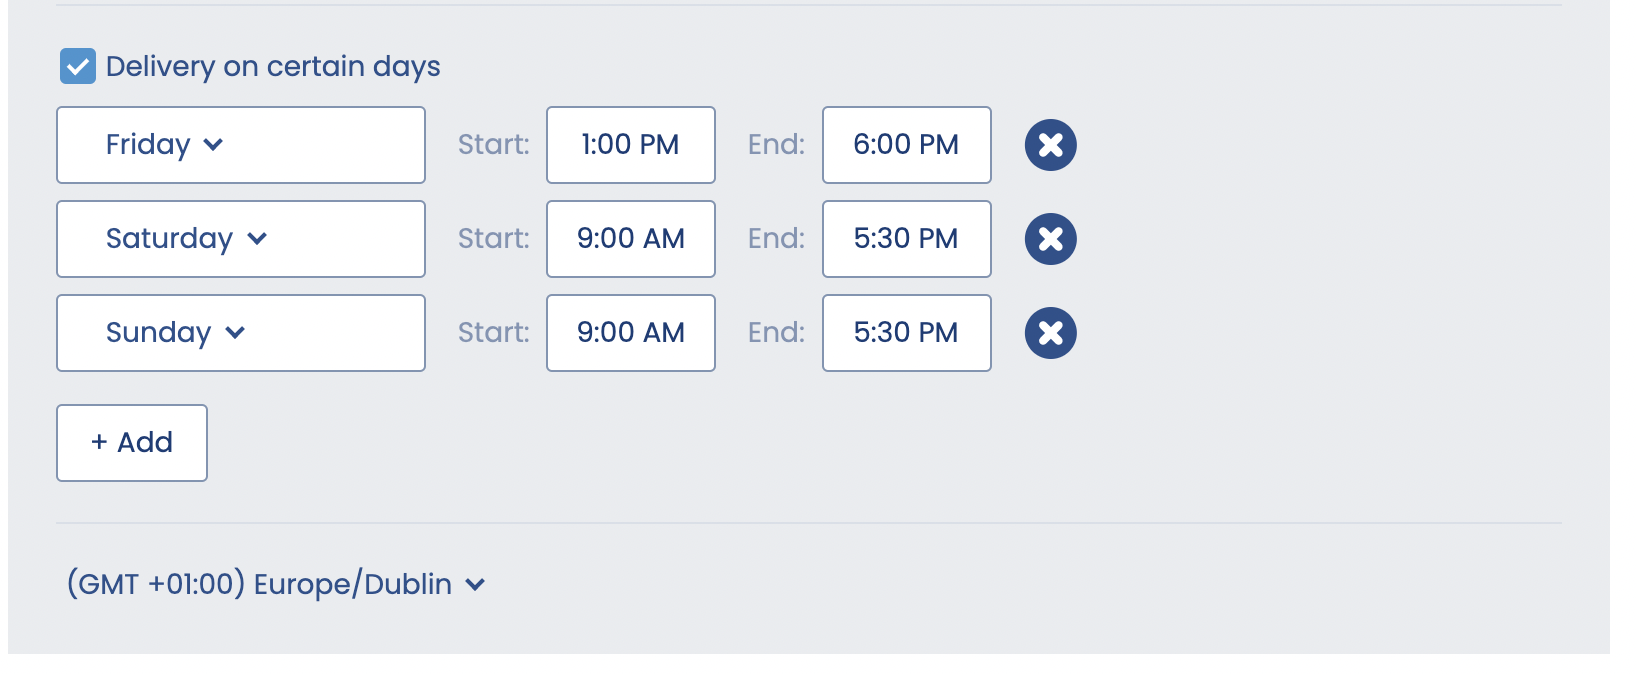
If you would like to sett your campaign to be delivered on certain times on specific days of the week, click Advanced Options and you can specify that by clicking the Deliver on certain days checkbox.
Delivery for Other Campaigns
If you wish to send a campaign based on the user entering or exiting a beacon or geofence or carrying out an in app event in your app and/ or combining those targeting types with a segment, you have slightly different targeting options. As users will be carrying out these actions in the future, you can only target people who will receive the campaign in the future.
The first choice to be made is whether this campaign is send to each user once or multiple times if they remain eligible for it. Choosing One Time is useful would be useful if you were sending a campaign that every user in that segment should get but only once. An example might be a Welcome Campaign which you would like to send every user once they enter a physical location but you only want to send it once even if the user leaves and re-enters the beacon or geofence region at some point in the future.
Conversely, you may want to send other campaigns multiple times to a user. An example might be a receipt for purchases the user makes, you may want to send that campaign to users every time they make a purchase and are added to that segment.
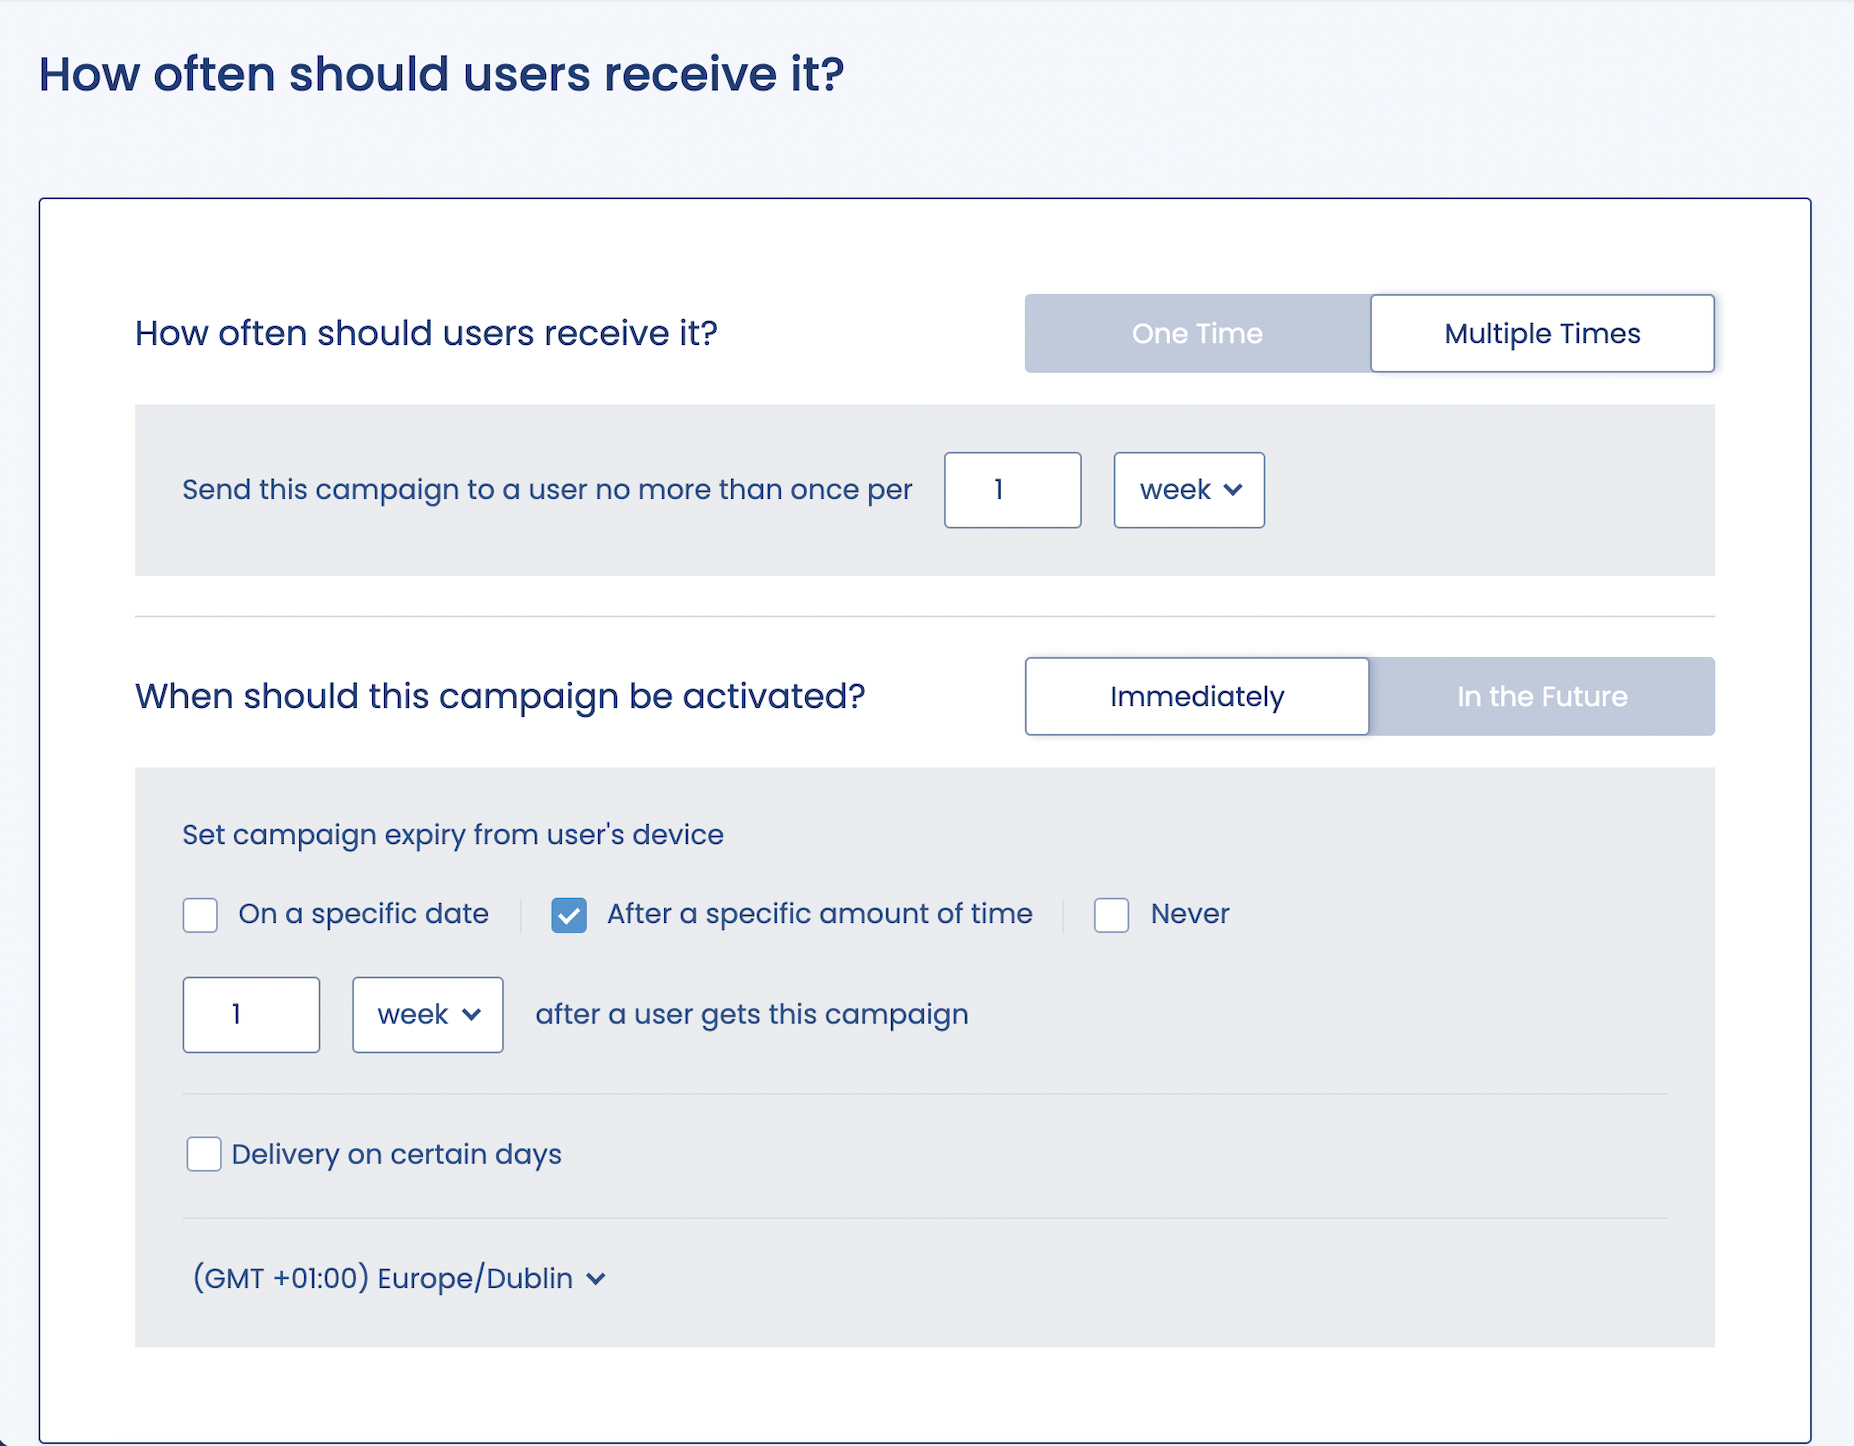
If you choose to send a campaign Multiple Times, you can set Campaign Limits to ensure that users do not get overloaded by campaigns. Campaign Limits adds a delay between users receiving this campaign. For instance, if you set the campaign limit to five minutes, users will only receive this campaign once every five minutes even if they are eligible to receive it more often than that.
The final choice to make is to decide when the campaign should be sent now or scheduled for some point in the future. Choose Activate Immediately to send the campaign immediately or choose Schedule for the future to send the campaign at some point in the future. You can also choose here when the campaign should stop sending or whether it should continue until it is manually stopped. You can also choose to send your campaign in another timezone if you wish.
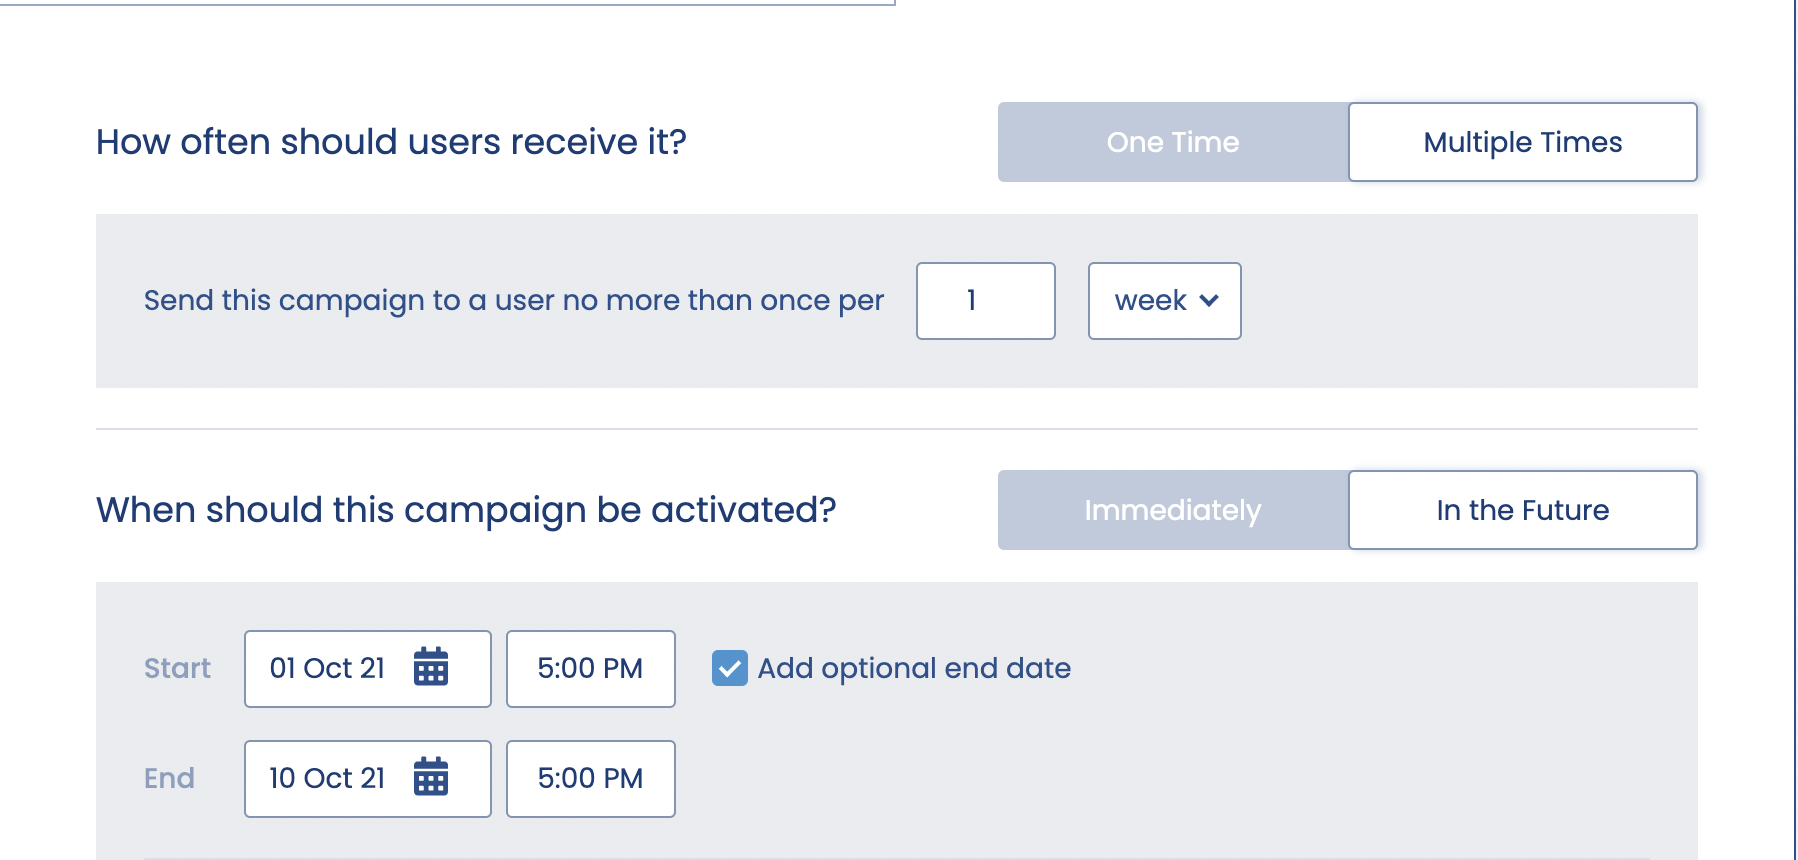
Be Careful
Please ensure that you add an end date if you want this card to be removed from the feed at some point in the future. It will not be possible to change this after the campaign is sent.
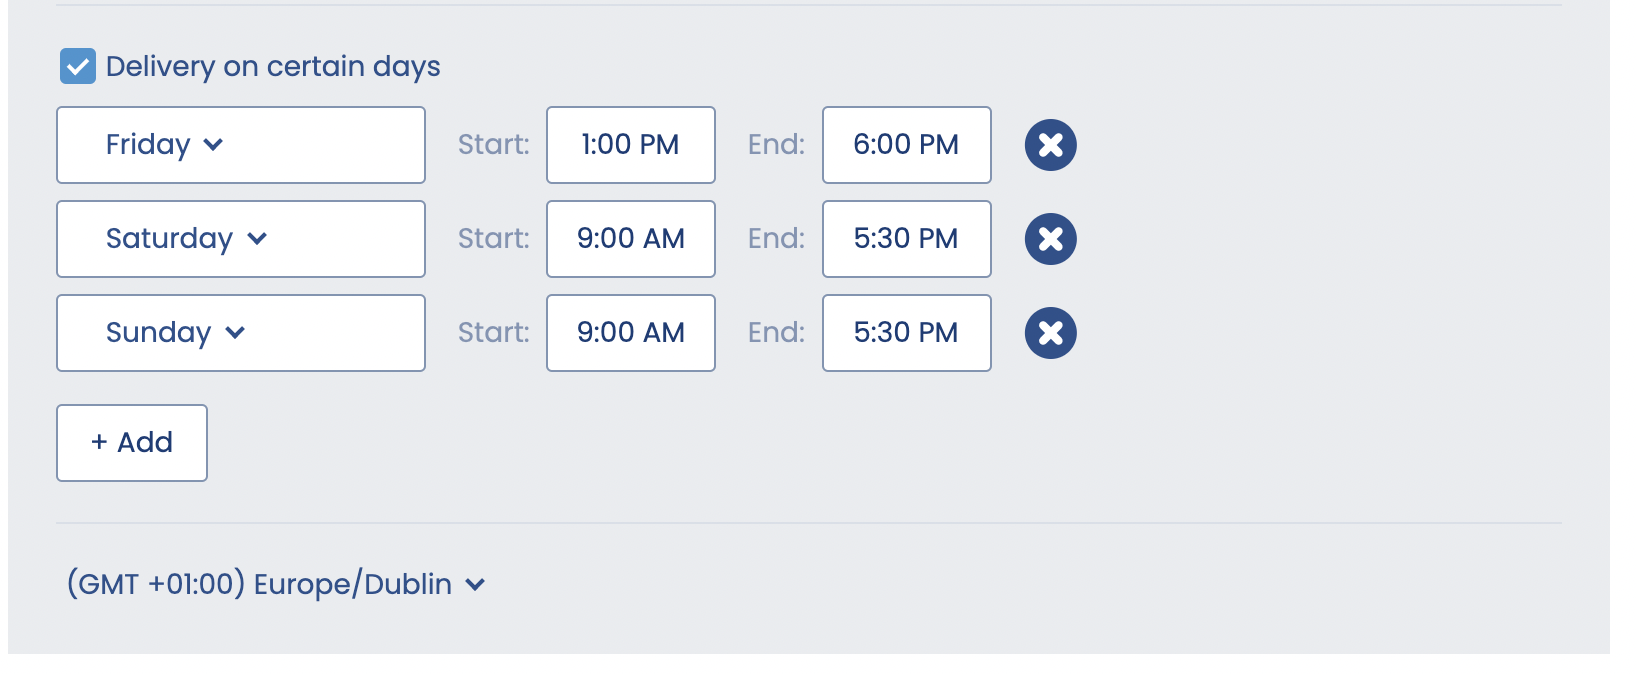
Pro Tip
If you would like to sett your campaign to be delivered on certain times on specific days of the week, click Advanced Options and you can specify that by clicking the Deliver on certain days checkbox.
7. Review and activate the campaign
Congratulations, your campaign is almost ready to be sent. Before you send it, Pulsate enable you to review everything that you have set up one last time so that you can make sure that everything is perfect.
The first thing you will notice on the Review page is the key parameters for this campaign which are what app the campaign is being sent for, the estimated reach of the campaign and when the campaign will be sent.
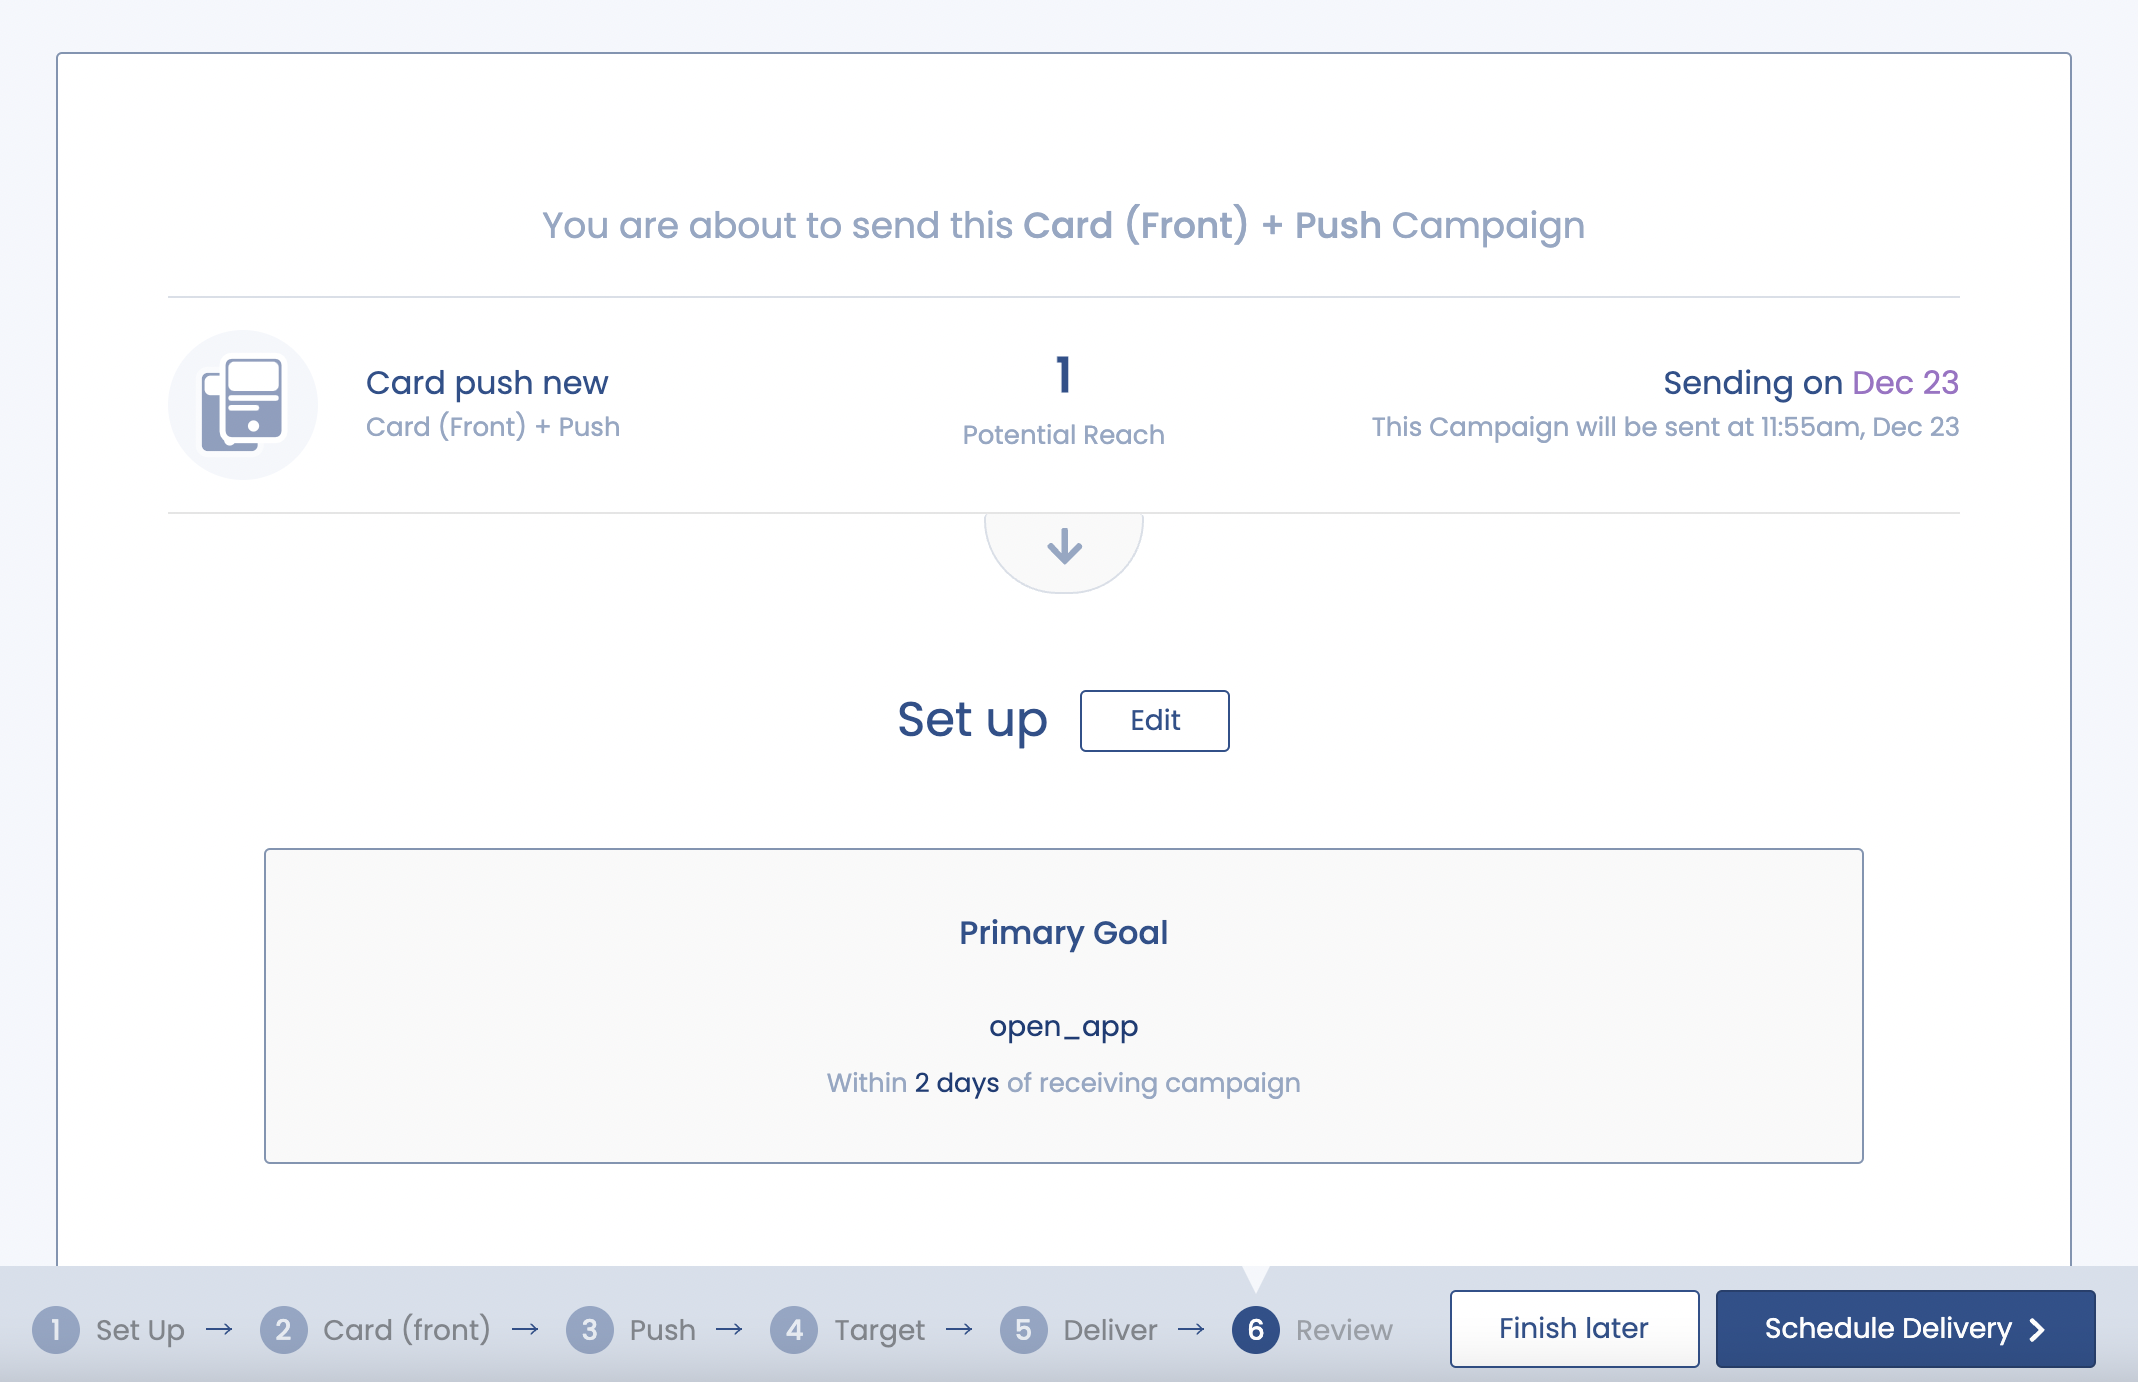
As you scroll down through the rest of the review page, you will be able to check the other details that you have set for that campaign including the Notification, Targeting and Delivery Options. If you see anything that you would like to change, you can quickly jump to that section by pressing the back button located at the bottom of the page.
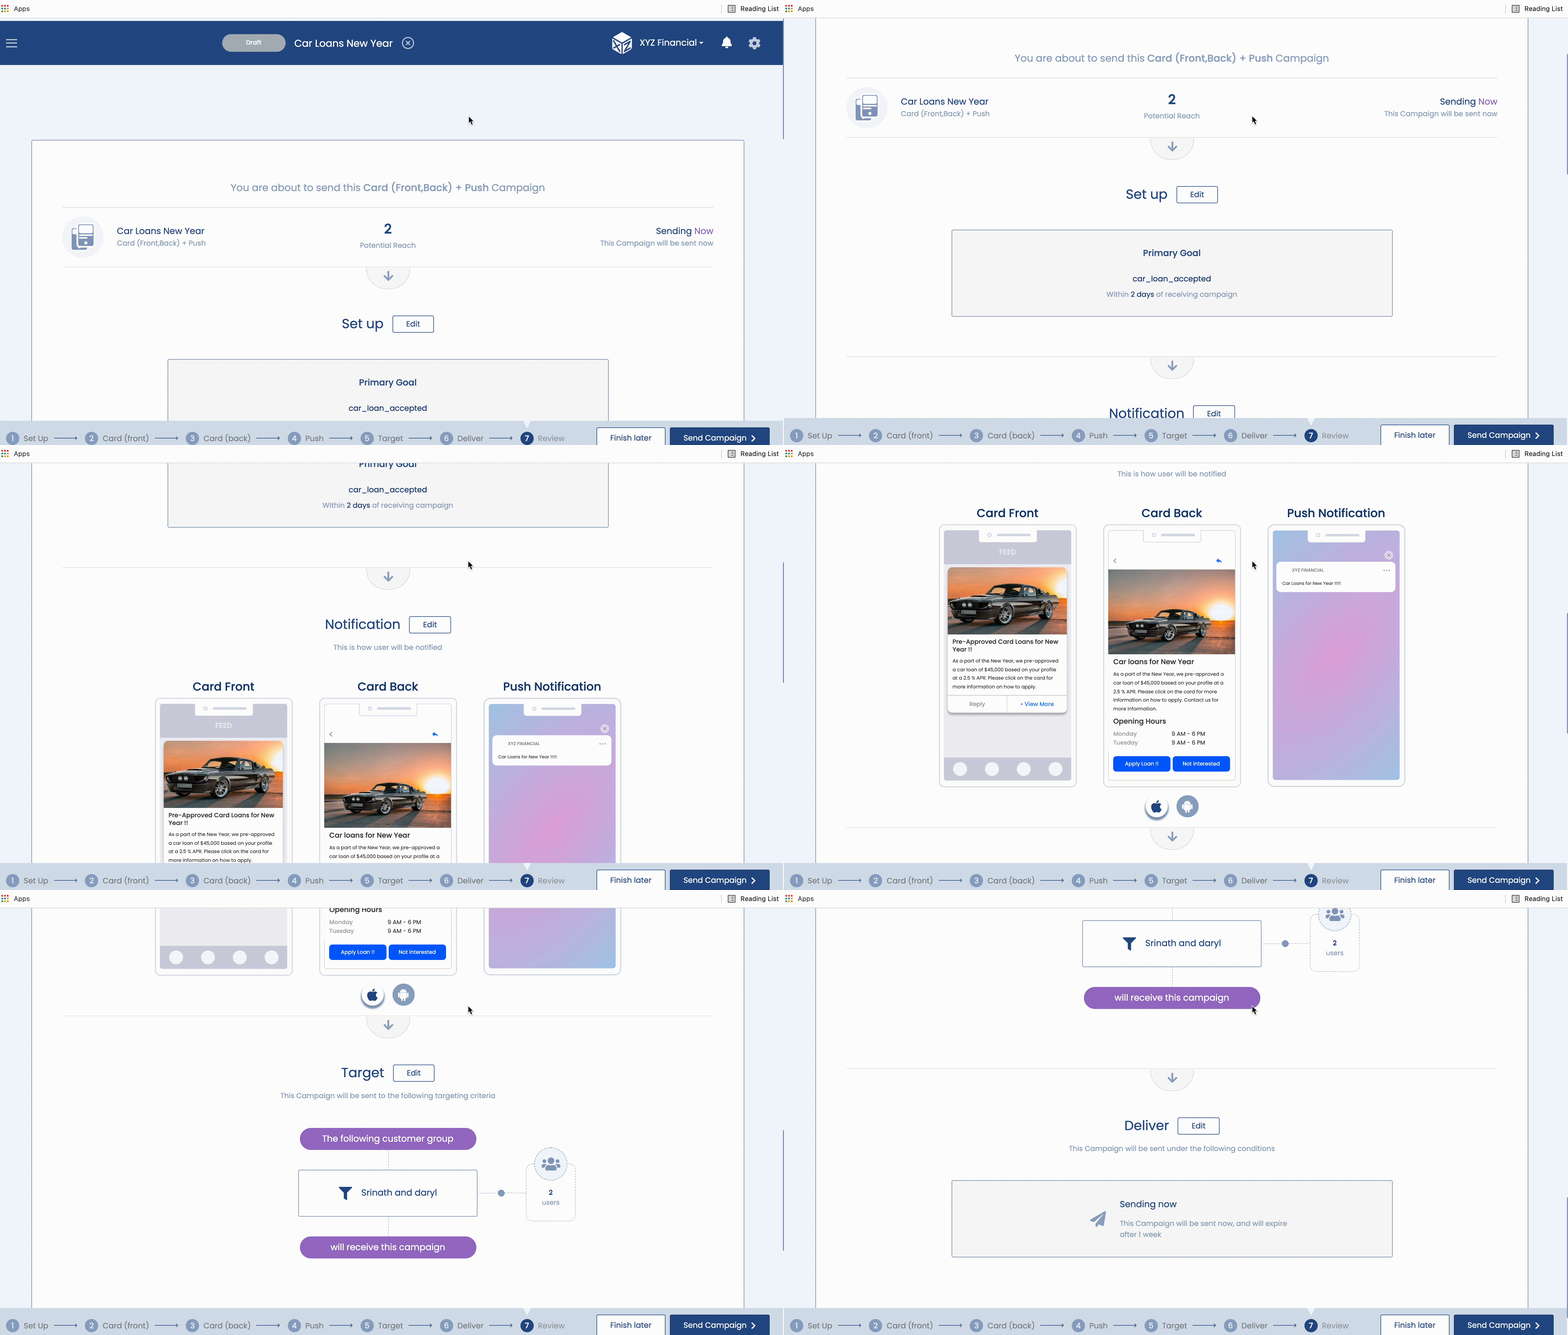
Once you are happy with all of the parameters that you have set for the campaign, you are ready to send it. To send the campaign press the Activate Campaign button at the bottom of the screen. You will be asked to confirm that you wish to send the campaign. If you are ready to send, press Activate Campaign and your campaign will be activated and sent when you have specified.
Remove cards from feed on users devices
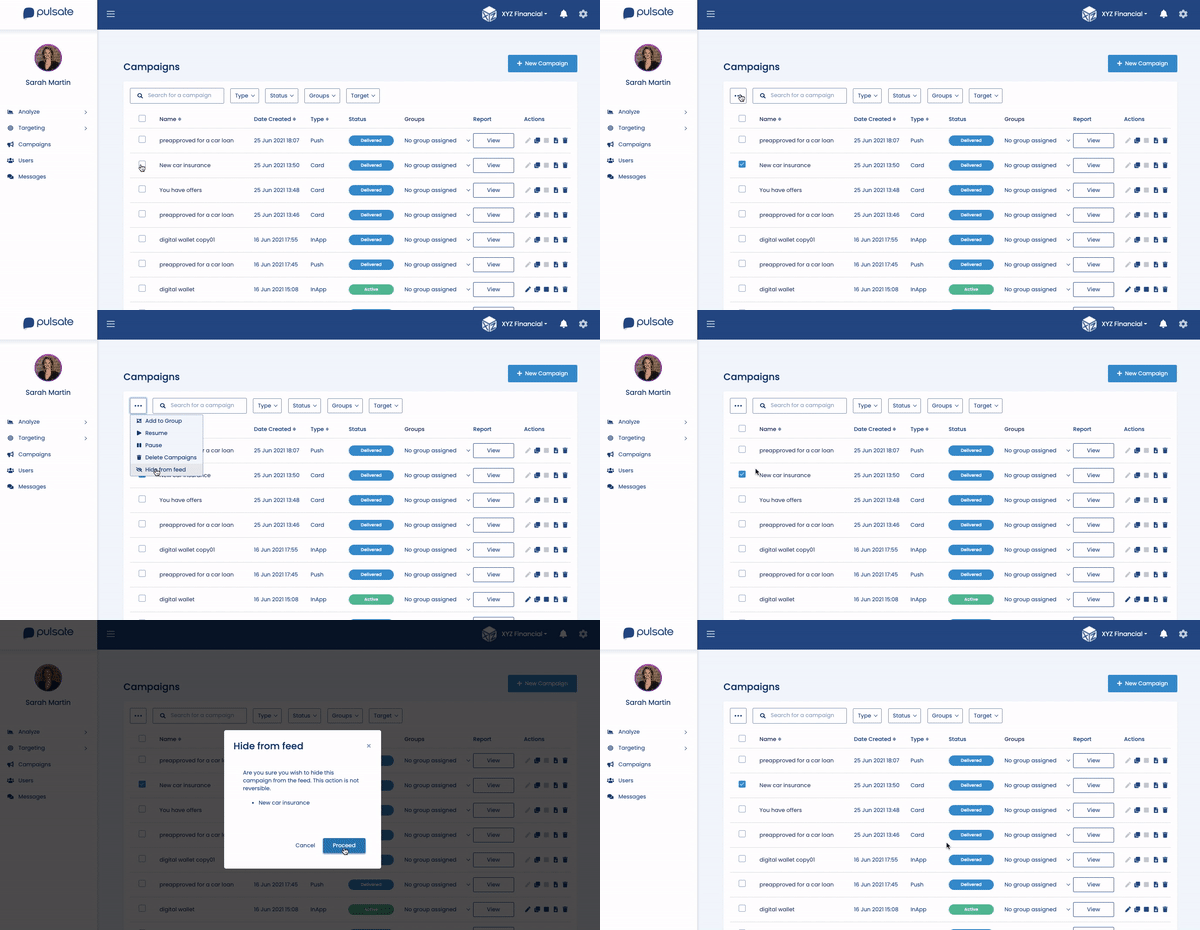
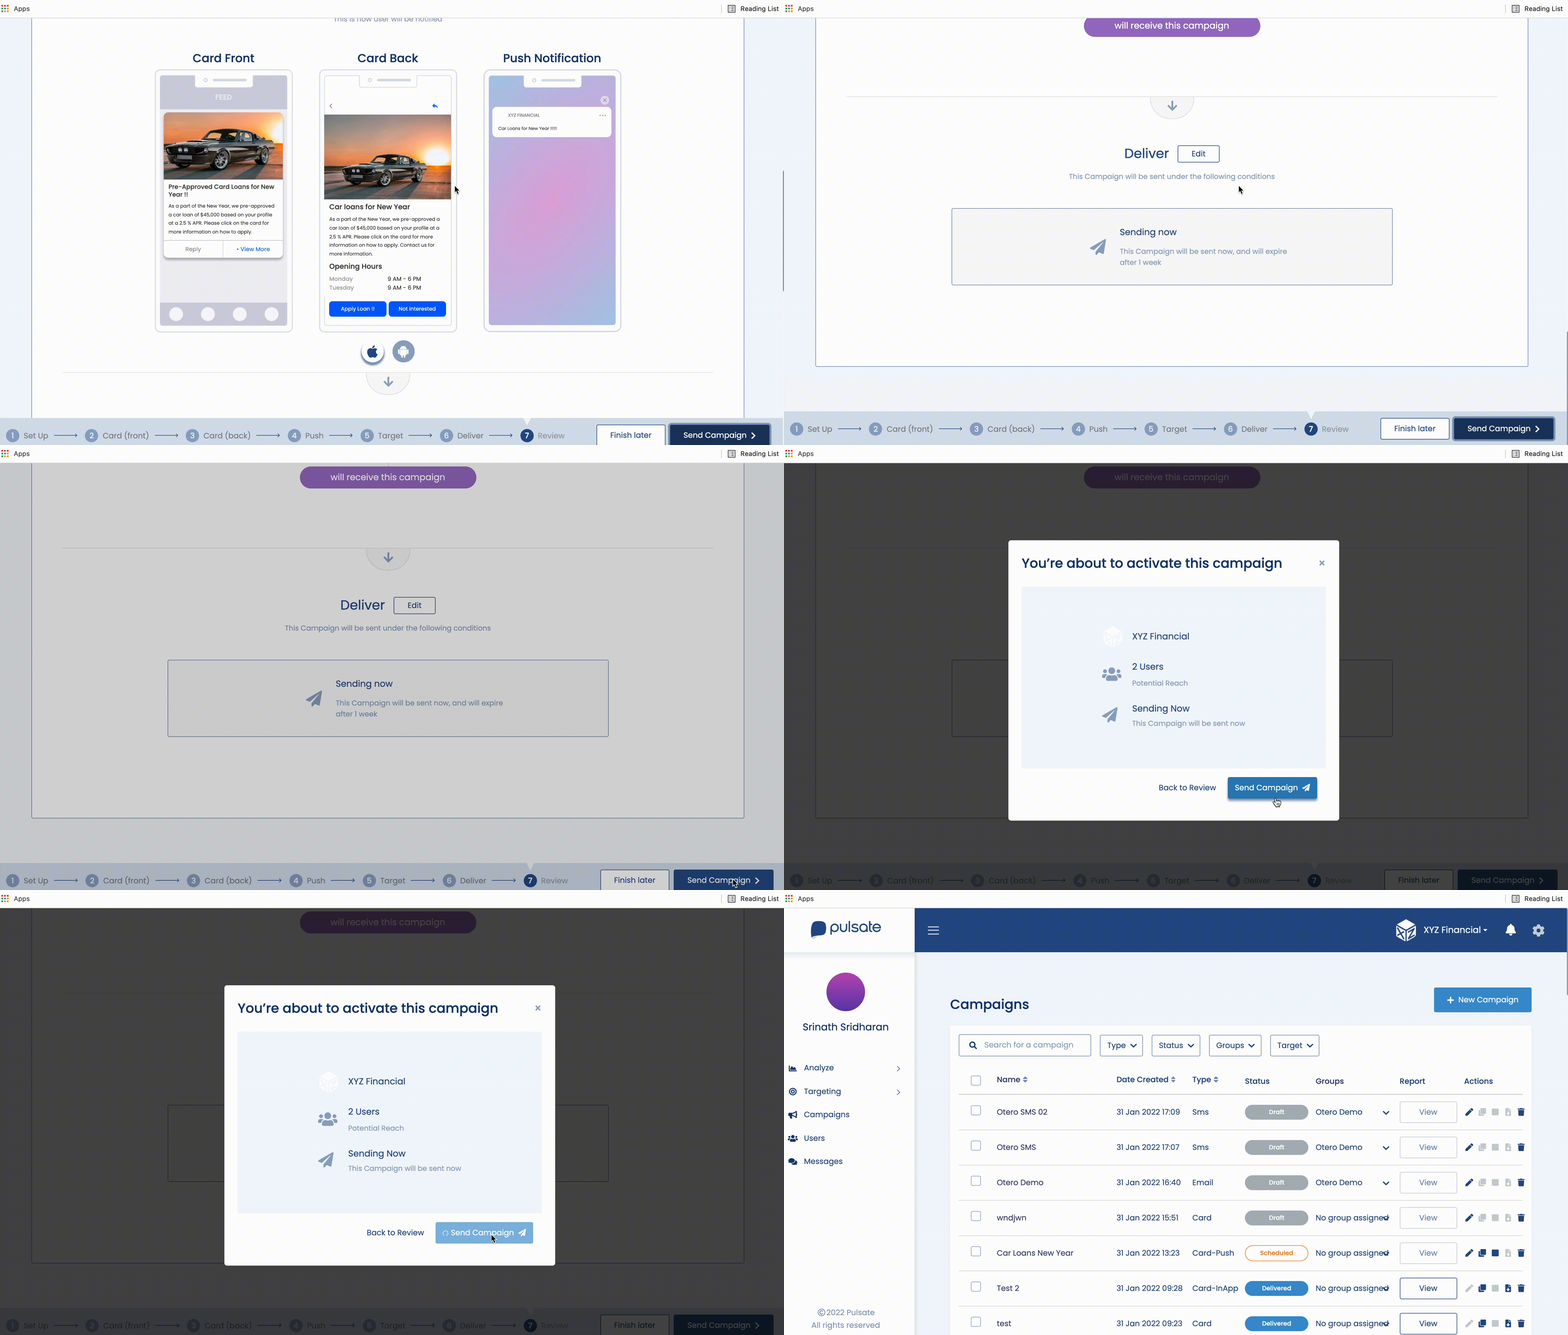
To remove cards from the user feed select the campaign, Advanced menu with 3 dots will appear in the left top corner of the list. Click on the advanced menu button and from the dropdown menu select "Hide from feed" button. A confirmation modal will pop up. Click "Proceed".
Please Note
Cards can be hidden only for delivered campaigns
