What is a Journey?
A Journey pertains to using automation to send out notifications and/or emails when the user sets off specific triggers. The advantage is you can set up a journey that targets users on their channel of choice, serving them the content they need at the right time at the right place.
Create a Journeys campaign
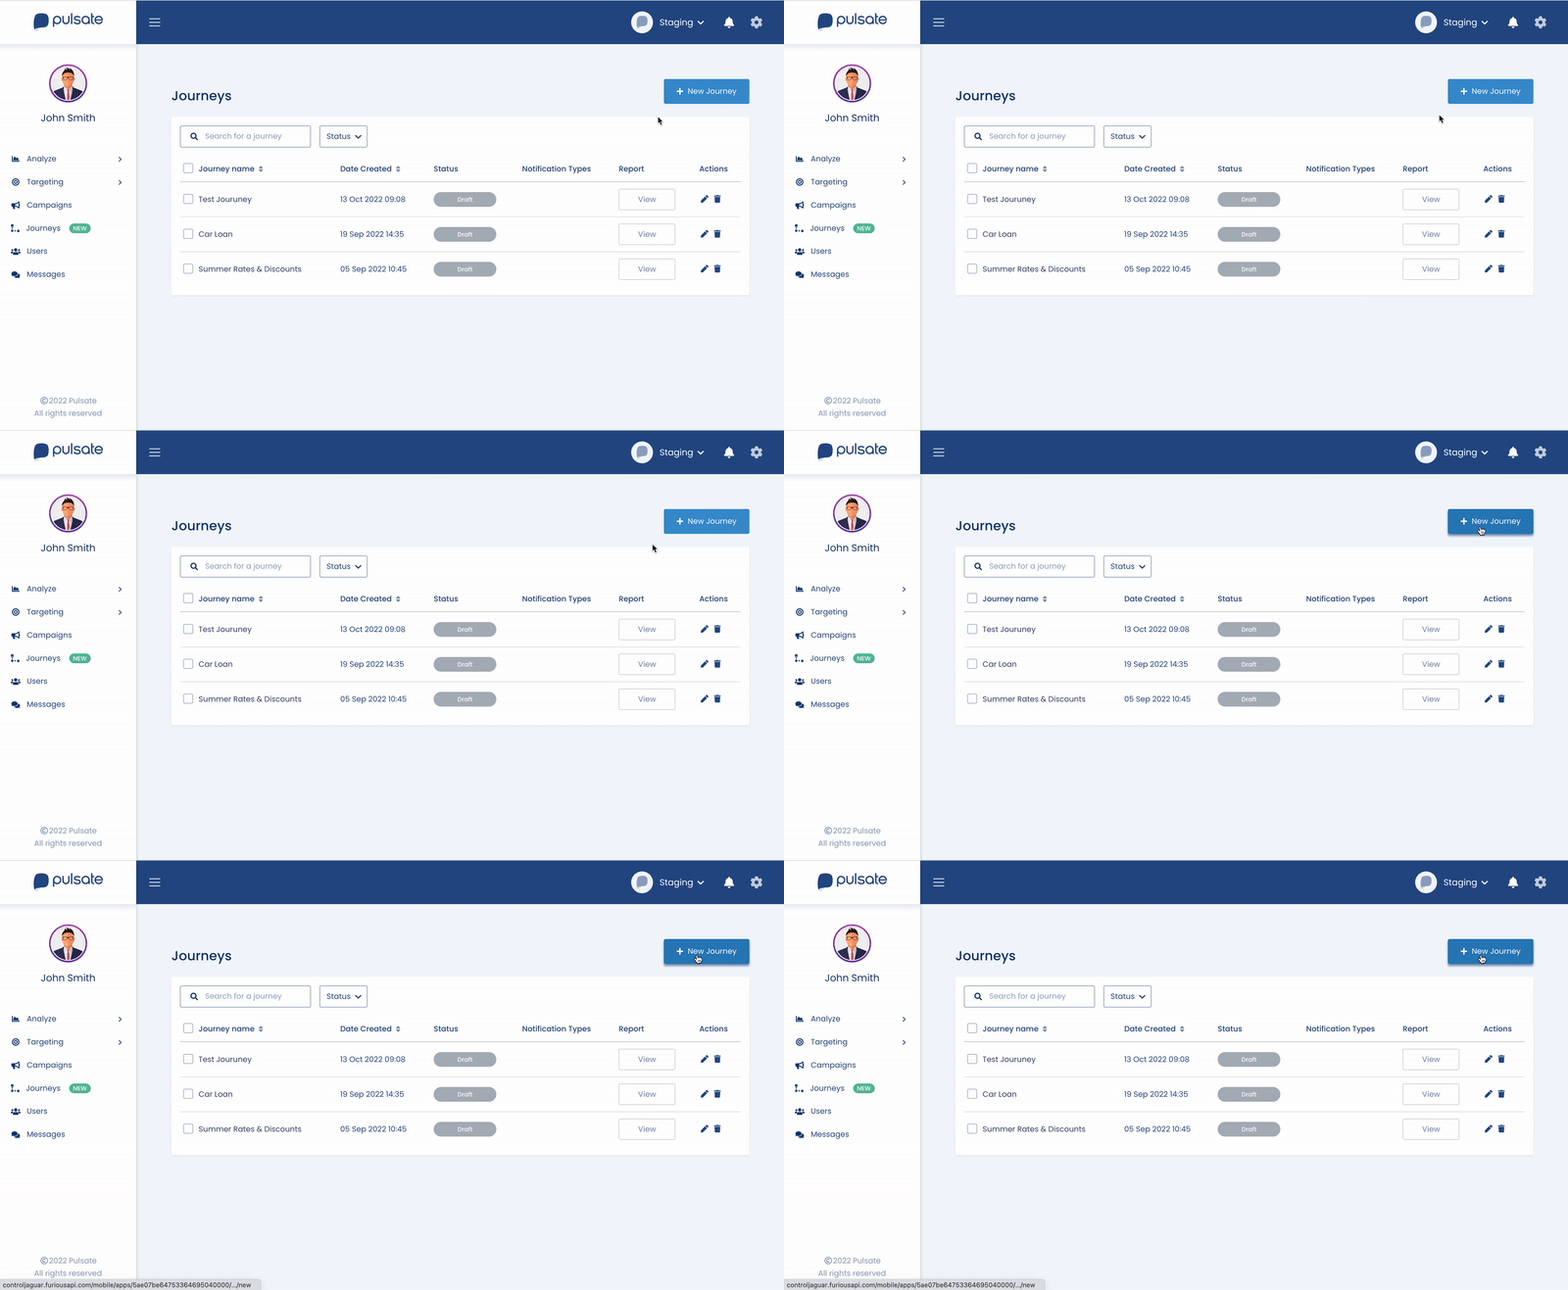
Step 1: Navigate to the Journeys Tab
To create a journey, click on New Journey, you will then be given the option to choose a journey template.
Step 2: Choose a Template
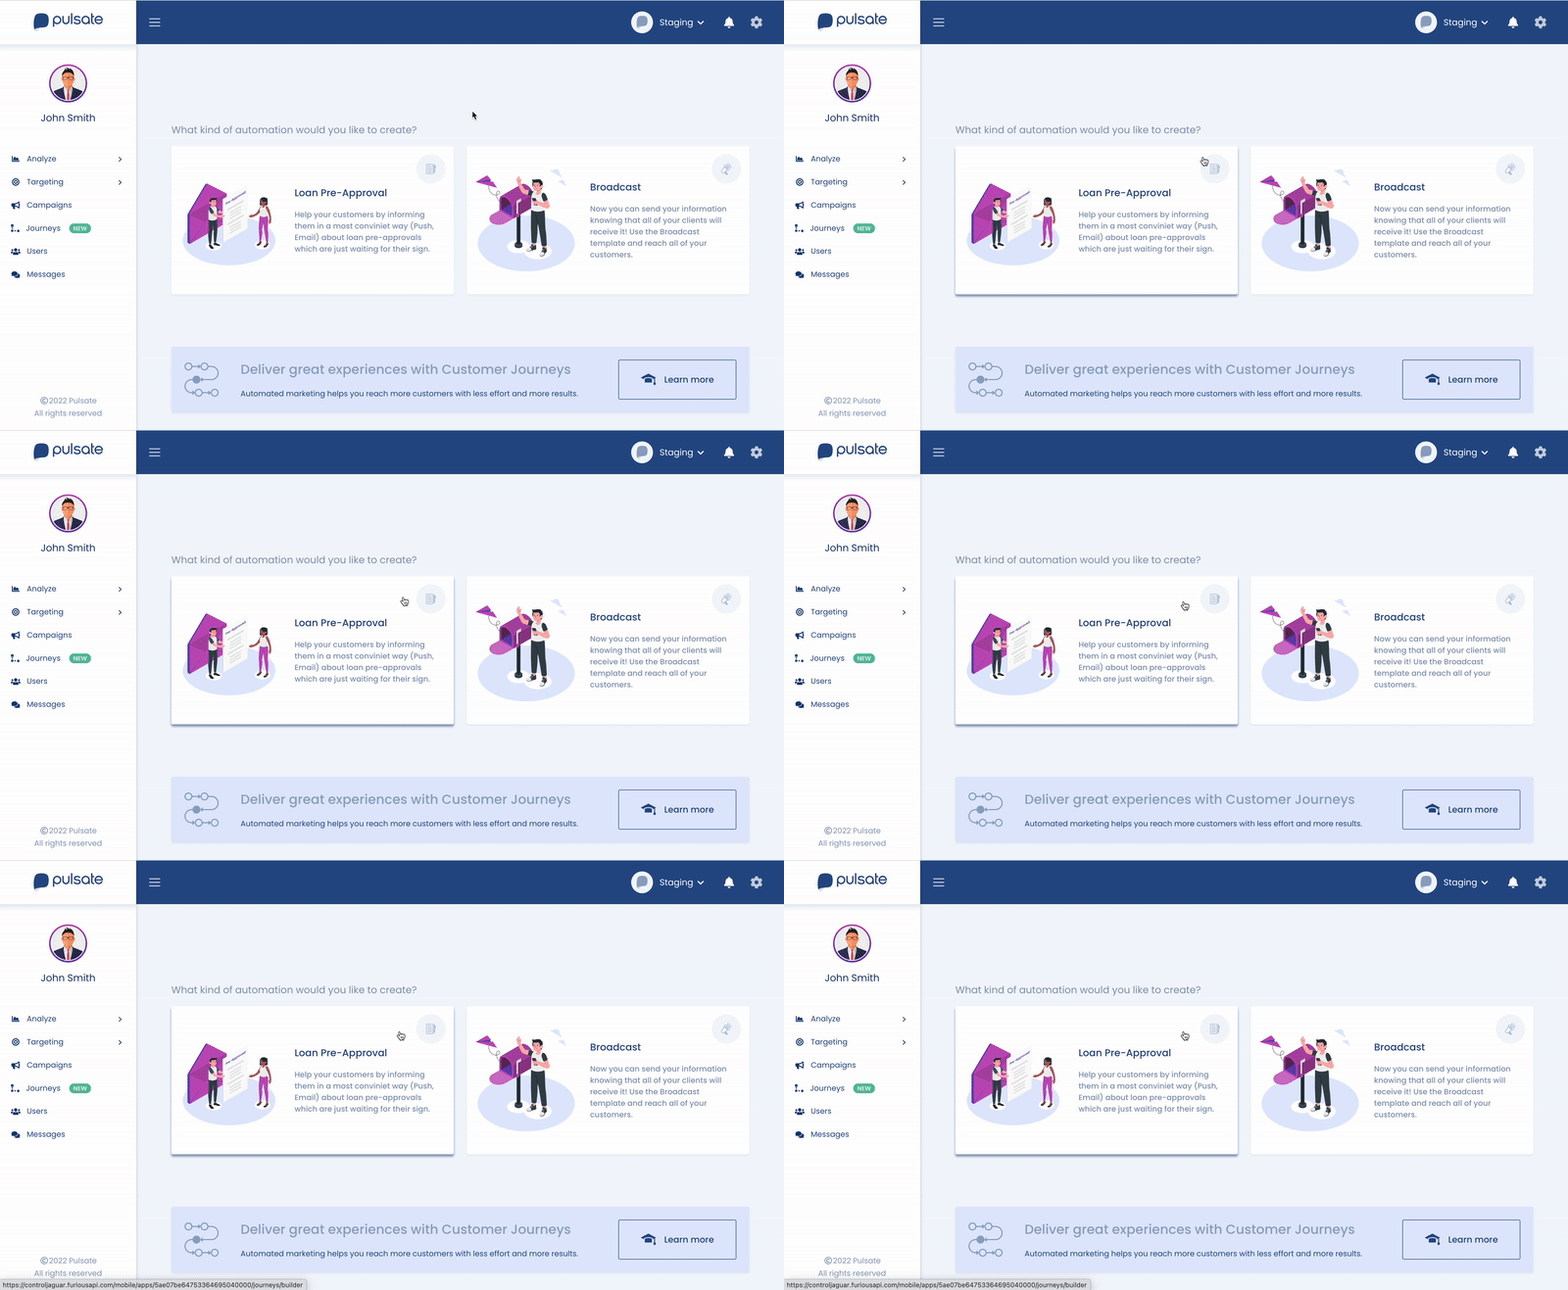
Choose a template from the grid, for example, ‘Checking Account’ or 'HELOC'. This template provides the building blocks for the journey.
Step 3: Journey Creation
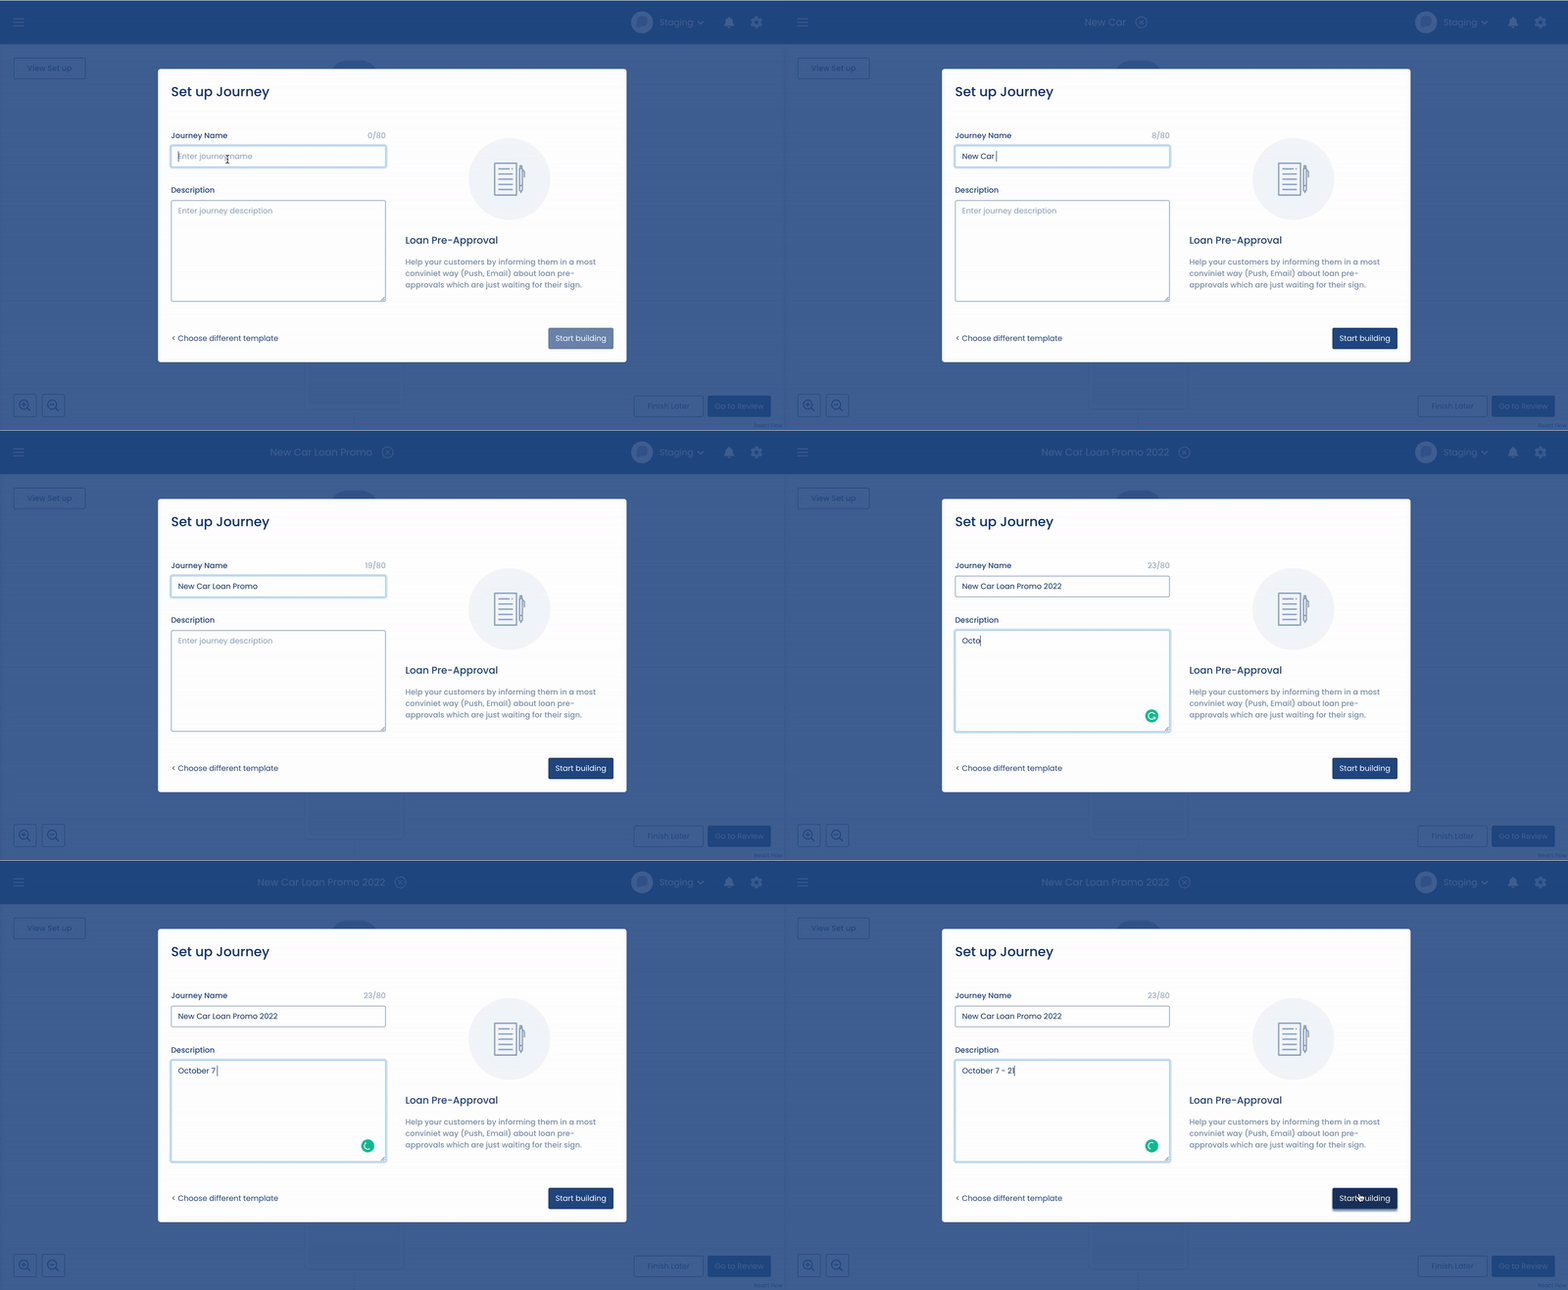
Once you choose a template a pop-up box will appear for you to give a name and description of the journey. The name and description will only be visible internally and will not be visible to targeted audiences.
Give the journey a name and description and continue by pressing start build.
If you wish to choose a different template before moving forward click ‘choose different template on the bottom left.
Step 4: Choosing a Segment
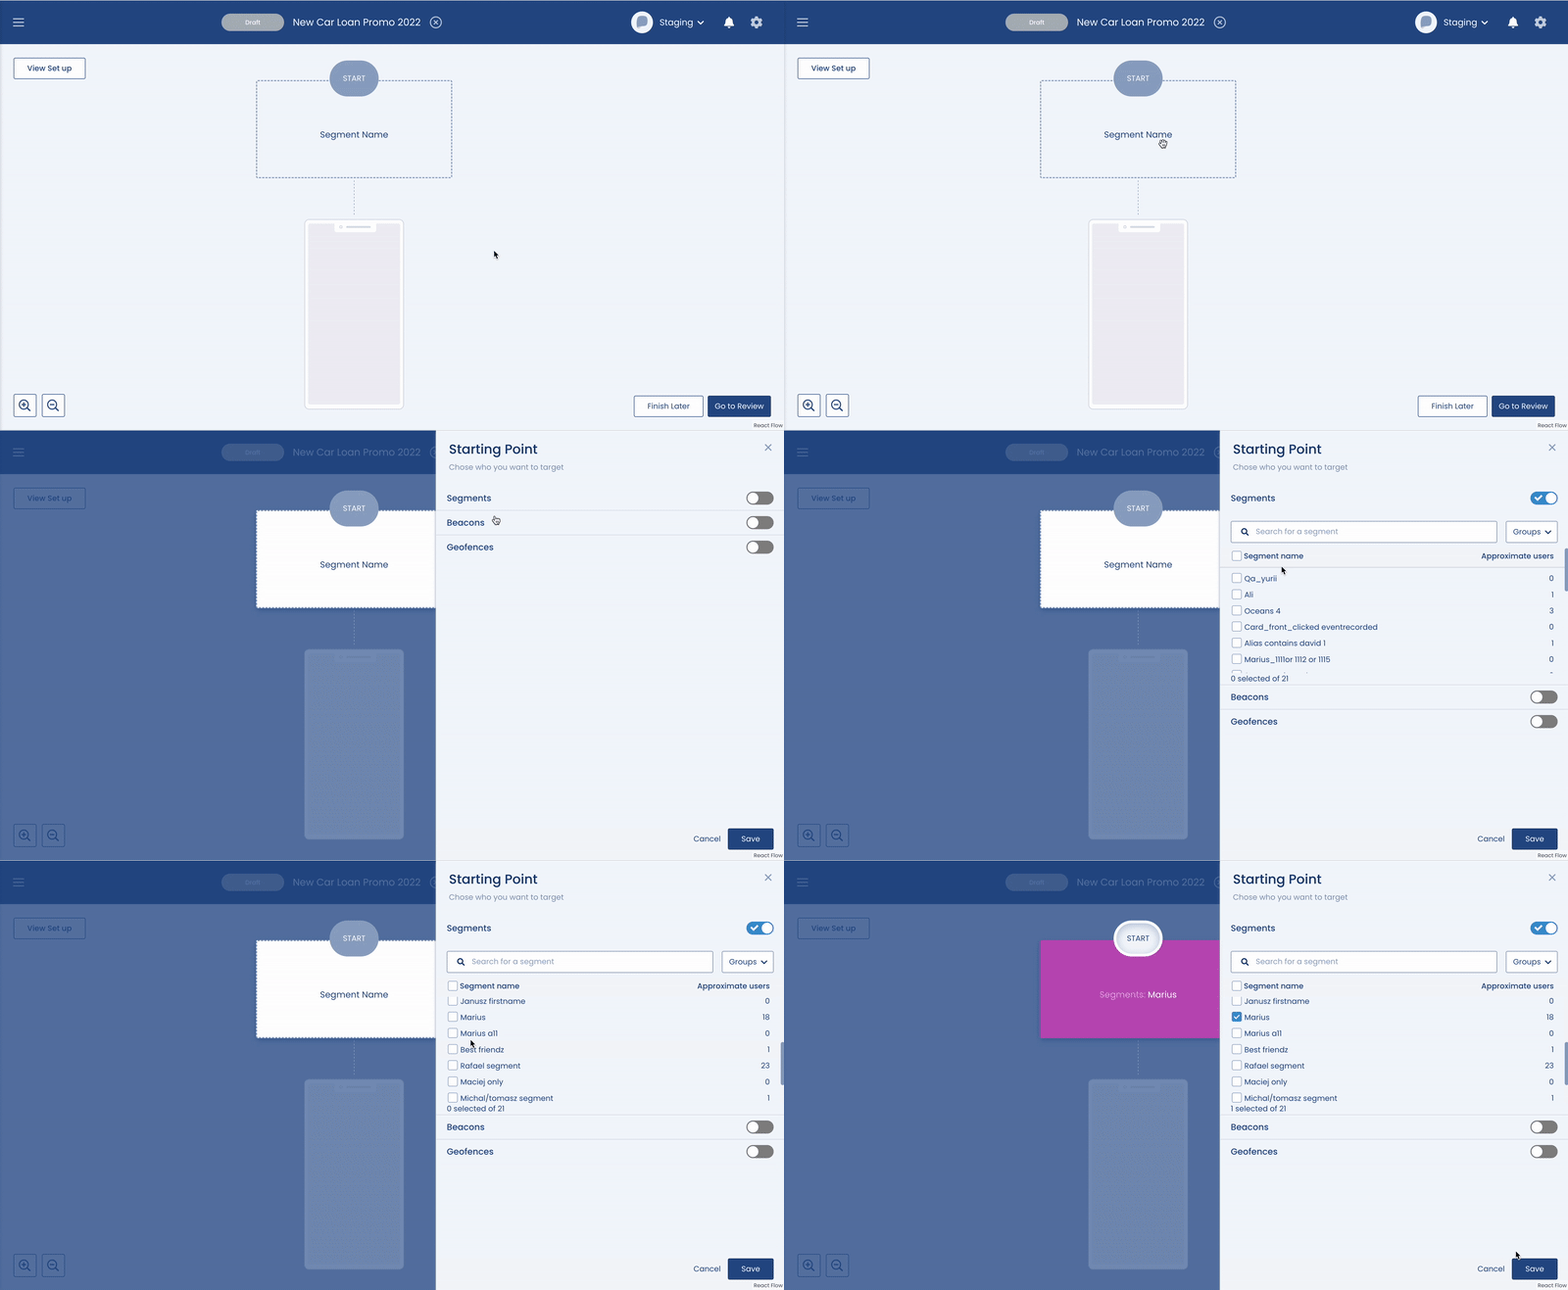
The first step of the journey is choosing the target audience. This is the audience for your journey and as much as possible it should be chosen based on the group of users that you believe will be most interested in this campaign based on their previous transaction history, current proximity to a physical location and/ or in-app actions that the users will take within your app.
In the segment section you can choose from the following parameters:
- Segments
- Beacons
- Geofences
When you choose any of these parameters, the approximate number of recipients will be displayed on the right-hand side of the screen with an estimate of how many users the campaign will be sent to.
Save the segment to move to the next stage of the journey.
Step 5: Creating the Journey Messages
Now it’s time to create the messages for the journey!
Important: The order of the notifications is the order in which the notifications with be sent. If the first notification can not be sent we will try to send the following notification
For example, if the push notification is first and the user is opted out we will send out the next notification
The notifications can be rearranged by simply dragging and dropping.
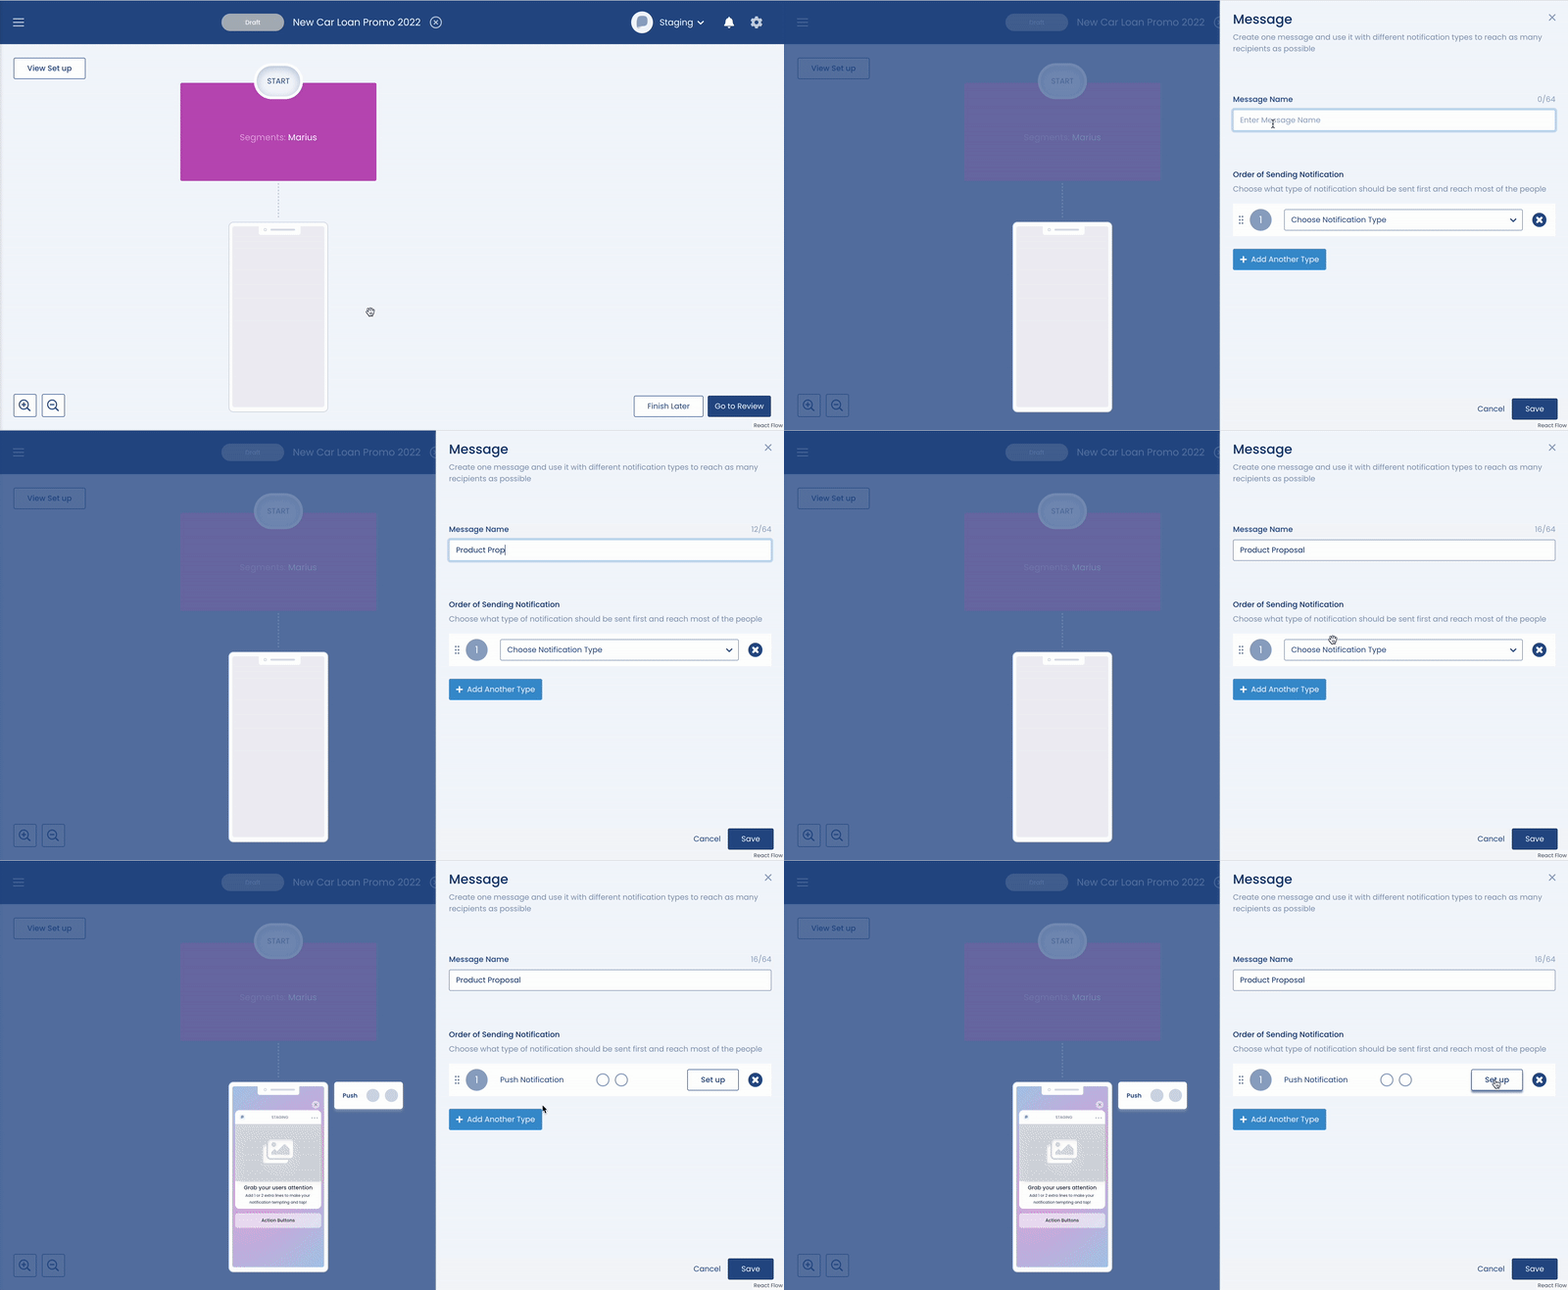
Push notification
- To create a push campaign follow the instructions here
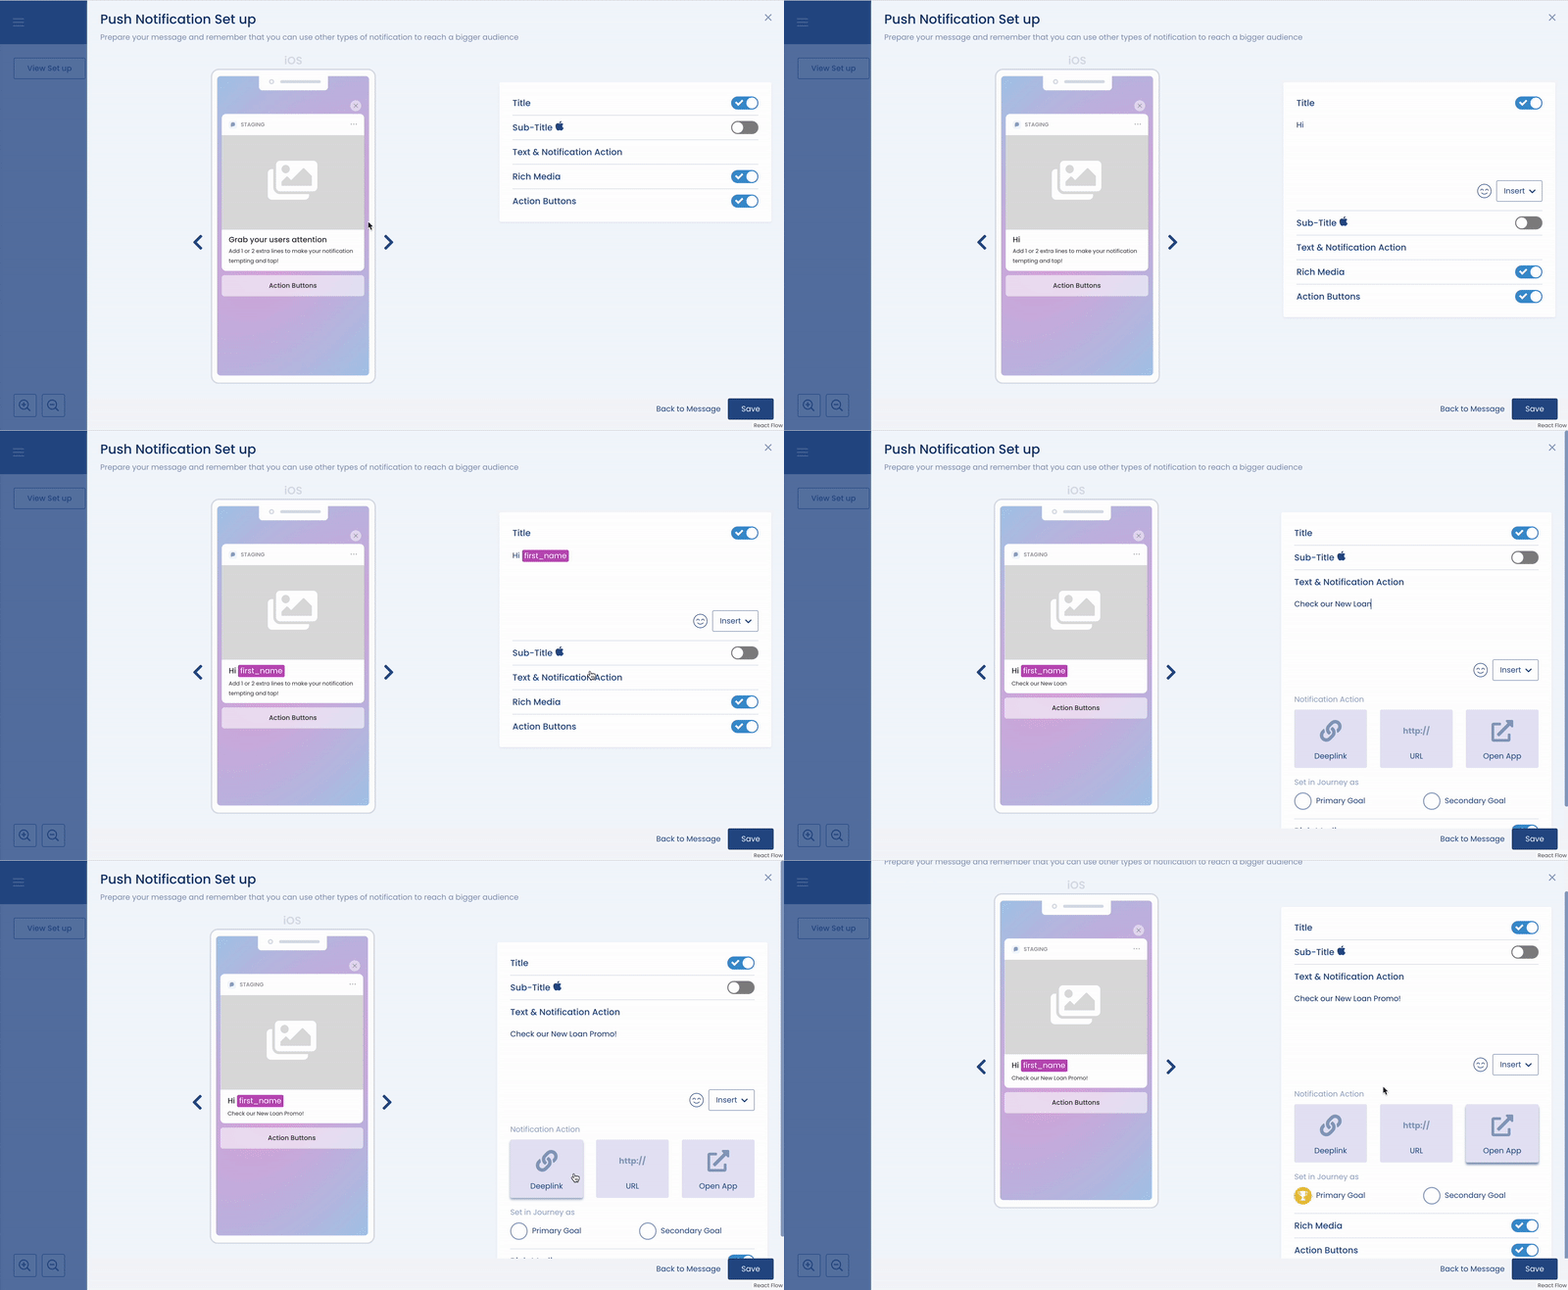
Primary Goals
You will assign a primary and a secondary goal for each campaign in the Journey. The Primary Goal is the intended CTA for the campaign, the Secondary Goal is the second intended CTA for the campaign.
Primary and Secondary Goals allow you to measure the success of a campaign. The analytics against these goals will be available in the campaign dashboard. More information on the campaign dashboard can be found below under reporting.
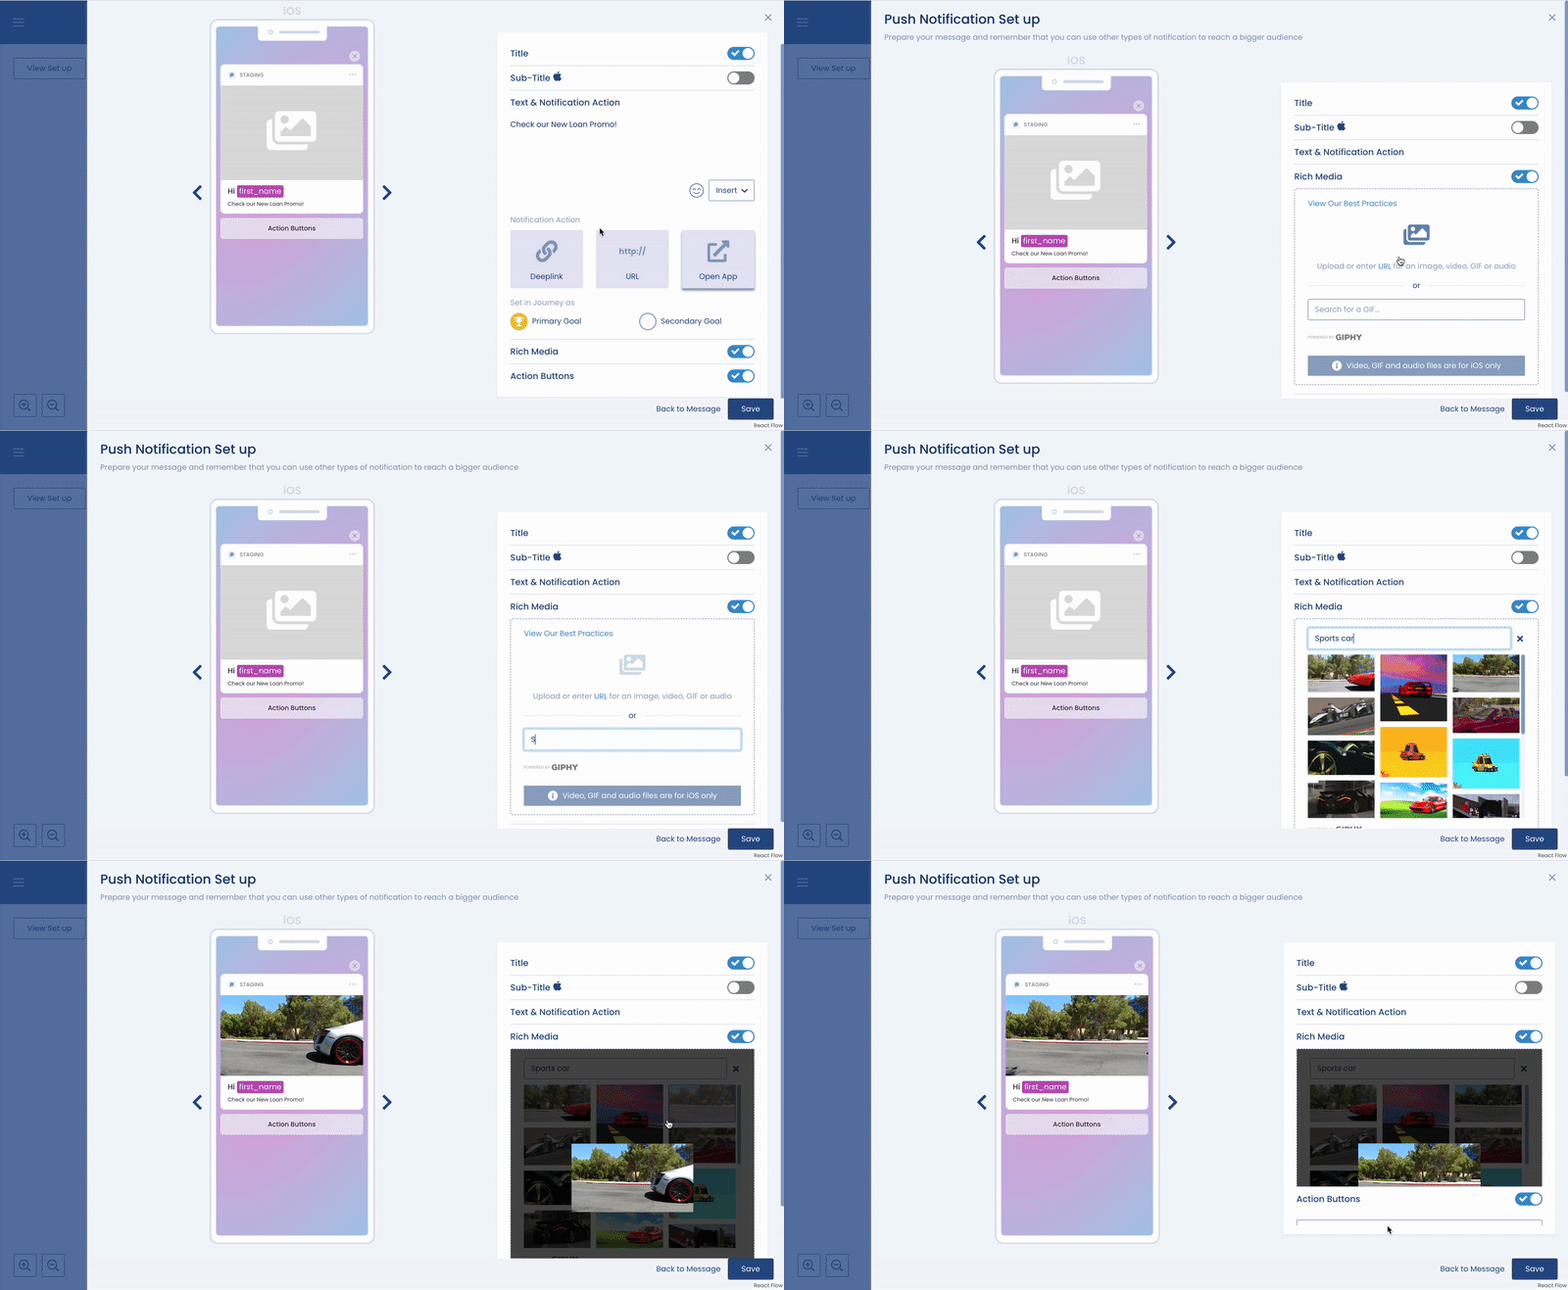
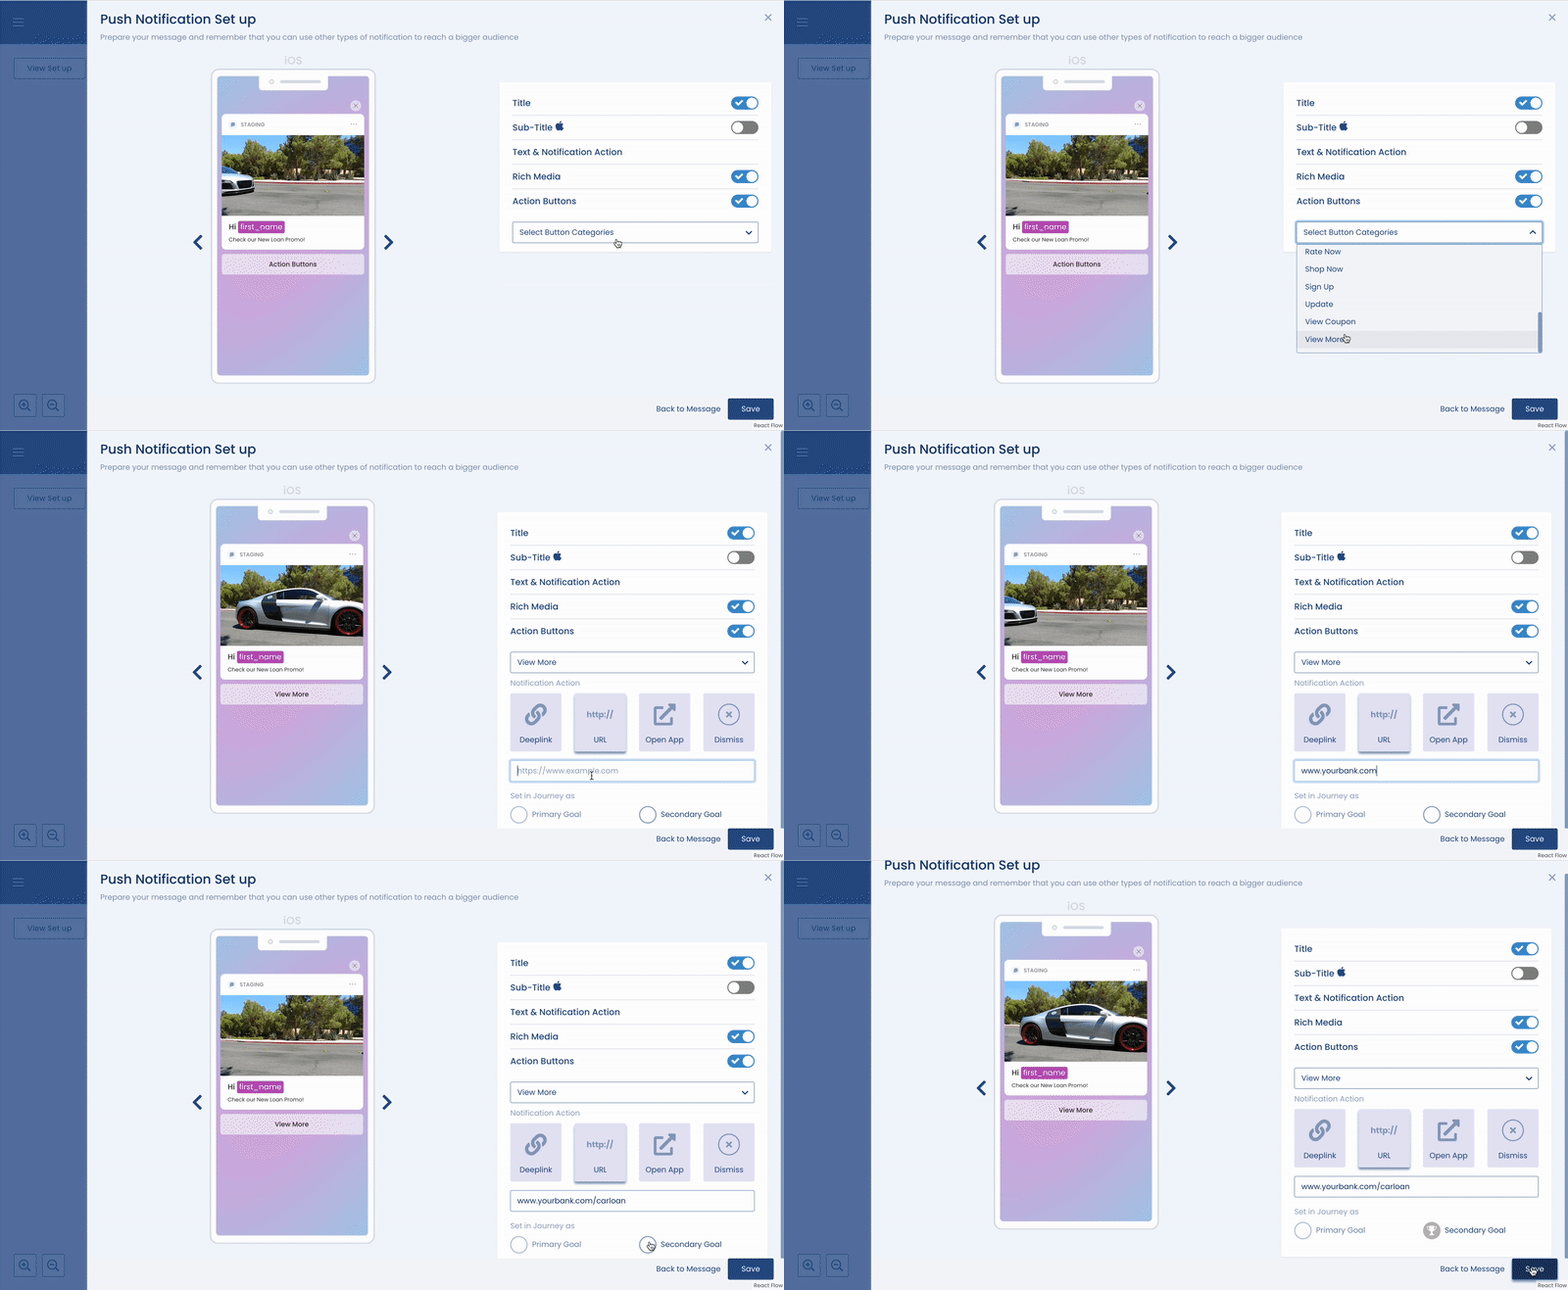
Email
- To create an Email follow the instructions here
Step 6: Split Conditions
What is a Split Condition?
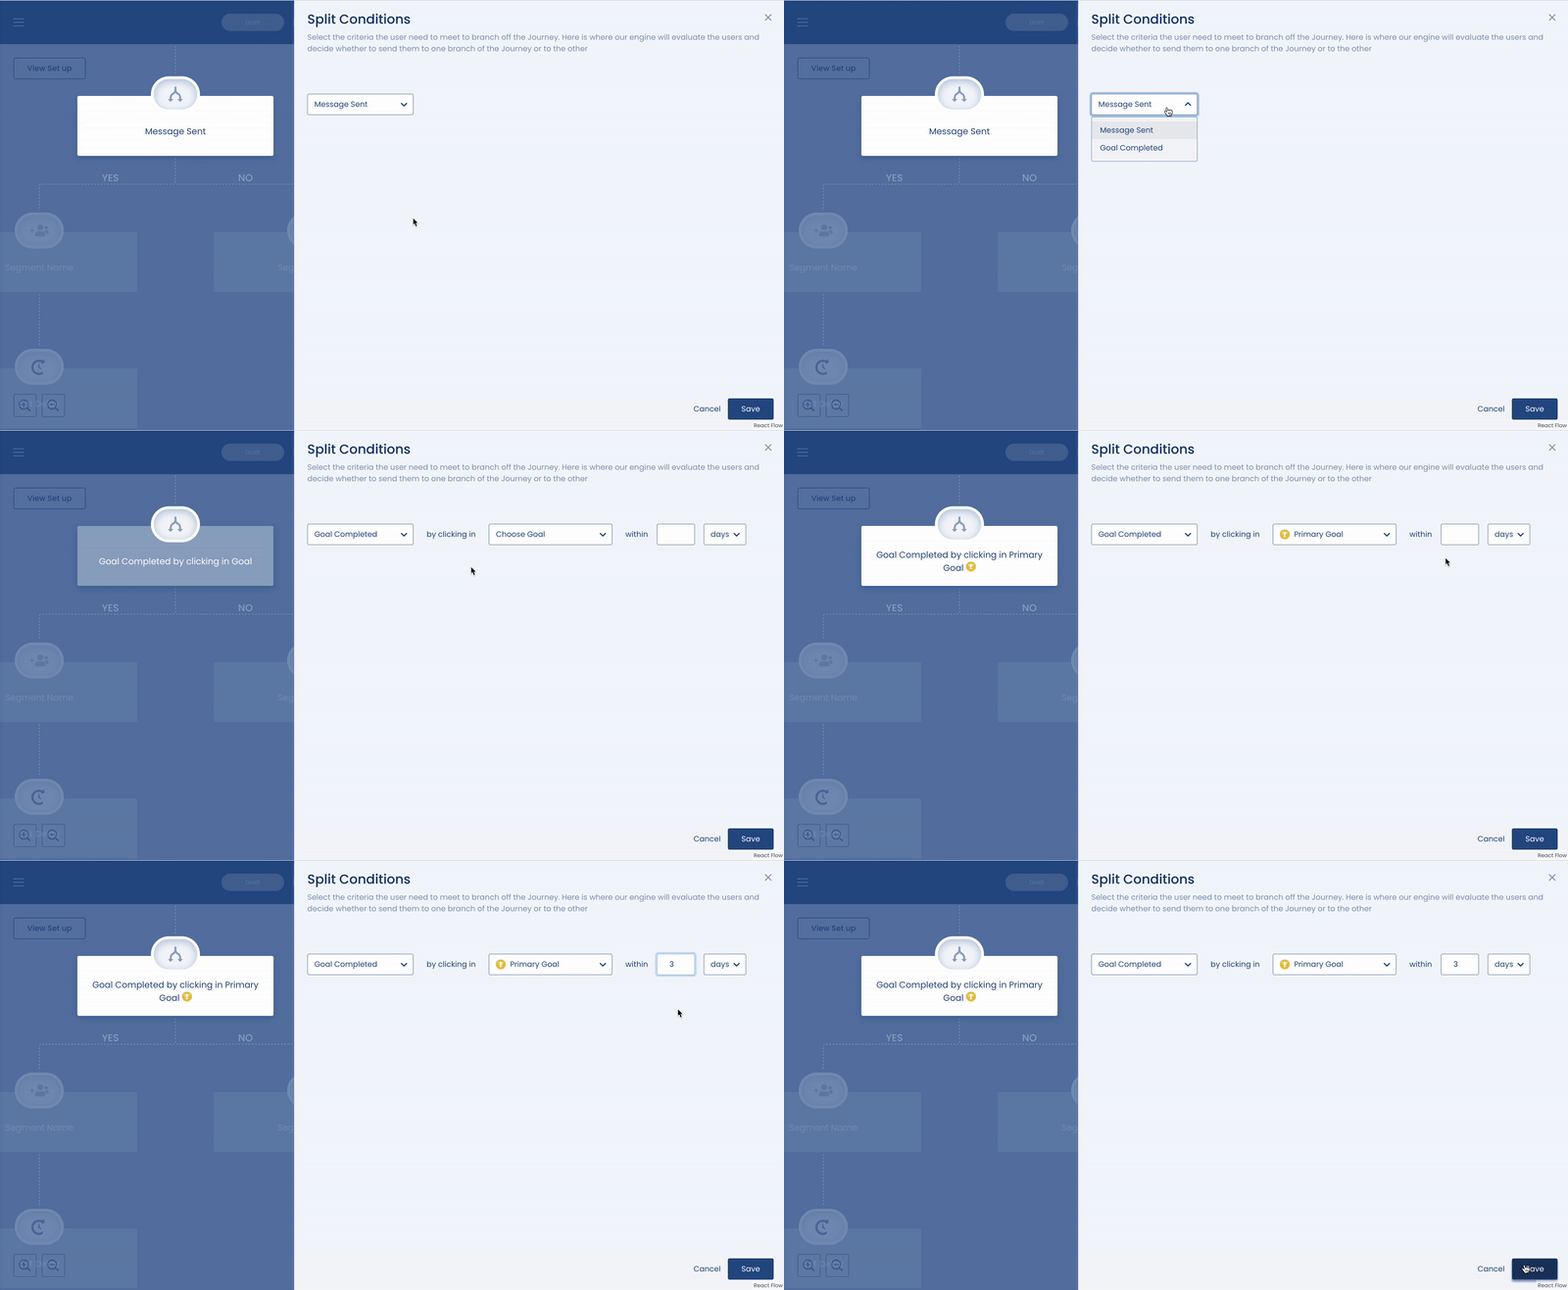
A split block will put the user on a proper path based on the performed action. Here is where our engine will evaluate the users and decide whether to send them to one branch of the Journey or to the other.
How do you create a split condition?
To create split conditions, select the criteria the user needs to meet to branch off the Journey.
There are two types of split conditions to choose from.
- Message sent
- Goal completed
Users will be grouped according to the split condition chosen.
Message Sent:
This split condition puts all users who the message was sent on a path that is aligned with the goal.
For this example, all users who were sent the message will branch off on the 'Yes' path and all users who were not sent the campaign will branch off onto the 'No' path.
To create a split condition based on ‘message sent', choose this option from the drop-down and save.
Goal Completed:
This split condition puts all user's who complete the set goal on the right path. The goal must be chosen in order for the path to exist.
For this example, the condition is based on users meeting the primary goal of a campaign within a chosen timeframe, once a user meets this goal in the set timeframe the user will branch off onto the right path.
To create a split condition based on goal completion, choose the 'primary goal' or 'secondary goal' option from the drop-down, pick a time frame and save.
Step 7: Auto segments
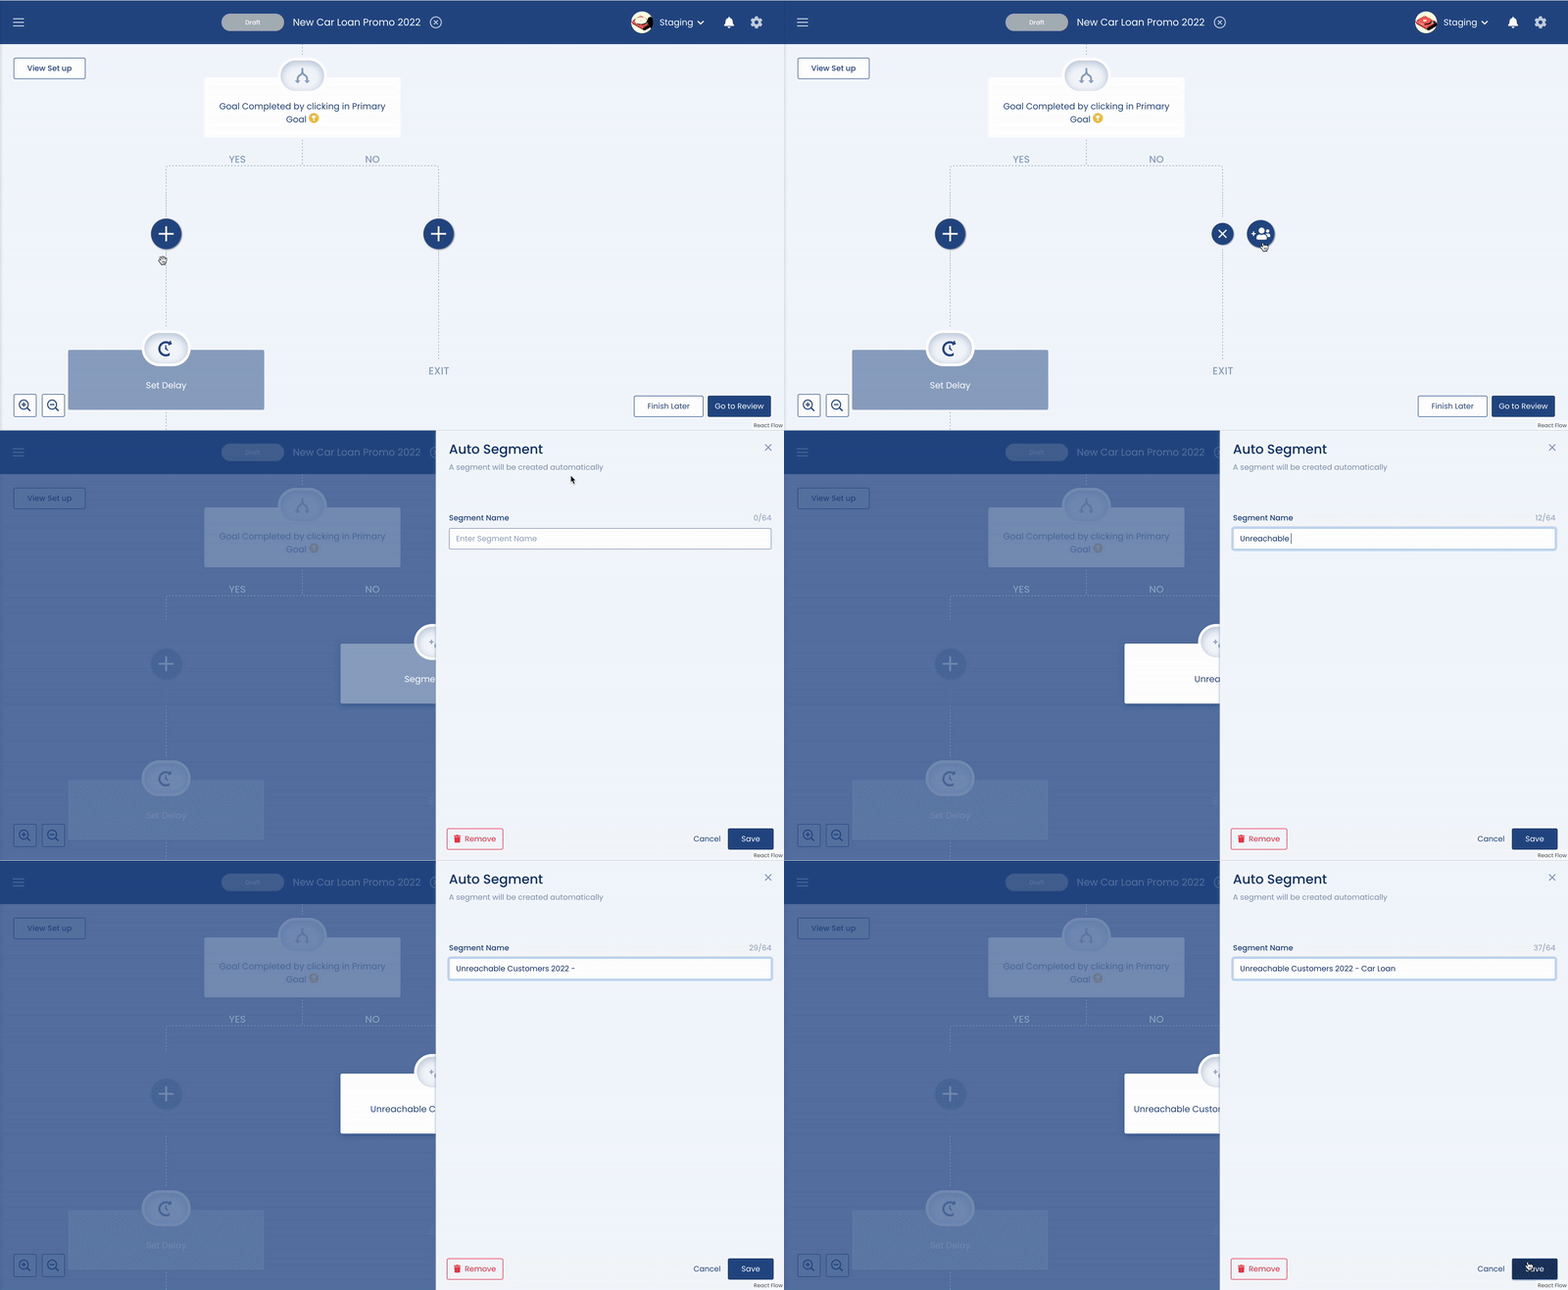
What is an auto segment? An auto segment is an automatically generated segment created on by our engine based on spilt conditions. Based on the split condition chosen in the previous step, targeted users are grouped together based on the condition set into two segments.
Auto segment creation
Click on the ‘Yes’ segment. If you want an Auto segment to be created then give the segment a name. If you do not want to create an auto segment from this journey, you can have the option to remove this step by clicking on the ‘Yes’ segment’ and clicking ‘remove’ on the bottom left.
Repeat this step for the ‘No’ auto segment should you wish to use it.
Auto segments are optional, the ‘Yes’ and ‘No’ segments are not dependent on each, one or both options can be used independently. This step can also be removed entirely.
Auto segments will be saved in the ‘targeting’ tab under segments and can be found under the name chosen when creating the auto segments.
An Auto segment block will create a segment and put the user in that segment and let them continue the journey.
Users from the yes path will be added to the new segment then they will get the next campaign. Also, users from no path will be added to a new segment (different of course) then they will get the next campaign from no branch.
Save and move on to the next step.
Step 8: Delay Time
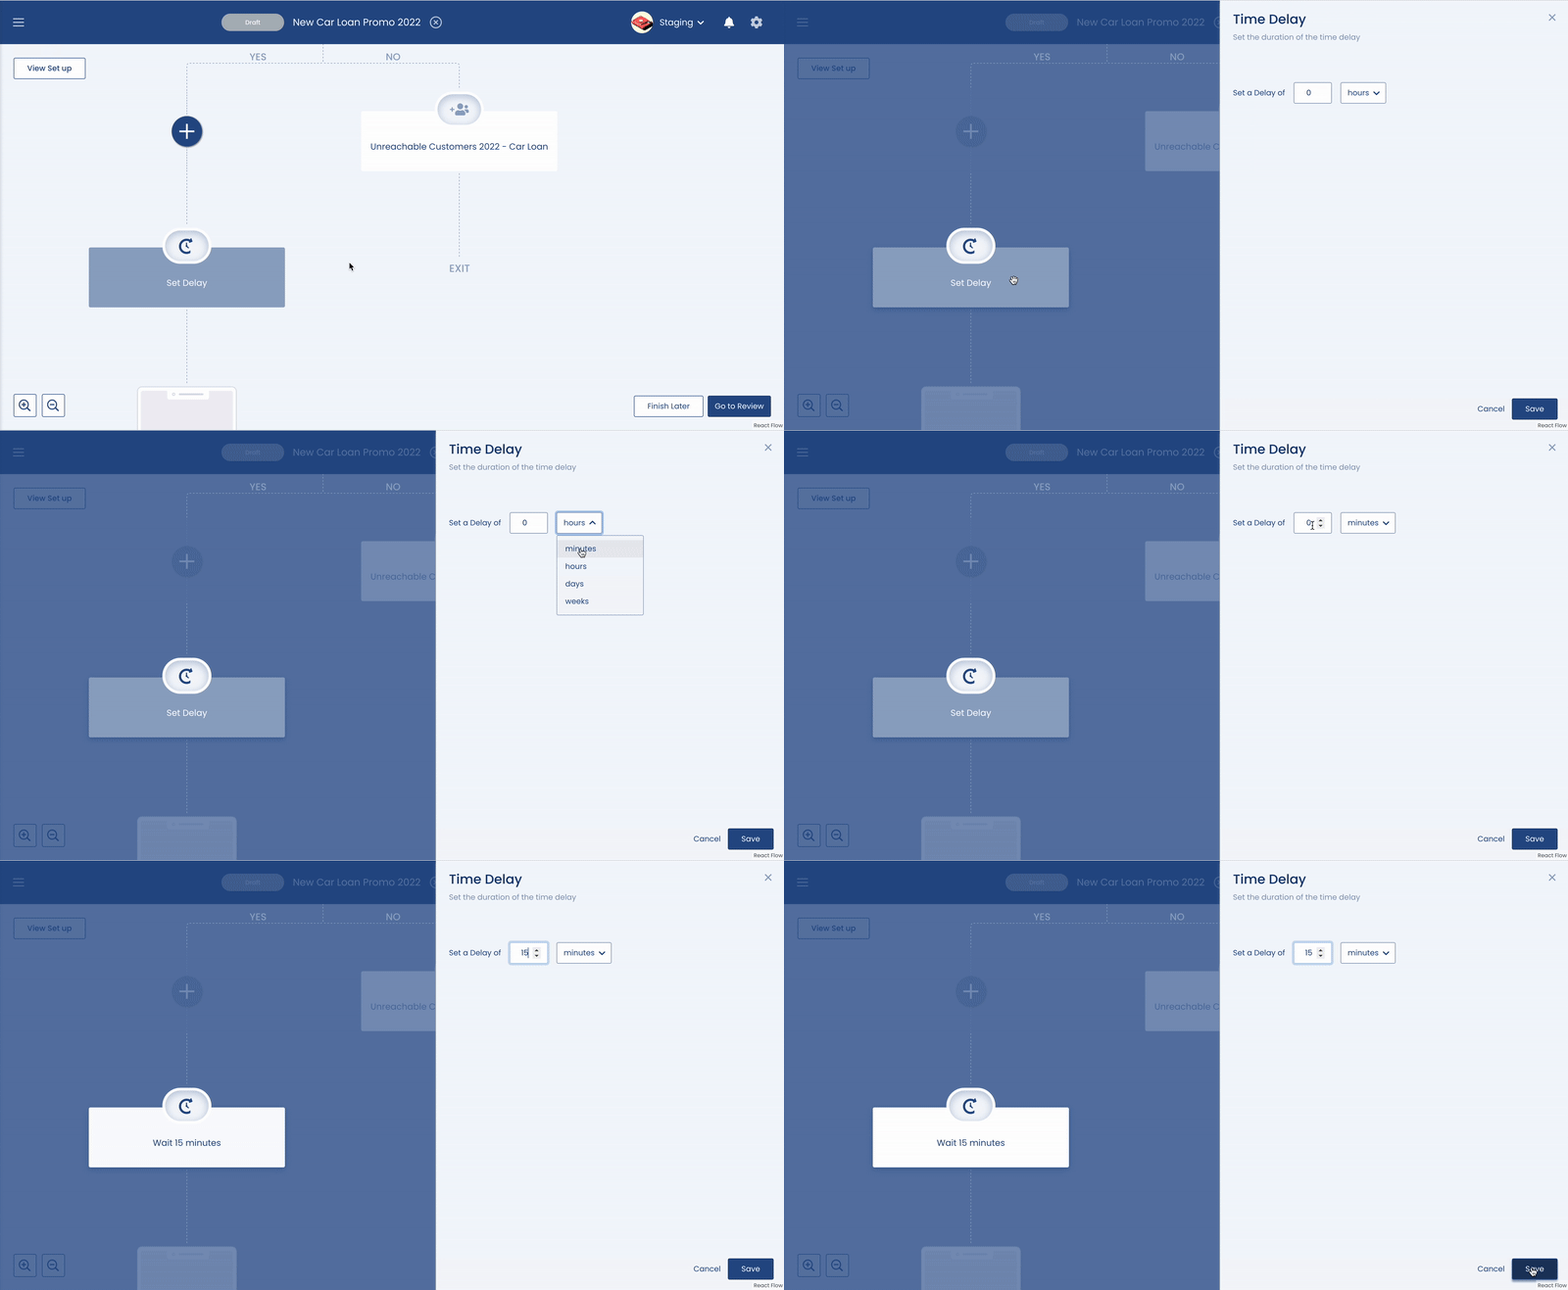
One you decide on the messaging for the journey you will want to decide the time between the messages in the journey. The delay time starts at the moment the primary goal is reached. It's important to put some thought into the time delay.
To set a delay time, click on the time delay box and set the duration of the time delay and save.
Step 9: Adding the second round notifications in the Journey
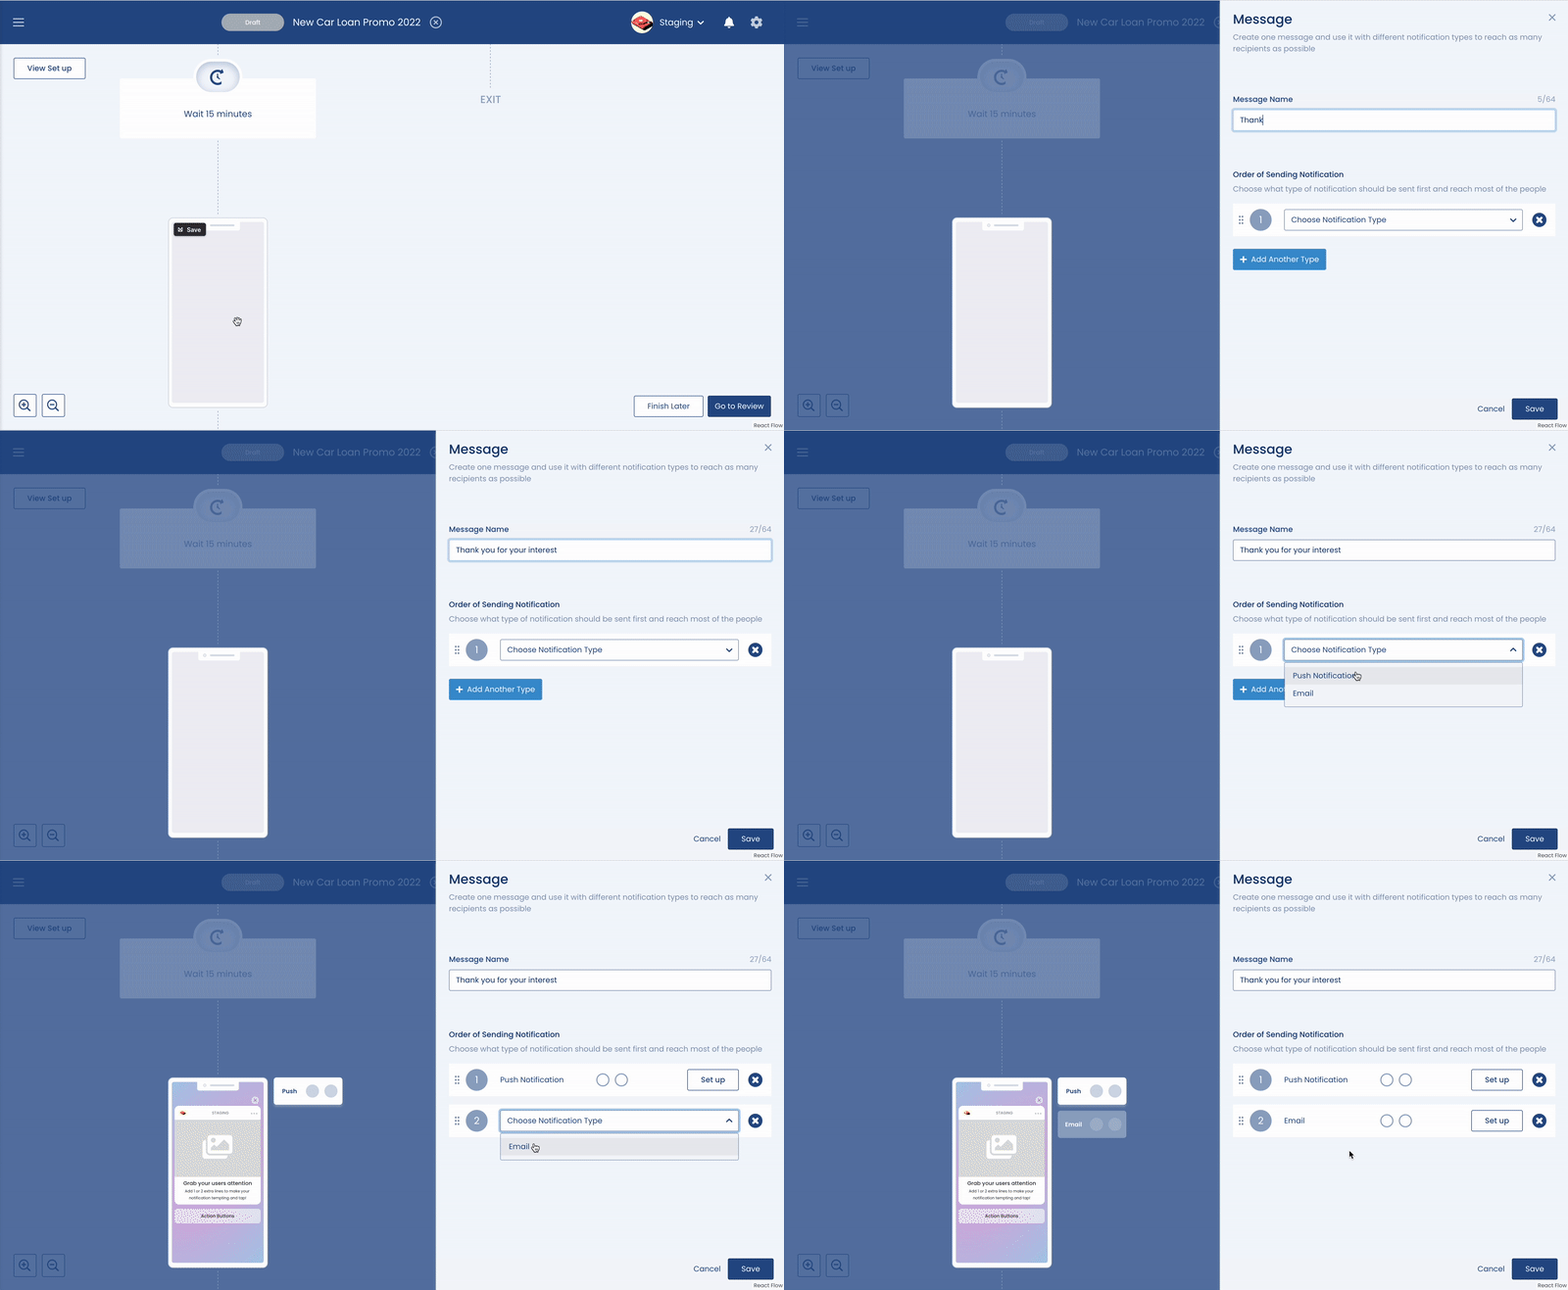
Now that you have added the first round of messages to the journey it's time to choose the second round of messaging. To build out the journey and add the subsequent messages to the journey, simply click on the mobile phone template builder and build create any campaign you choose as normal and as described above.
Step 10: Review and activate the campaign
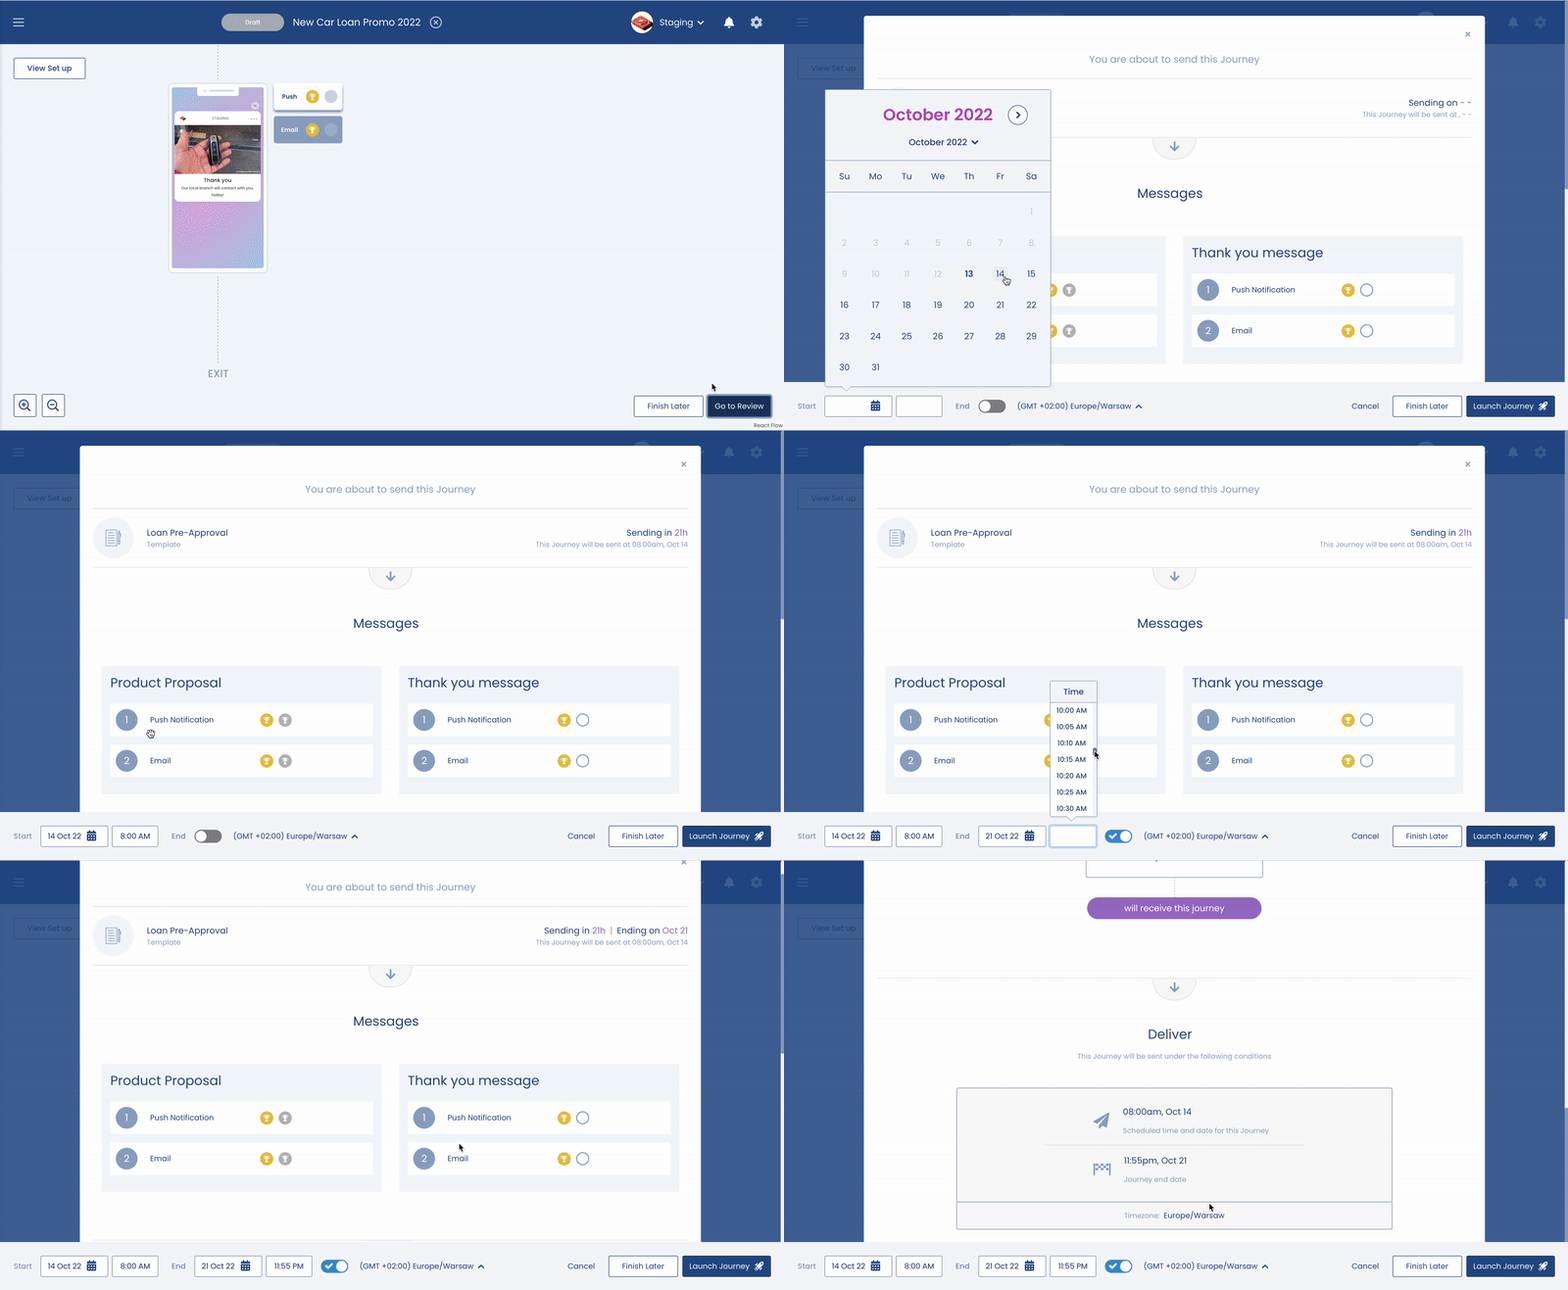
Congratulations, your Journey is almost ready to be sent. Before you send it, Pulsate enables you to review everything that you have set up one last time so that you can make sure that everything is perfect.
The first thing you will notice on the Review page is the key parameters for this campaign.
You will see the notification types used to create the Journey. As you scroll down through the rest of the review page, you will be able to check the other details that you have set for that campaign including the Primary Goals, Targeting and Delivery Options. If you see anything that you would like to change, you can quickly jump to that section by pressing the back button located at the bottom of the page.
Once you are happy with all of the parameters that you have set for the campaign, you are ready to send it. To send the campaign press the 'Launch Journey' button at the bottom of the screen. If you are ready to send, press 'Launch Journey' and your campaign will be activated and sent when you have specified.
Reporting
After the Journey ends you will want to analyse the performance of the Journey by viewing the Journey statistics. The Journey Stats page can be accessed by clicking on the 'View' under the report column on the Journey Stats page. There are two viewing options, 'Overview' and 'Details
Campaign Overview Statistics are divided into three parts:
- Campaign Statistics Dashboard
- Campaign Statistics (Tiles)
- Goals Performance (Primary and Secondary Goals)
- Campaign Performance
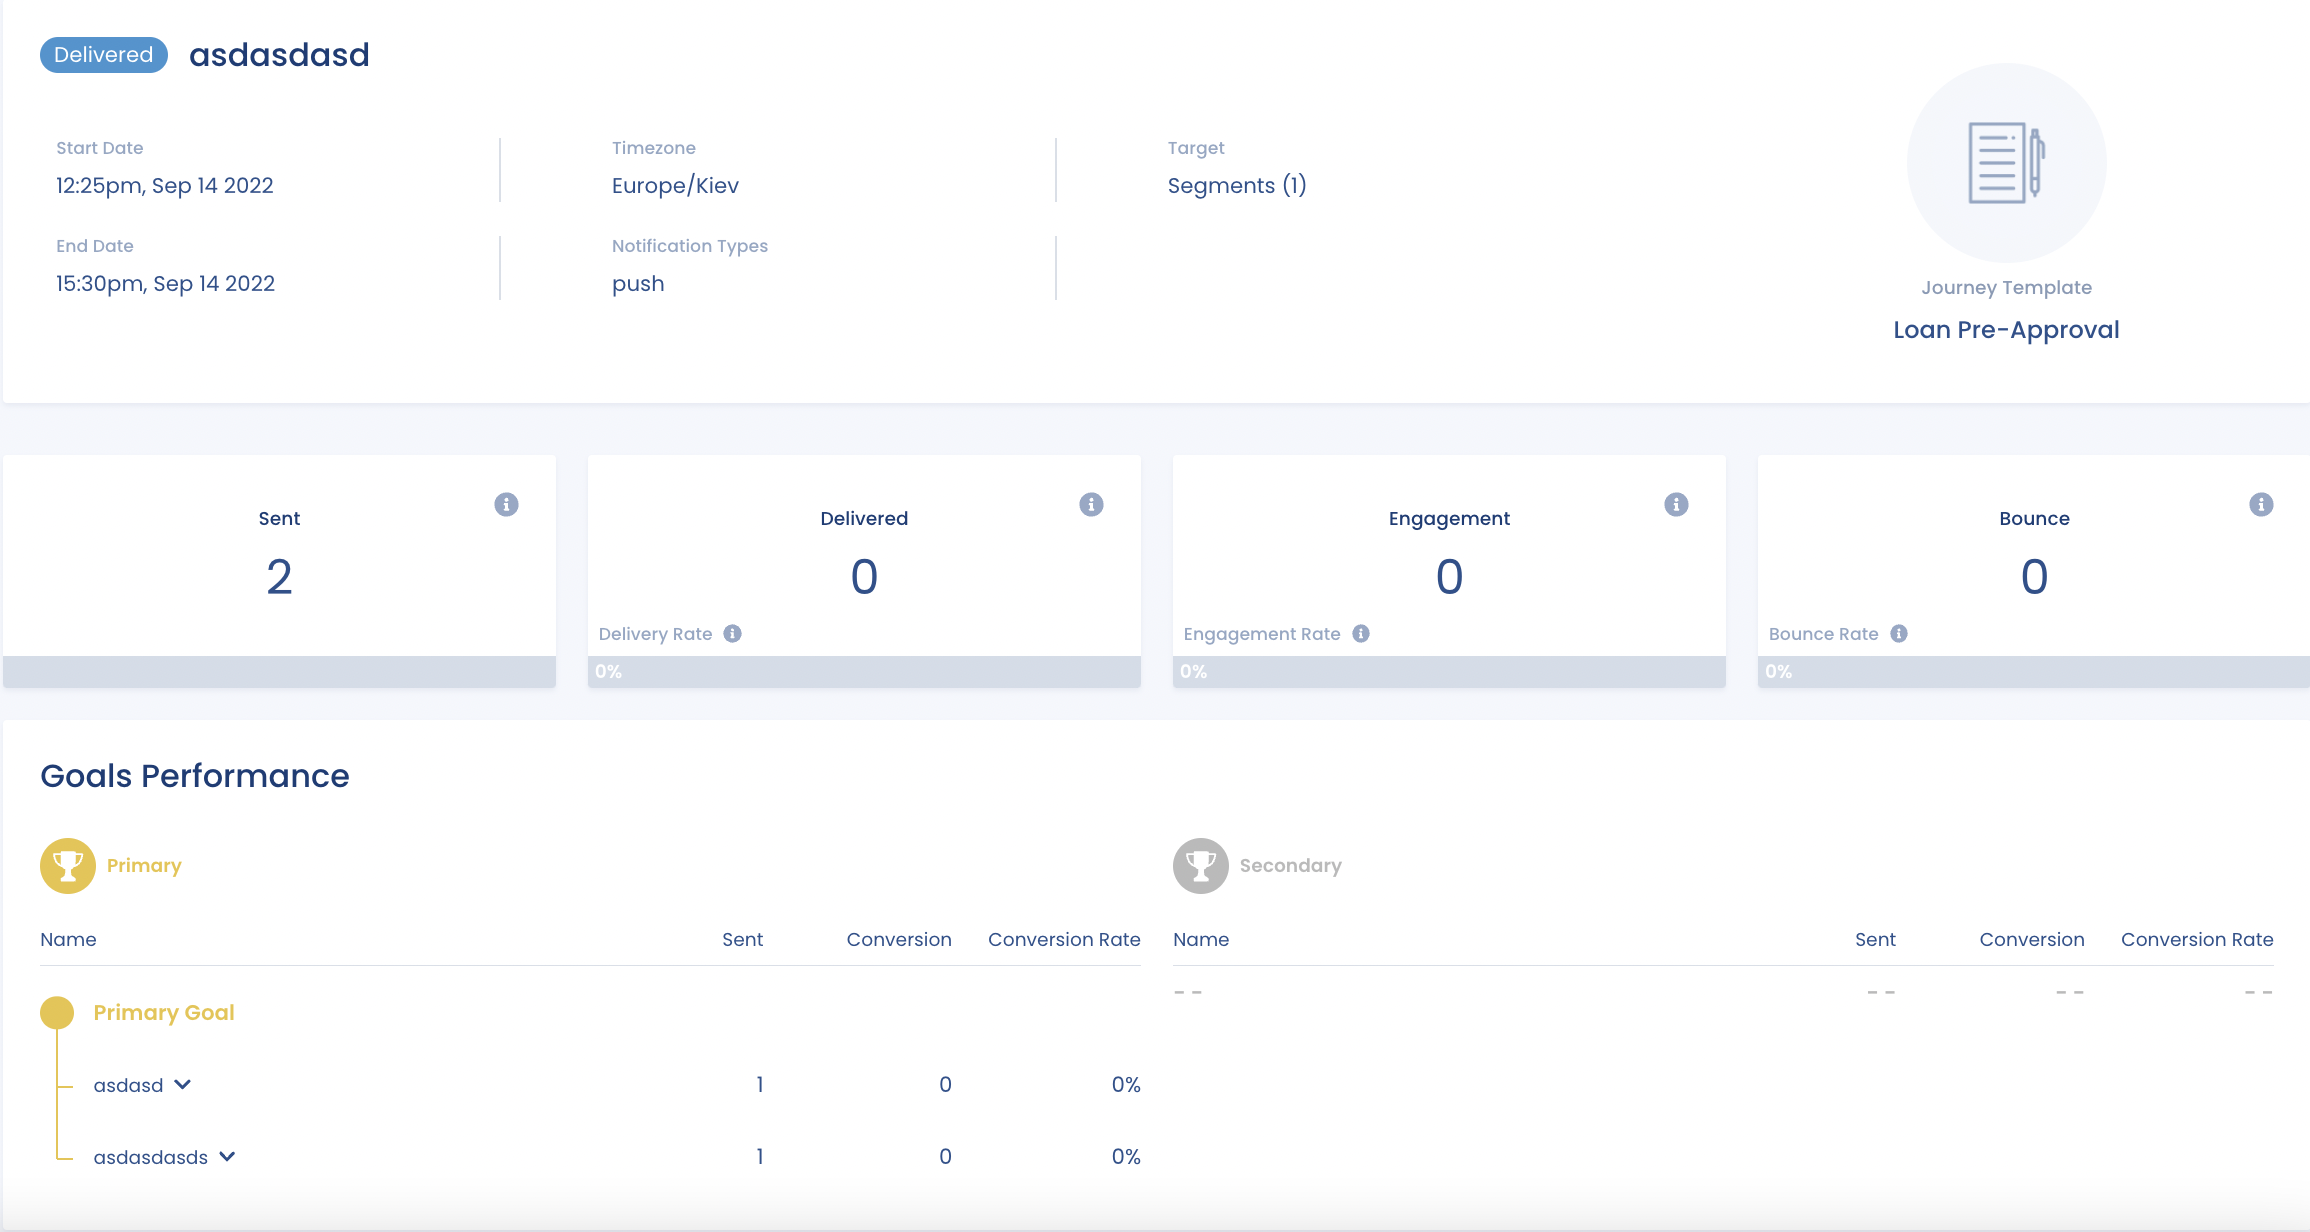
Campaign Statistics Dashboard
Each Campaign has a main dashboard that shows, Campaign Status, Campaign Name, Campaign Start Date, Campaign End Date, Campaign TimeZone, Campaign Type, Target, Campaign Primary Goal, Campaign Secondary Goal, Sent and Control Group
| Statistics Name | Statistics Description |
|---|---|
| Campaign Status | The current campaign status. Scheduled/Active/Paused/Delivered |
| Campaign Name | It shows the campaign name |
| Start Date | Campaign start date and time |
| End Date | Campaign end date and time (optional if selected) |
| Timezone | The TimeZone of the campaign created |
| Campaign Type | Campaign type (Push, In-app, Card, SMS, Email) |
| Target | Options chosen in the Target sections (Segment, Geofence, Beacon) |
| Primary Goal | Primary conversion goal for the campaign |
| Secondary Goal | Secondary conversion goal for the campaign (optional, if selected) |
| Sent | The number of sent campaigns |
Campaign Statistics (Tiles)
Each campaign has its own statistics.
Push Campaign
| Push Stats Name | Push Stats Description |
|---|---|
| Sent | Total number of unique campaigns sent |
| Delivered | Total number of campaigns delivered |
| Engagement | Total number of campaign interactions |
| Bounce | Total number of campaign undeliverables |
Goal Performance
| Statistics | Description |
|---|---|
| Primary Goal | Intended action set against the campaign. |
| Secondary Goal | Second action set against the campaign |
| Sent | Total number of unique campaigns sent |
| Conversion | Total number of the campaign opens |
| Conversion Rate | Total % of campaing opend |
Details
| Statistics | Description |
|---|---|
| Delivered | Total number of campaigns delivered |
| Pending Delivery | Total number of campaigns not delivered yet |
| Clicked | Total number of campaigns clicked |
| Bounced | Total number of campaigns bounced |
